Automating app releases for multiple platforms with Xcode Cloud

Go from confusion to confidence with a step-by-step Swift Concurrency course, helping you smoothly migrate to Swift 6 and fully leverage its features.
I recently decided to spend some time automating the release process for NowPlaying and make shipping new versions of the app as simple as possible.
I decided to use Xcode Cloud as our CI/CD solution due to its tight integration with Xcode and App Store Connect and the fact that, as we have an Apple Developer Membership, we would get a tier of 25 compute hours per month at no extra cost!
At the moment, NowPlaying has two targets that we ship to the App Store regularly - one for iOS and one for tvOS. I wanted to create a solution that would allow us to specify which platform we want to release and have the workflow take care of the rest.
Defining the workflow
While I am taking an iterative approach to the automation and there are things I still want to improve, the workflow I settled on works in the following way:
- We manually create a tag in the repository that specifies the version number and platform we want to ship:
iOS/<version>orvisionOS/<version>. - Once the tag is pushed, a workflow for the specific platform is triggered.
- Before the app is built, the workflow sets the
MARKETING_VERSIONproperty of all relevant targets for the specified platform to the version number in the tag. - Changes are committed and pushed to the
mainbranch of the repository. - The app is built and distributed to TestFlight using Xcode Cloud.
The iOS Workflow
I started setting up the iOS workflow and all of its steps and information, which I will go through in this section.
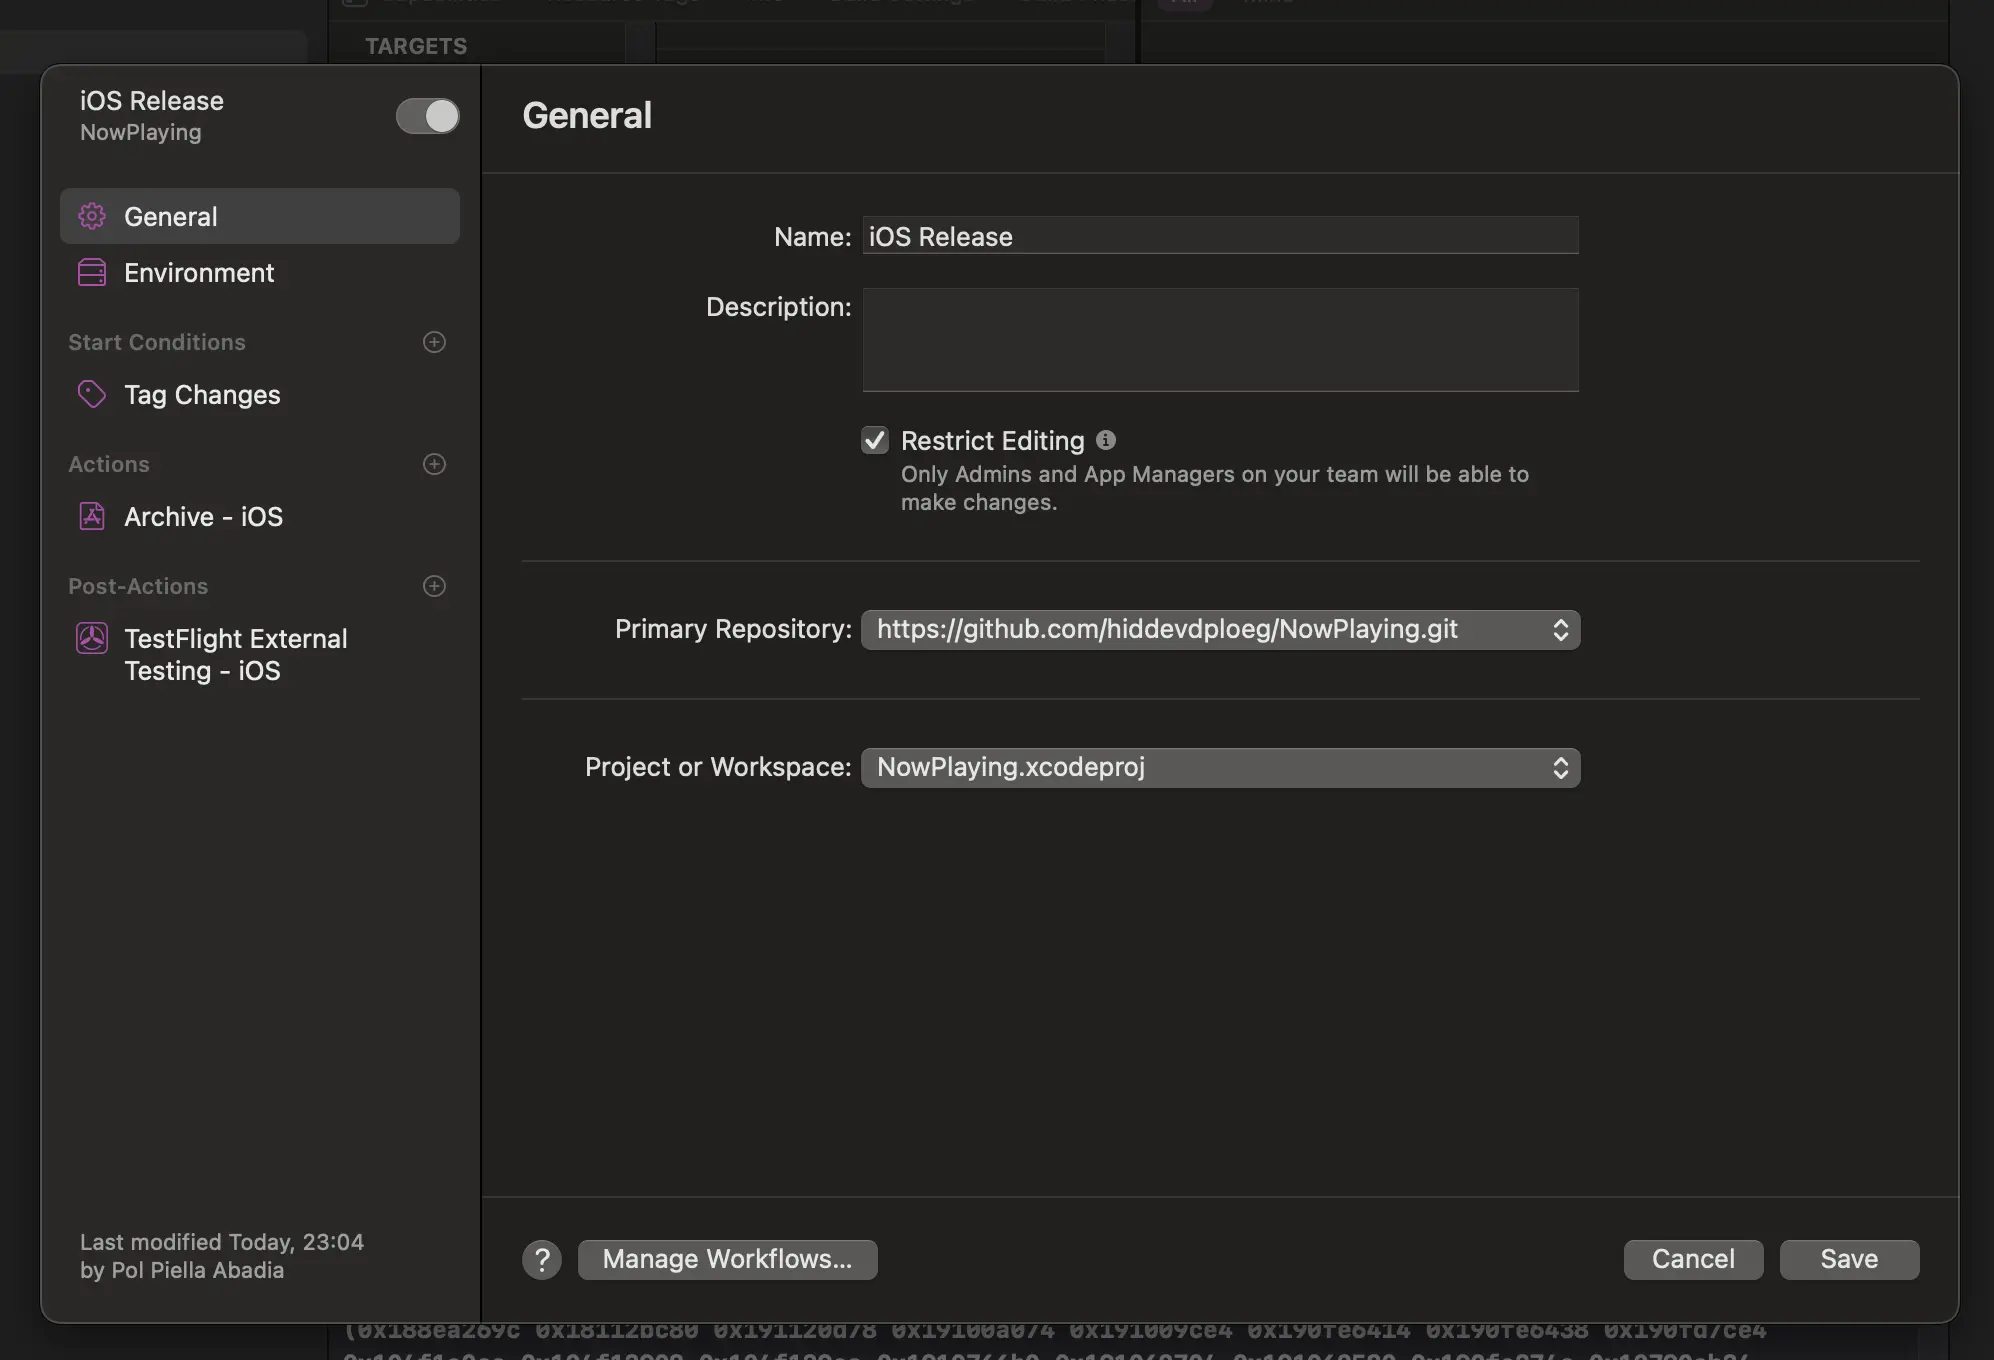
In the general information section, I specified which repository and project to use, as well as checked the ‘Restrict Editing’ box.
The latter is required for workflows that upload builds for external testing:
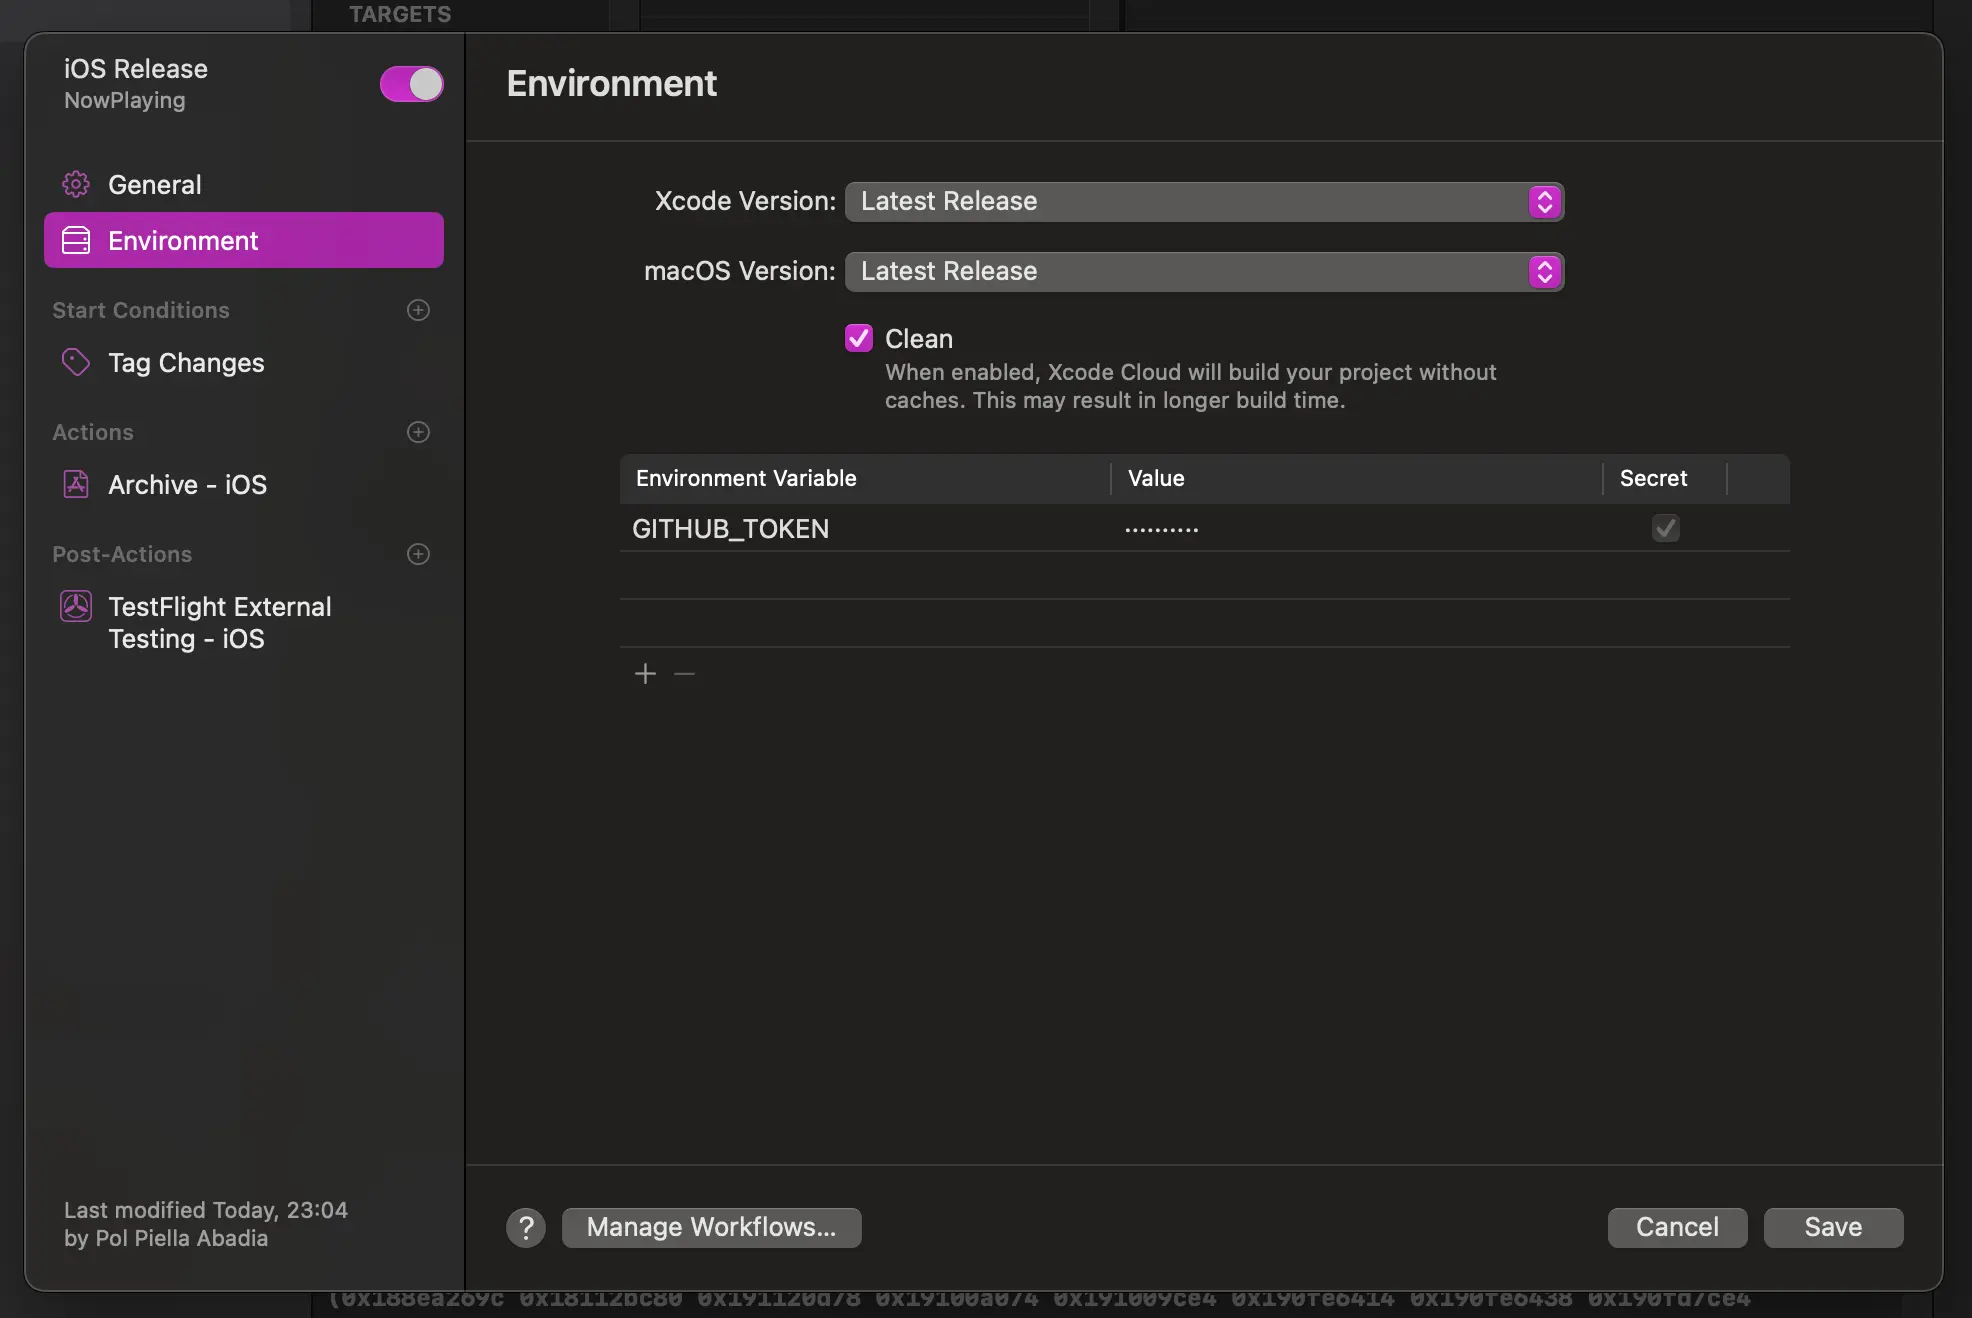
Then, I added a GitHub token with push permissions to the environment variables section and marked it as a secret. This token will be used later on in the workflow to push the version update changes to the repository:
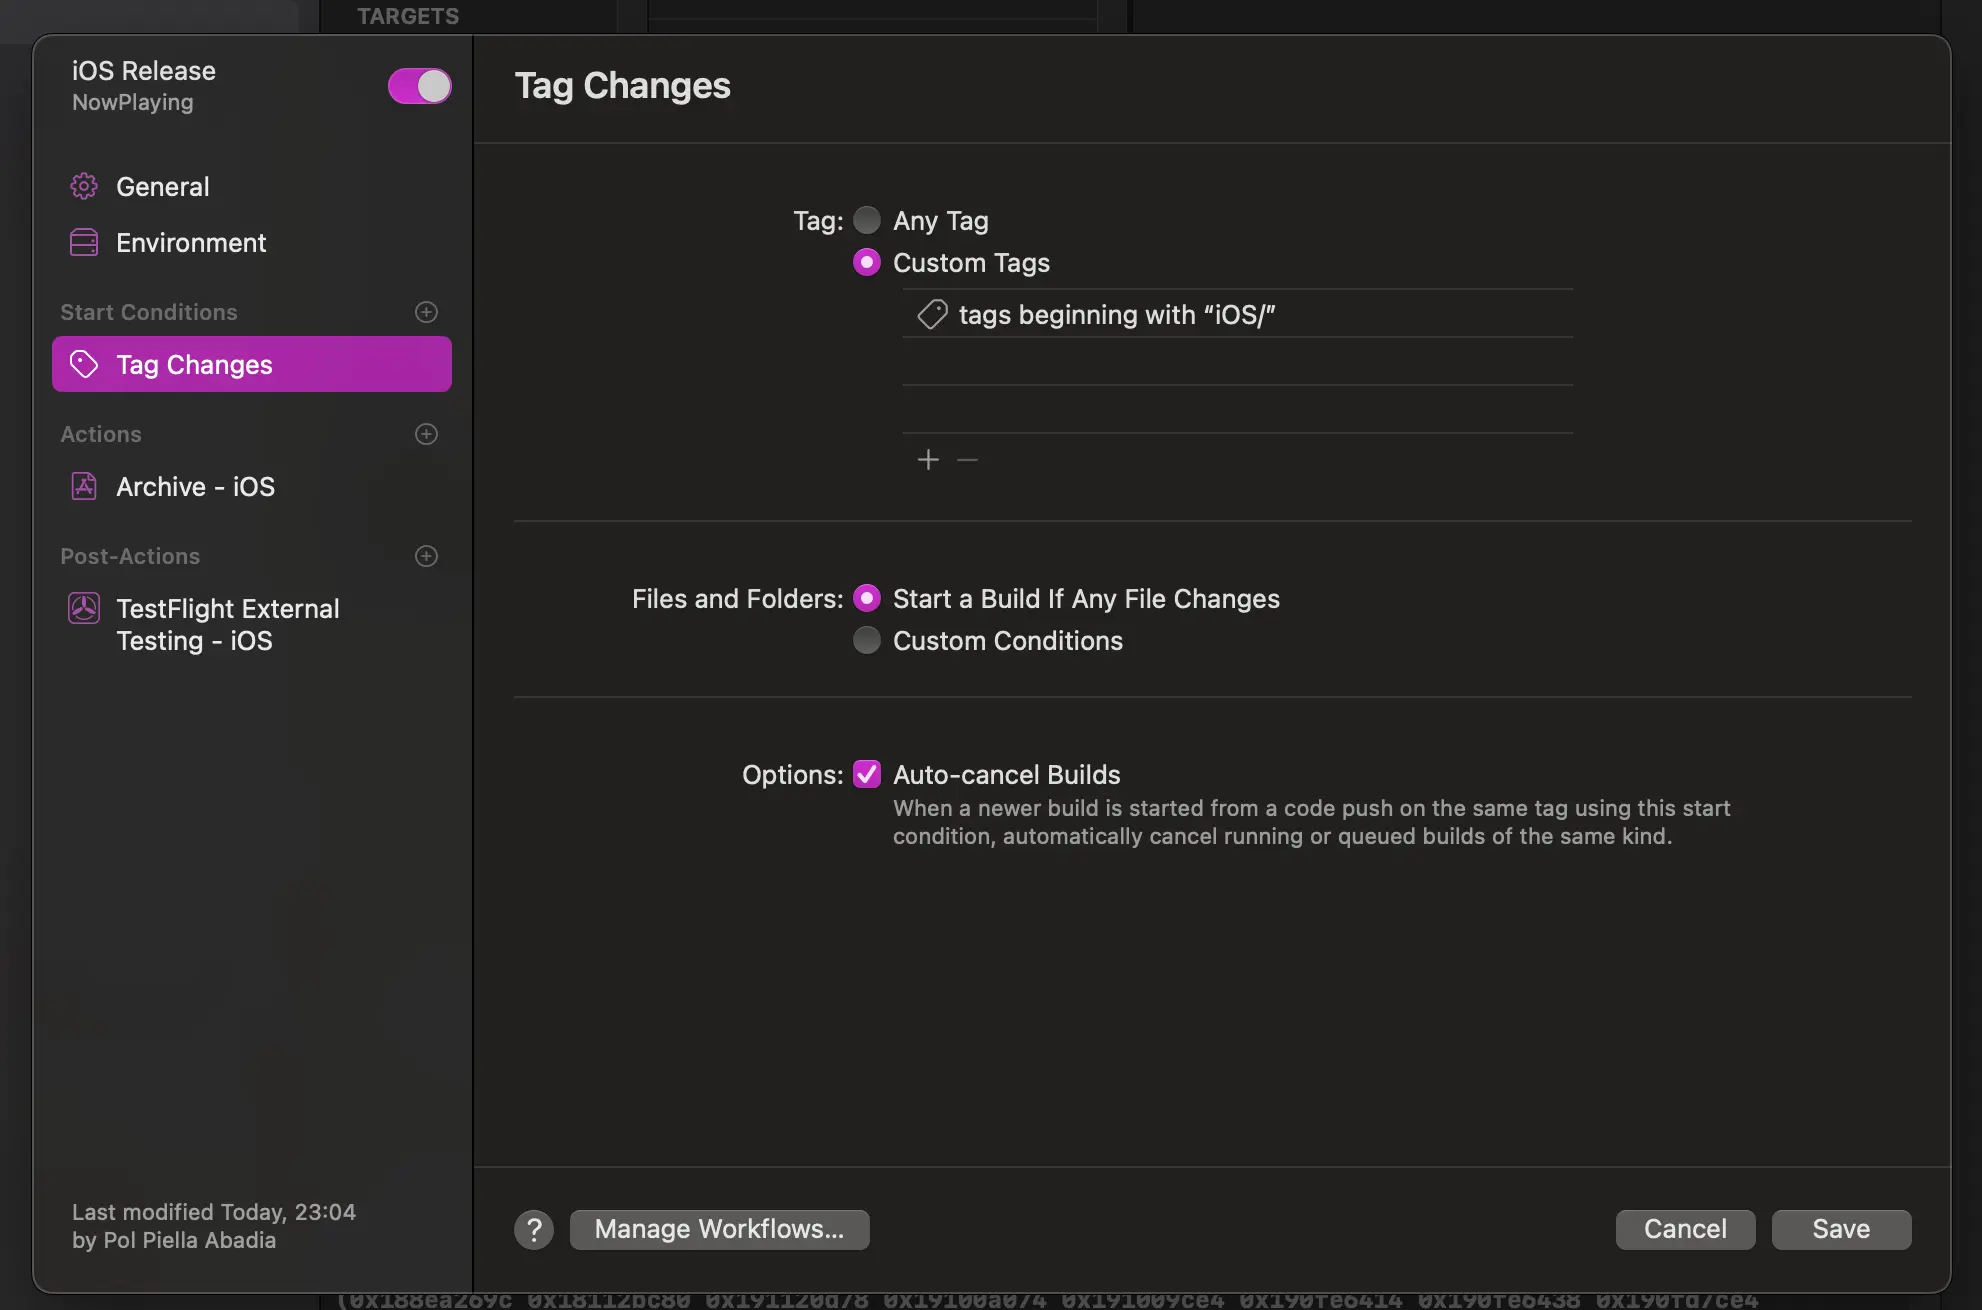
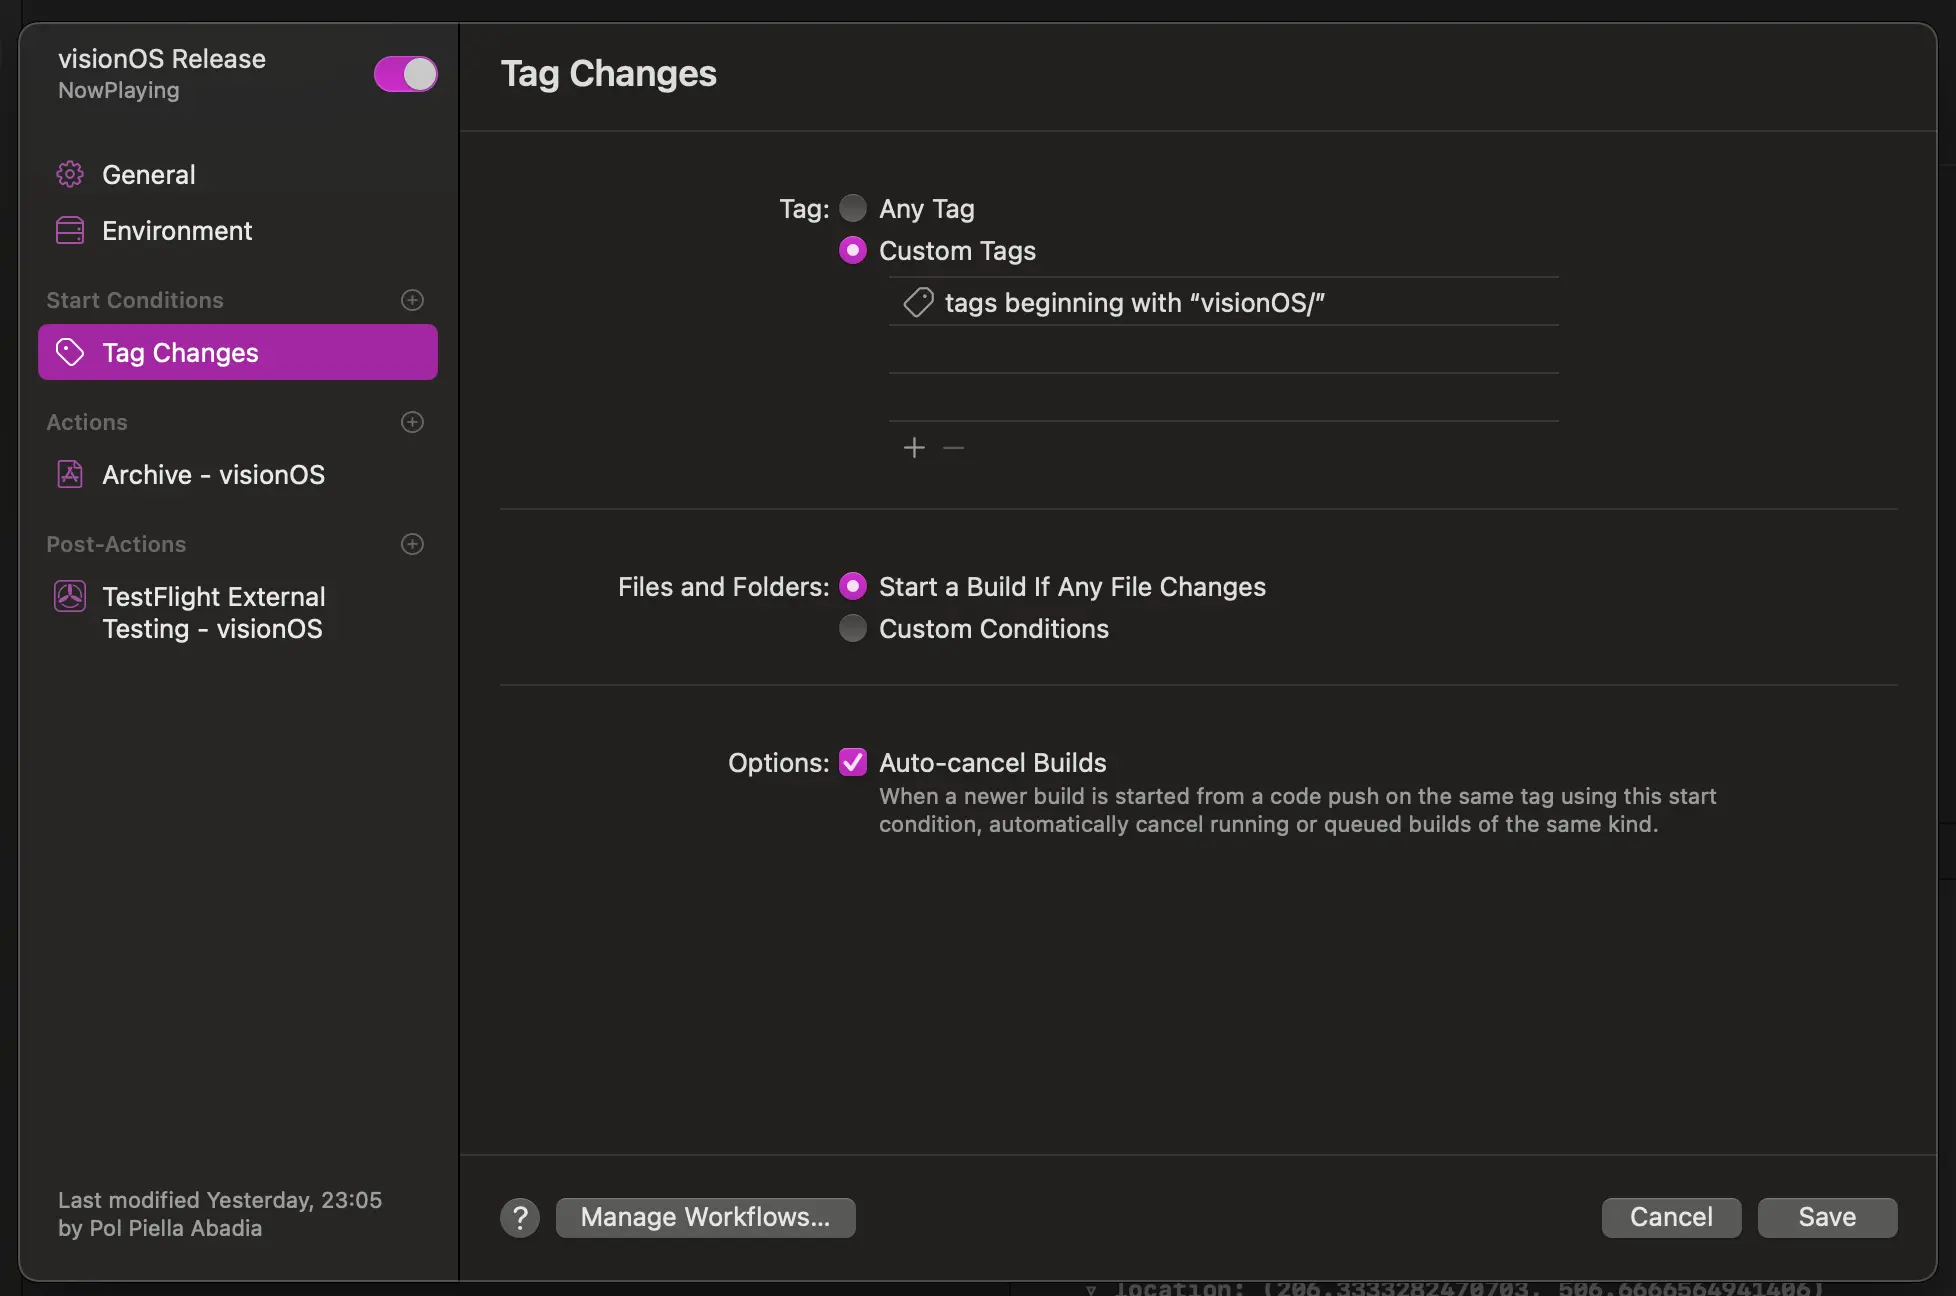
The workflow has a single start condition - when a tag is created. I specified that the workflow should only run when the tag name is prefixed with iOS/:
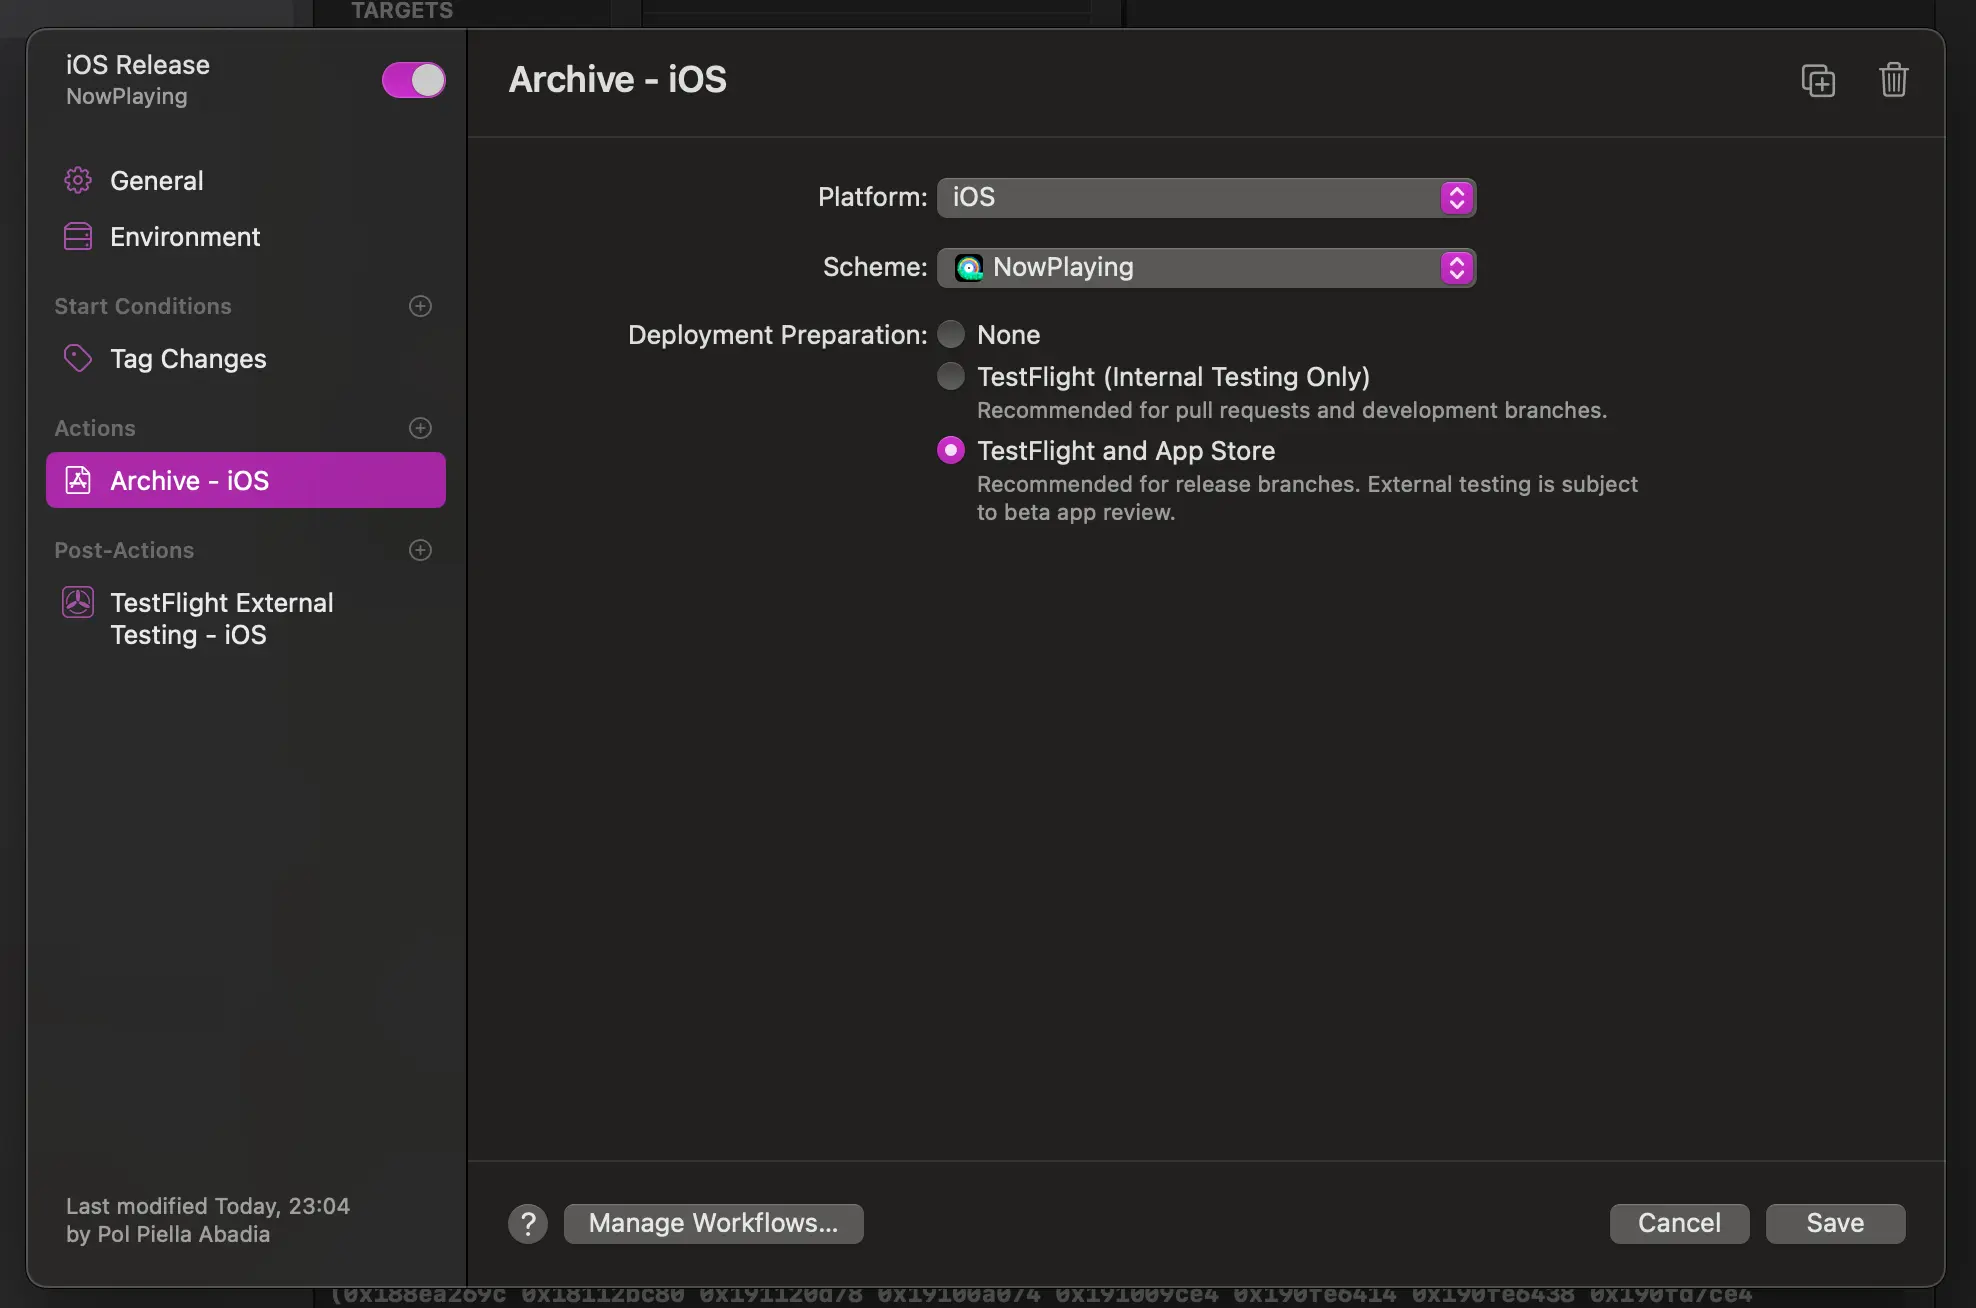
The workflow only has a single action that archives the app for iOS and prepares it for external testing and distribution to the App Store:
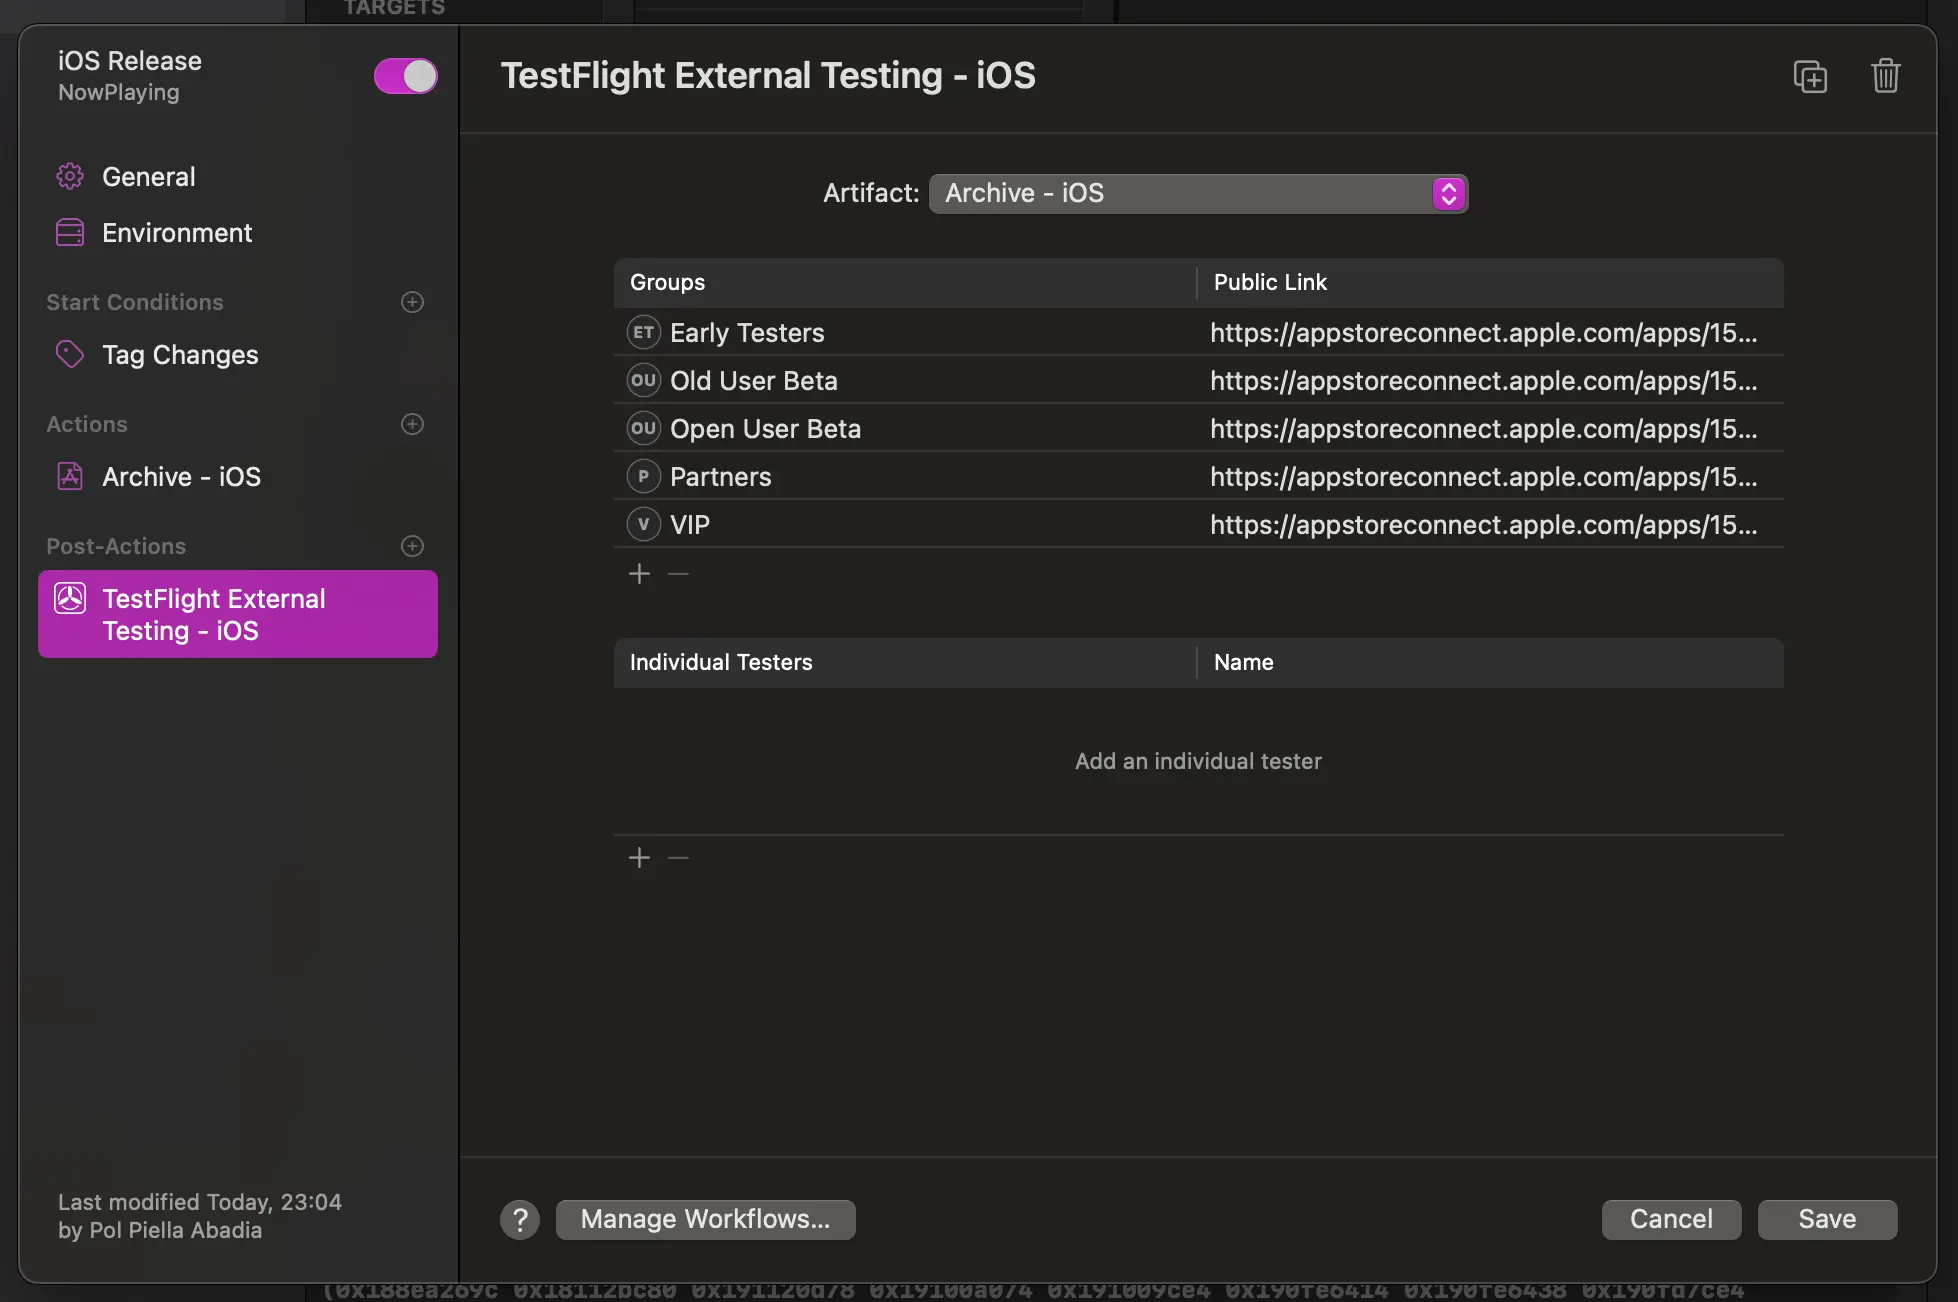
Last but not least, the workflow needs to upload the build to TestFlight and add it to any relevant groups of beta testers:
The visionOS Workflow
Both the iOS and visionOS workflows are very similar, so I will only highlight the main differences between the two you need to be aware of.
First, instead of specifying the iOS/ prefix for the tag, I specified visionOS/:
And in the Archive action, I changed the scheme and platform to the visionOS target:

Setting up Fastlane
Now that the Xcode Cloud workflow was ready, I needed to create a script that would set the MARKETING_VERSION property of the relevant targets to the version number in the tag.
I decided to use fastlane for this as it is a tool I am familiar with and it provides a lot of actions that make it easy to automate numerous tasks.
To install fastlane, I decided to use Ruby’s Bundler so that I could manage all dependencies and easily install them on CI:
bundle initThe command above created a Gemfile at the root of the repository that I then edited to include the fastlane and xcodeproj gems and support loading fastlane plugins:
source "https://rubygems.org"

gem "fastlane"
gem "xcodeproj"

plugins_path = File.join(File.dirname(__FILE__), 'fastlane', 'Pluginfile')
eval_gemfile(plugins_path) if File.exist?(plugins_path)
Now, after running the bundle install command, I had fastlane available locally, so I could then initialize the fastlane project by running the bundle exec fastlane init command.
I also installed a plugin to help me check the git status for specific files to then decide on whether to commit changes or not:
bundle exec fastlane add_plugin fastlane-plugin-git_statusWriting the script
The first thing I did after initializing the fastlane project was to create a new lane in the FastFile with some logic to read the value of the tag, set the MARKETING_VERSION property of the relevant targets and commit the changes to the repository:
fastlane_require 'xcodeproj'

# 1
def set_all_xcodeproj_version_numbers(version_number, platform)
  project = Xcodeproj::Project.open('../NowPlaying.xcodeproj')
  targets = project.targets
  if platform == "ios"
    targets = targets.select { |target| target.name != "NowPlayingTests" && target.name != "NowPlaying visionOS" }
  else
    targets = targets.select { |target| target.name == "NowPlaying visionOS" } if platform == "visionOS"
  end

  targets.each do |target|
    target.build_configurations.each do |config|
      config.build_settings["MARKETING_VERSION"] = version_number
    end
  end
  project.save
end

desc "Description of what the lane does"
lane :bump_version do
  # 2
  split_git_ref = ENV["CI_TAG"].split("/", -1)
  version_number = split_git_ref.last
  platform = split_git_ref.first
  # 3
  set_all_xcodeproj_version_numbers(version_number, platform.downcase)
  # 4
  if git_status(path: "NowPlaying.xcodeproj/project.pbxproj").empty?
    puts "🚀 Nothing to commit, pushing the same version again!"
  else
    sh("git fetch origin main:main")
    sh("git checkout main")

    git_commit(path: "NowPlaying.xcodeproj/project.pbxproj", message: "[🚀 release #{platform}] Updating version to: #{version_number}")

    # Push with personal access token to enable permissions in Xcode Cloud
    sh("git push https://polpielladev:#{ENV["GITHUB_TOKEN"]}@github.com/hiddevdploeg/NowPlaying.git")
  end
end
Let’s go through the lane I created step by step:
- I created a method called
set_all_xcodeproj_version_numbersthat takes the version number and the platform as arguments. This method opens theNowPlaying.xcodeprojfile and sets theMARKETING_VERSIONproperty of all relevant targets to the version number. Theplatformargument is used to determine which targets to update. - I then created a lane called
bump_versionthat reads the value of the tag using Xcode Cloud’sCI_TAGenvironment variable and uses it to retrieve the version and platform. - The new lane then calls
set_all_xcodeproj_version_numbersmethod with the version number and platform as arguments. - Finally the lane checks if the
NowPlaying.xcodeproj/project.pbxprojfile has been modified and, if so, commits the changes to the repository and pushes them to themainbranch using the GitHub token I added to the environment variables in the Xcode Cloud workflow. If the file has not been modified, the lane prints a message to the console and exits.
Once the lane was ready, I added a new file called ci_post_clone.sh in a new ci_scripts directory at the root of the repository. This file is executed by Xcode Cloud straight after the repository is cloned and before the actions start.
#!/bin/sh

cd ..

echo 'export GEM_HOME=$HOME/gems' >>~/.bash_profile
echo 'export PATH=$HOME/gems/bin:$PATH' >>~/.bash_profile
export GEM_HOME=$HOME/gems
export PATH="$GEM_HOME/bin:$PATH"

gem install bundler --install-dir $GEM_HOME

bundle install

bundle exec fastlane bump_version
The script installs all dependencies using Bundler and then calls the bump_version lane I created in the FastFile.
If you’d like to learn more about all available ci scripts and how to use them in Xcode Cloud, check out my article on the topic.
Future improvements
There are a couple of things I would like the workflow to do in the future:
- Automatically update the release notes based on a local file in the repository and handle translations automatically, as I do in this article on my blog.
- Create a new release in GitHub with the release notes and the tag.
I will keep iterating on this automation and will update the article with any new improvements I make, so make sure to keep an eye on my social media to not miss any updates!