GitHub webhooks 🤝 Xcode Cloud
A native macOS app for App Store Connect that streamlines app updates and releases, making the process faster and easier.
Webhooks are automated messages which allow you to build custom applications and integrations that extend a website’s default capabilities. Websites send these webhook events to their subscribers whenever specific actions occur.
Subscribing to webhook events is straightforward. You need to create a server which can handle POST requests and provide the server’s URL to the website vending the webhook.
Then, whenever the website triggers the event, it sends a POST request to the provided URL with the relevant data in the request’s body.
This article goes through how you can write a serverless Swift function to listen to GitHub’s issue_comment webhook, which fires events every time a user adds a comment to a repository’s issue or pull request, and:
- Checks if the comment is on a pull request.
- Verify that the comment’s body matches the ‘Upload to TestFlight’ string.
- If it does, the function triggers an Xcode Cloud build which uploads the app for internal testing on TestFlight using the App Store Connect API.
The Xcode Cloud workflow
Before starting the automation process, you first need to set up an Xcode Cloud workflow which uploads the app to TestFlight for internal testing which the webhook can trigger.
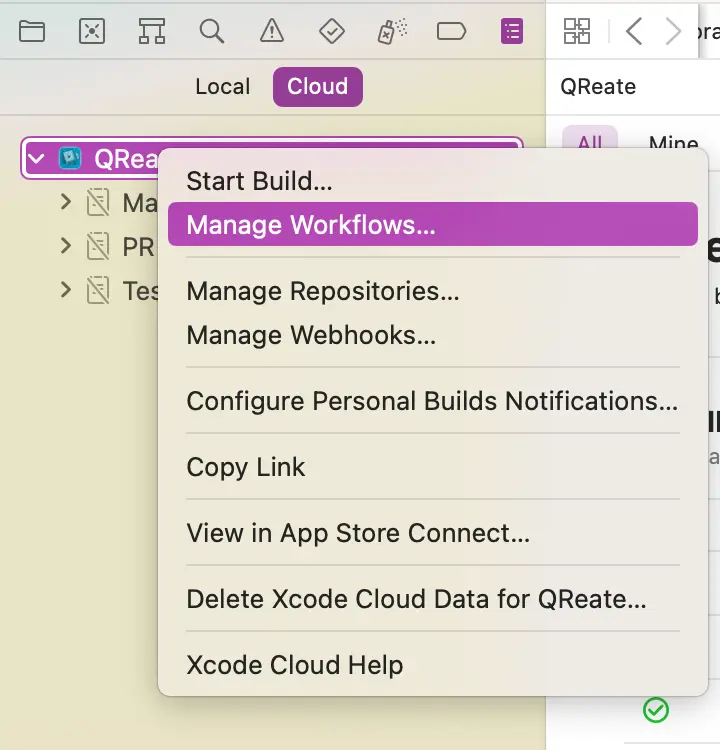
To do so, open Xcode, go to the Report Navigator menu, select the Cloud tab, right-click the target you want to create the new workflow for and click the Manage Workflows... button from the context menu.
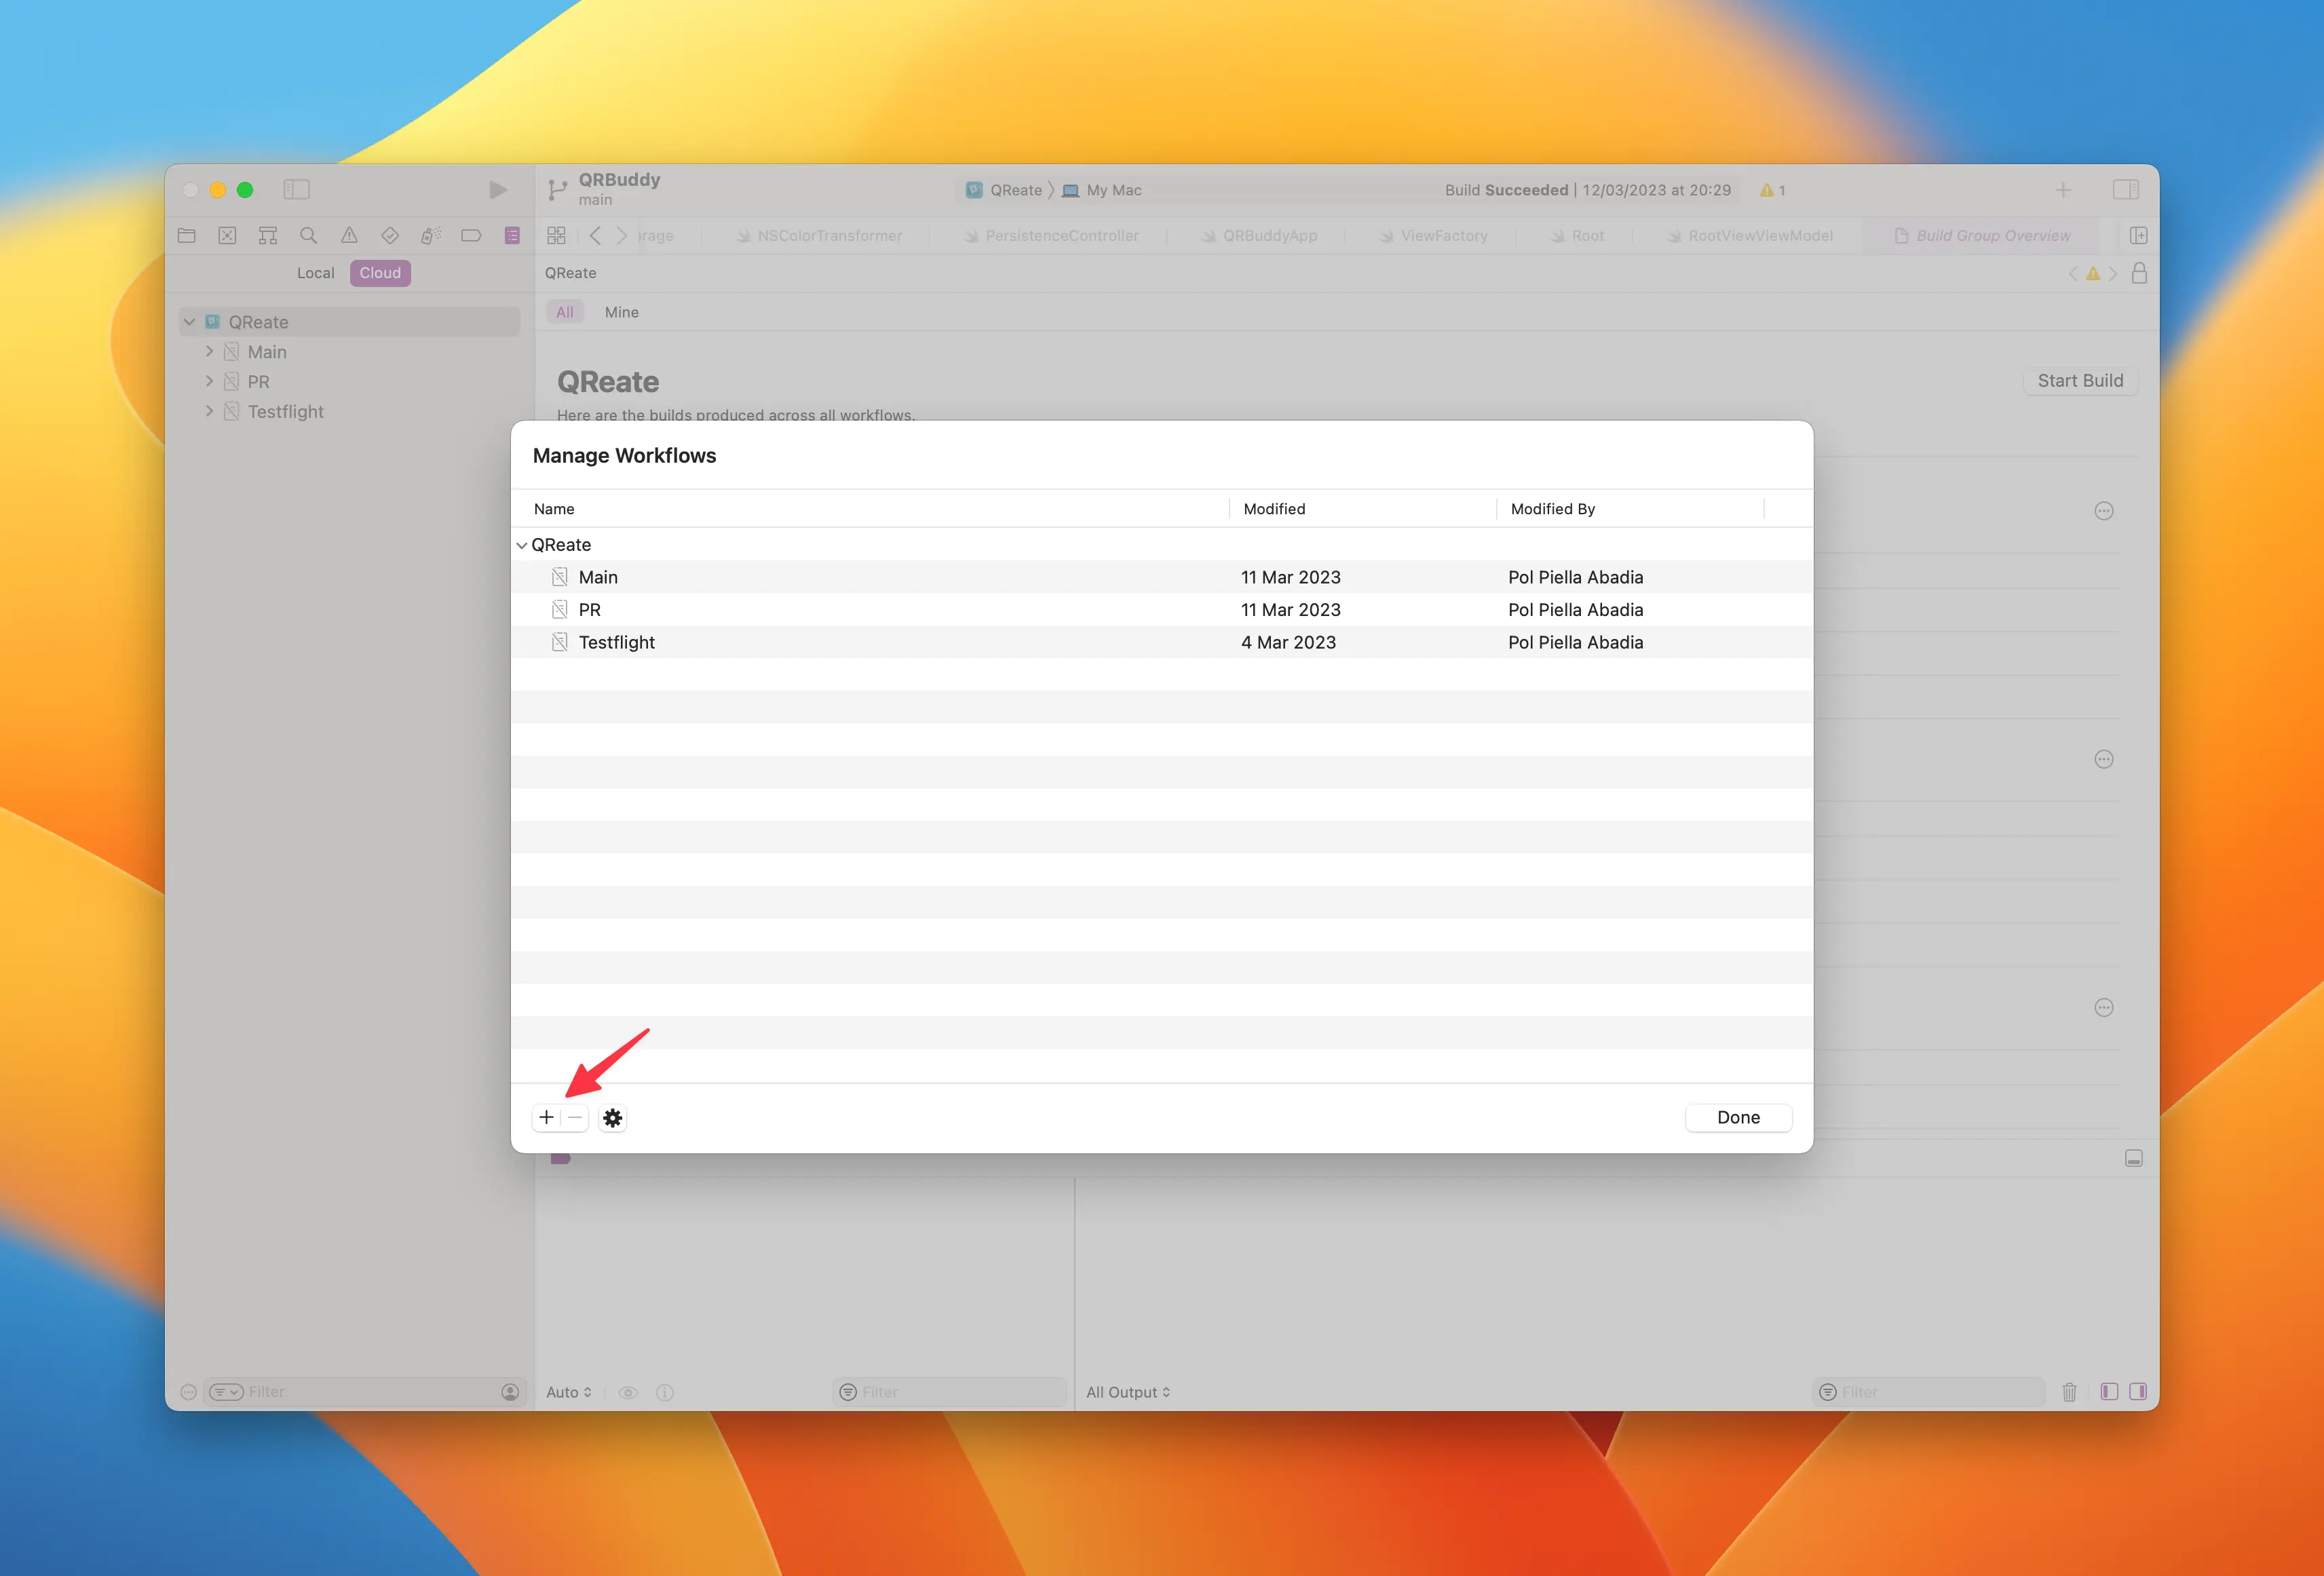
In the workflow list screen, click the + button.
Change the default name of the workflow to ‘TestFlight’ and turn it off so that it does not get run automatically based on the start conditions you’ll set up next. This is the way to create a manual workflow in Xcode Cloud.
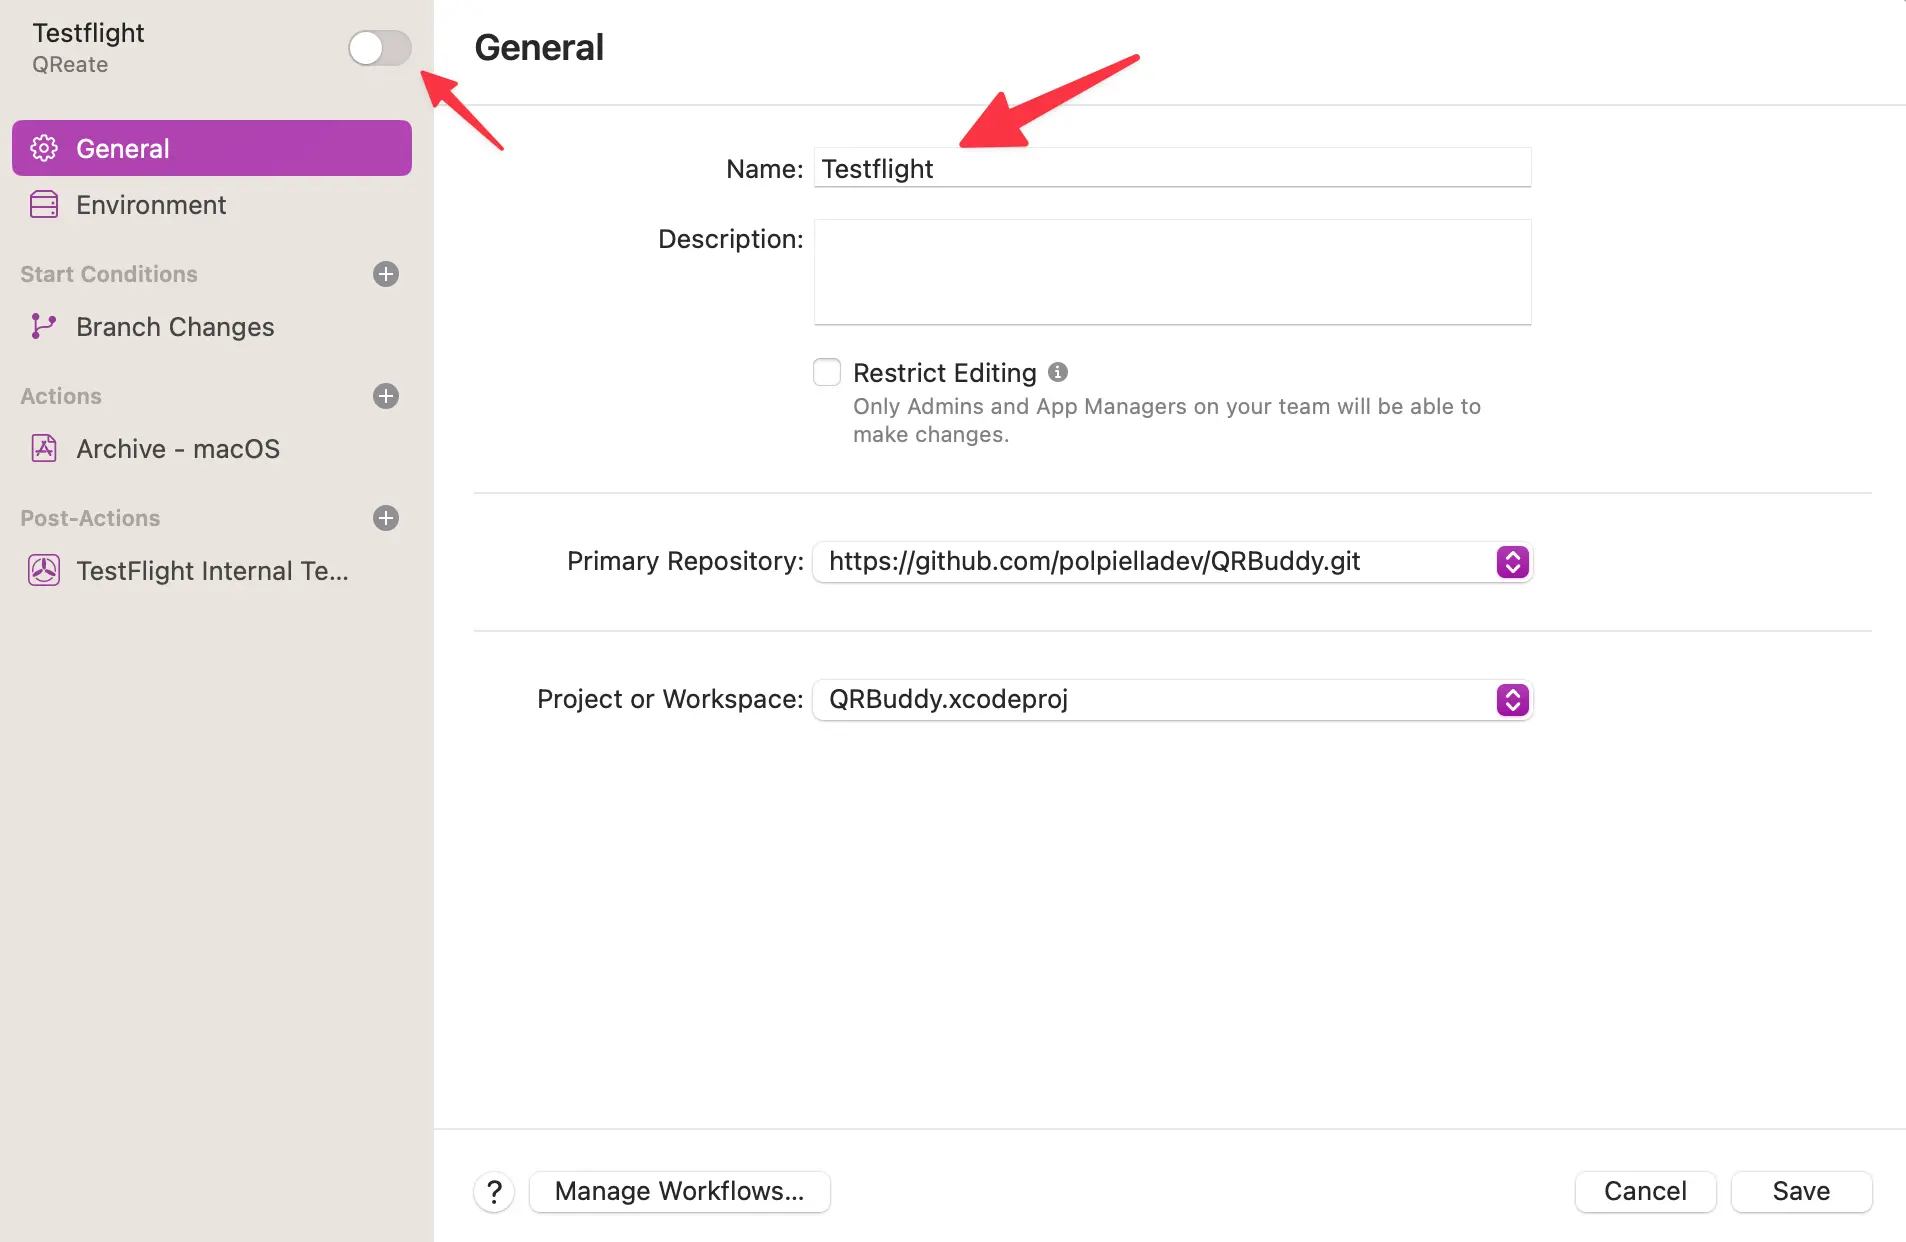
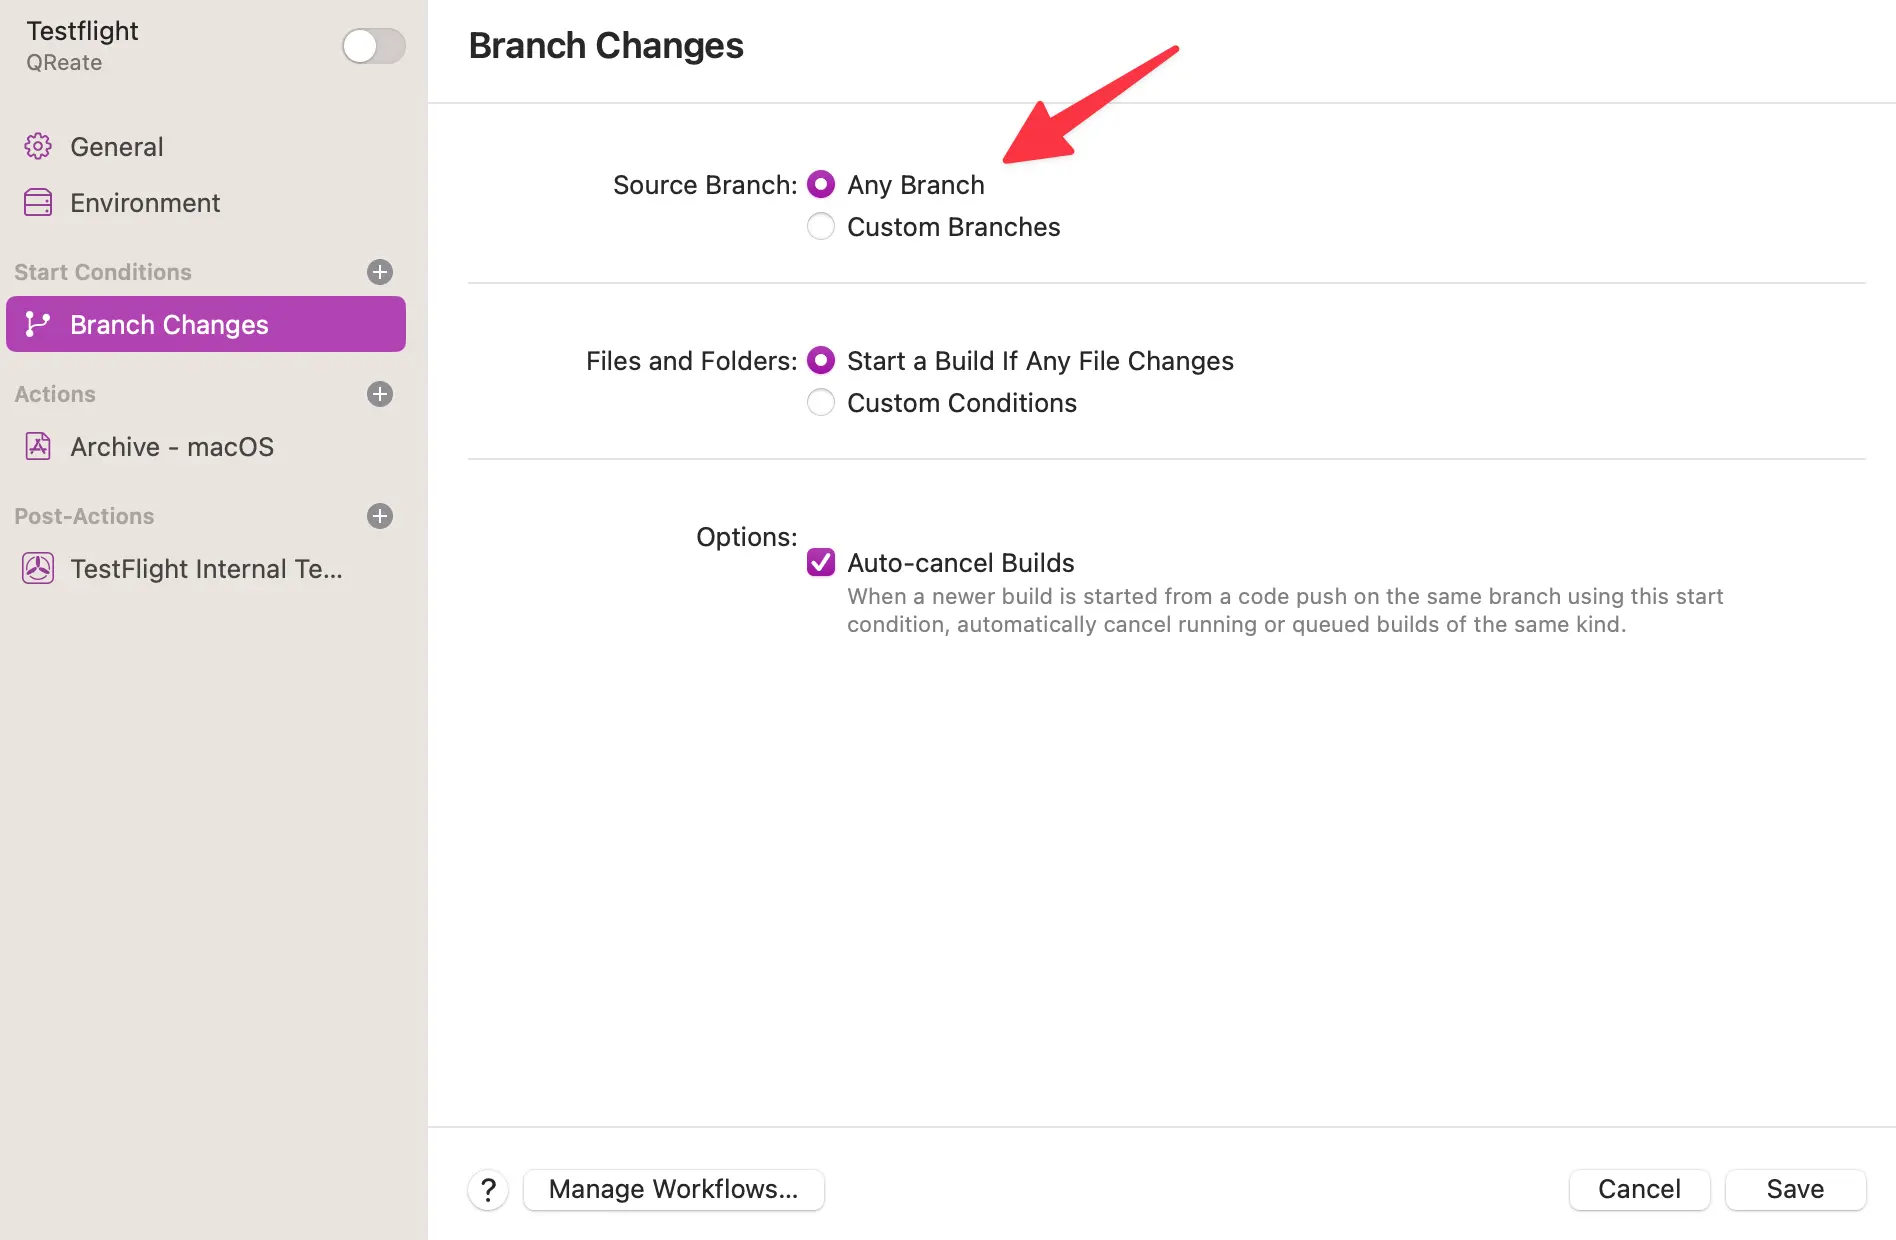
Add a start condition to start the workflow on any branch change. Every Xcode Cloud workflow requires a start condition, but you can prevent this condition from triggering a new build by turning the workflow off.
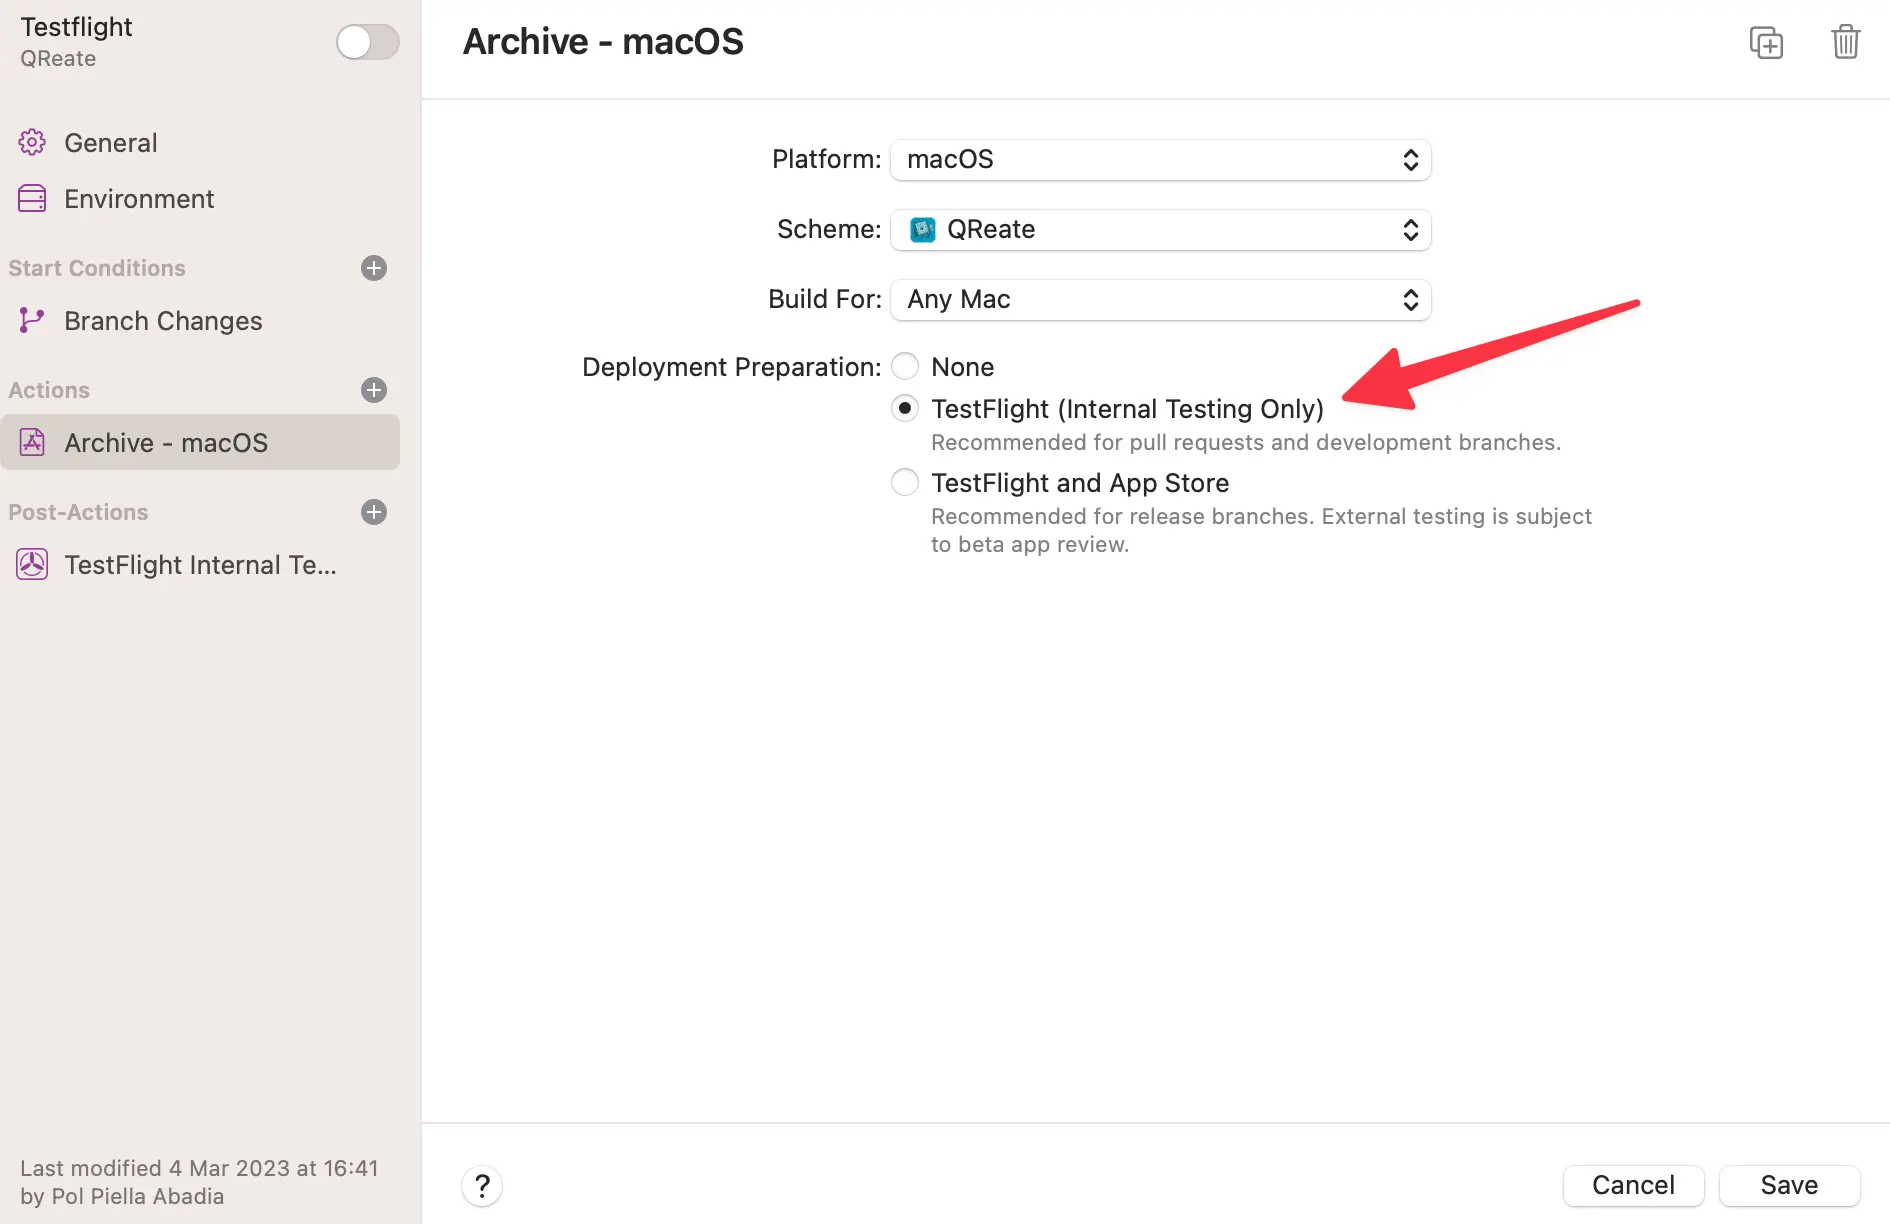
Add an archive action and select the TestFlight (Internal Testing Only) deployment preparation.
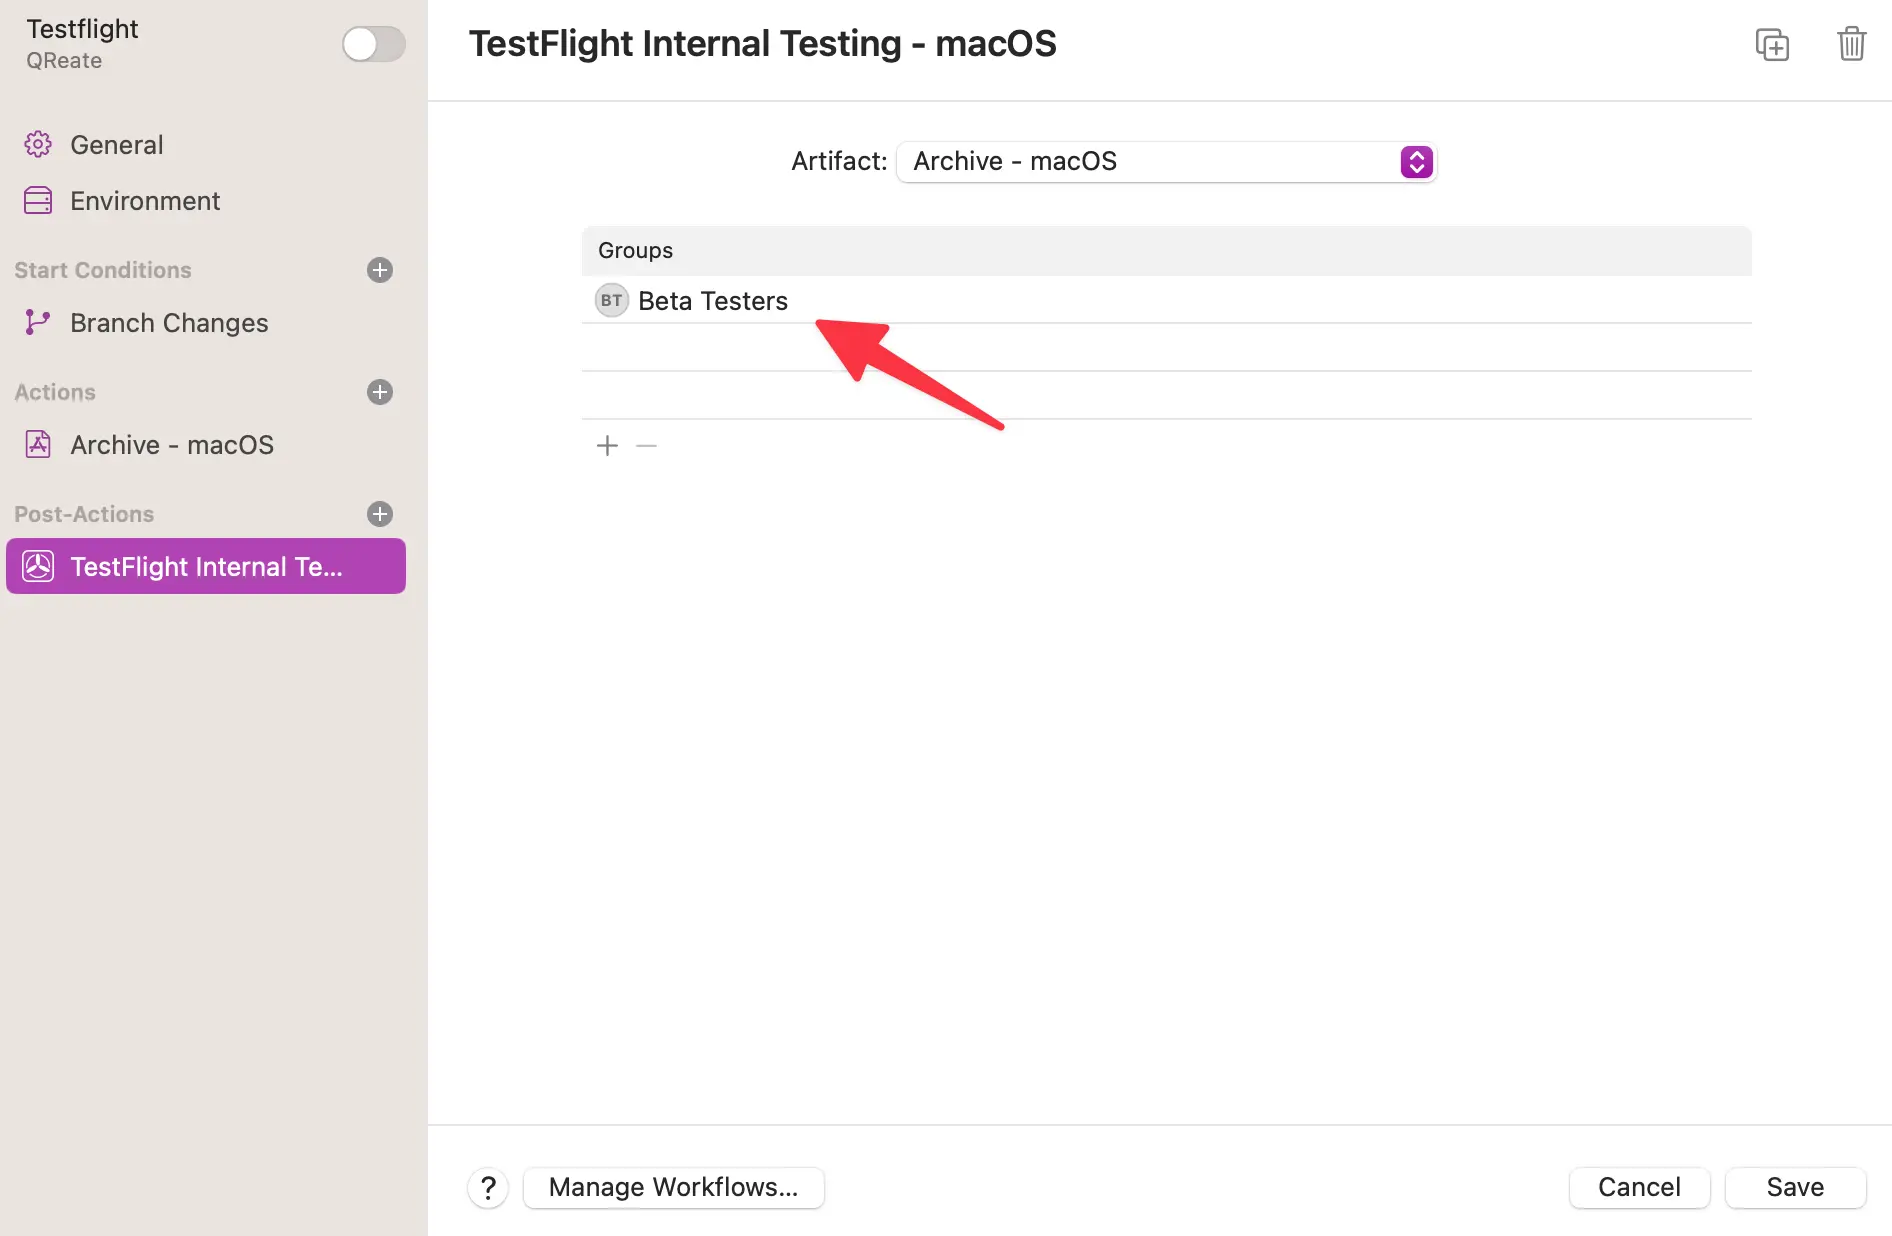
Add a post-action step to deliver the app to TestFlight for internal testing. You need to add a test group for this step to work.
When triggered, the new workflow uploads the app to TestFlight and distributes it to an internal test group.
Creating a serverless function
An easy way to create a service which listens to POST requests from GitHub is to use an Amazon Web Services lambda. Using this approach has the added benefit of not having to worry about a server’s uptime and maintenance.
Thanks to the great work from the swift-server group, you can create a lambda using Swift.
Please note that this article assumes knowledge of building and deploying Swift Amazon Web Services lambdas. If you are not familiar with this topic, please refer to the swift-aws-lambda-runtime documentation.
Getting started
To create an Amazon Web Services lambda, you first need to create an executable Swift package:
# Create an empty directory
mkdir upload-to-testflight-webhook
# Move into the new directory
cd upload-to-testflight-webhook
# Create a new executable Swift package
swift package init --type executable --name UploadToTestFlightWebhook
The preceding command generates an executable Swift package with the following folder structure:
.
├── Package.swift
├── README.md
├── Sources
│   └── UploadToTestFlightWebhook
│       └── UploadToTestFlightWebhook.swift
└── Tests
    └── UploadToTestFlightWebhookTests
        └── UploadToTestFlightWebhookTests.swift
Adding the dependencies
The first dependency you need to bring in is the swift-aws-lambda-runtime by the swift-server group.
The lambda also needs to listen to the POST requests sent by GitHub and, for this reason, it needs to have an Amazon API Gateway that can handle these as its trigger.
To read data from the gateway’s body, you need to add the swift-aws-lambda-events package from swift-server as a dependency.
// swift-tools-version: 5.7

import PackageDescription

let package = Package(
    name: "UploadToTestFlightWebhook",
    platforms: [.macOS(.v12)],
    dependencies: [
        .package(url: "https://github.com/swift-server/swift-aws-lambda-runtime.git", exact: "1.0.0-alpha.1"),
        .package(url: "https://github.com/swift-server/swift-aws-lambda-events.git", exact: "0.1.0")
    ],
    targets: [
        .executableTarget(
            name: "UploadToTestFlightWebhook",
            dependencies: [
                .product(name: "AWSLambdaRuntime", package: "swift-aws-lambda-runtime"),
                .product(name: "AWSLambdaEvents", package: "swift-aws-lambda-events")
            ]
        )
    ]
)
Creating an empty lambda
To create an Amazon Web Services lambda which handles API Gateway events, you need to import both the AWSLambdaRuntime and AWSLambdaEvents packages you imported in the previous section and create a @main decorated struct which conforms to the LambdaHandler protocol.
import AWSLambdaRuntime
import AWSLambdaEvents

@main
struct UploadToTestFlightWebhook: SimpleLambdaHandler {
    func handle(_ request: APIGatewayV2Request, context: LambdaContext) async throws -> APIGatewayV2Response {
        return .init(
            statusCode: .ok,
            body: "Hello World 👋"
        )
    }
}
Parsing the web hook’s payload
The GitHub issue_comment webhook sends a payload with the relevant information every time a user adds a comment to a repository’s issue or pull request.
From all the information in the payload, the webhook just needs the following fields:
{
  "action": "created",
  "issue": {
    "pull_request": {
      "url": "https://api.github.com/repos/polpielladev/QRBuddy/pulls/1"
    }
  },
  "repository": {
    "name": "QRBuddy"
  },
  "comment": {
    "body": "Upload to testflight"
  }
}
To parse the payload, the lambda needs to decode the APIGatewayV2Request’s body property into a GithubWebhookData struct using a JSONDecoder with a convertFromSnakeCase key decoding strategy.
struct GithubWebhookData: Decodable {
    let action: String
    let issue: Issue
    let repository: Repository
    let comment: Comment

    struct Issue: Decodable {
        let pullRequest: PullRequest

        struct PullRequest: Decodable {
            let url: URL
        }
    }

    struct Repository: Decodable {
        let name: String
    }

    struct Comment: Decodable {
        let body: String
    }
}

@main
struct UploadToTestFlightWebhook: SimpleLambdaHandler {
    let snakeCaseDecoder: JSONDecoder

    init() {
        let decoder = JSONDecoder()
        decoder.keyDecodingStrategy = .convertFromSnakeCase
        snakeCaseDecoder = decoder
    }

    func handle(_ request: APIGatewayV2Request, context: LambdaContext) async throws -> APIGatewayV2Response {
        guard let body = request.body,
              let bodyData = body.data(using: .utf8),
              let request = try? snakeCaseDecoder.decode(GithubWebhookData.self, from: bodyData) else {
            return .init(statusCode: .badRequest, body: "Could not parse the request content...")
        }

        guard request.action == "created",
              request.comment.body.lowercased() == "upload to testflight" else {
            return .init(statusCode: .ok, body: "Not handling the event...")
        }

        // ...
    }
}
The lambda needs to handle just the created action to ensure it triggers builds for new comments and not for comment edits or deletions.
The lambda also needs to verify that the comment’s body matches ‘upload to TestFlight’ and is not case-sensitive.
Retrieving the pull request’s information
While the GitHub issue_comment webhook sends some of the pull request’s information, it doesn’t send enough to determine what the pull request’s head branch is.
To find this information, the lambda needs to make a GET request to the pullRequest’s url property from the webhook’s event payload.
This property is a URL pointing to the pulls GitHub endpoint, which requires authentication when working with private repositories. GitHub API’s response contains a head object with the branch’s ref, which is the name that the lambda needs.
struct GithubPullRequest: Decodable {
    let head: Head

    struct Head: Decodable {
        let ref: String
    }
}

@main
struct UploadToTestFlightWebhook: SimpleLambdaHandler {
    func handle(_ request: APIGatewayV2Request, context: LambdaContext) async throws -> APIGatewayV2Response {
        // ...

        var urlRequest = URLRequest(url: request.issue.pullRequest.url)
        urlRequest.setValue("Bearer 🙈", forHTTPHeaderField: "Authorization")
        // Small helper class to make async requests
        let urlSession = URLSessionWrapper()
        let data = try await urlSession.data(for: urlRequest)

        let headBranchName = try snakeCaseDecoder.decode(GithubPullRequest.self, from: data)
            .head
            .ref

        // ...
    }
}
Importing appstoreconnect-swift-sdk
To make it easier to interact with App Store Connect, you can use Antoine van der Lee’s appstoreconnect-swift-sdk Swift package:
// swift-tools-version: 5.7

import PackageDescription

let package = Package(
    name: "UploadToTestFlightWebhook",
    platforms: [.macOS(.v12)],
    dependencies: [
        // Use the master revision as it implements Linux compatibility
        .package(url: "https://github.com/AvdLee/appstoreconnect-swift-sdk.git", revision: "master"),
        .package(url: "https://github.com/swift-server/swift-aws-lambda-runtime.git", exact: "1.0.0-alpha.1"),
        .package(url: "https://github.com/swift-server/swift-aws-lambda-events.git", exact: "0.1.0")
    ],
    targets: [
        .executableTarget(
            name: "UploadToTestFlightWebhook",
            dependencies: [
                .product(name: "AWSLambdaRuntime", package: "swift-aws-lambda-runtime"),
                .product(name: "AWSLambdaEvents", package: "swift-aws-lambda-events")
            ]
        )
    ]
)
Setting up the APIProvider
The APIProvider from the appstoreconnect-swift-sdk Swift package gives you a way to interact with App Store Connect’s API. It requires an APIConfiguration with your App Store Connect’s credentials to be able to make authenticated requests.
// ...
import AppStoreConnect_Swift_SDK

@main
struct UploadToTestFlightWebhook: SimpleLambdaHandler {
    func handle(_ request: APIGatewayV2Request, context: LambdaContext) async throws -> APIGatewayV2Response {
        // ...

        let config = try APIConfiguration(
            issuerID: "🙈",
            privateKeyID: "🙈",
            privateKey: "🙈"
        )

        let provider = APIProvider(configuration: config)

        // ...
    }
}
This article doesn’t go into detail on how to create and retrieve the credentials from App Store Connect. For more information, please refer to this article on the topic.
Triggering an Xcode Cloud build
The lambda now has all the tools and information it needs from the webhook to interact with the App Store Connect API and trigger a new TestFlight workflow run.
Finding the correct product
To trigger a new workflow run, you first need to find the product associated with the pull request’s repository name by:
- Making a network request to the App Store Connect API’s ciProducts endpoint to retrieve all the Xcode Cloud products of type
app. - Finding the product that matches the pull request’s repository name by comparing the
repositoryNameproperty from thescmRepositoryincluded item with the pull request’s repository name. If there are any matches, the lambda retrieves the repository entity’sid. - Finding the product that matches the repository entity’s
idby comparing therepositoryIdproperty from theproduct’srelationshipswith the repository entity’sid. If the repository has no matching product, the lambda returns a404response.
@main
struct UploadToTestFlightWebhook: SimpleLambdaHandler {
    func handle(_ request: APIGatewayV2Request, context: LambdaContext) async throws -> APIGatewayV2Response {
        // ...

        let producstEndpoint = APIEndpoint
                .v1
                .ciProducts
                .get(parameters: .init(filterProductType: [.app], include: [.primaryRepositories, .bundleID]))

        let productResponse = try await provider.request(producstEndpoint)

        guard let repositoryId: String = productResponse
            .included?
            .compactMap({ includedItem in
                switch includedItem {
                case .scmRepository(let scmData) where scmData.attributes?.repositoryName == request.repository.name:
                    return scmData.id
                default: return nil
                }
            })
            .first,

        let productId = productResponse.data.first(where: {
            $0.relationships?.primaryRepositories?.data?.contains { $0.id == repositoryId } == true
        })?.id else {
            return .init(statusCode: .notFound, body: "Could not find a product for this repository")
        }

        // ...
    }
}
Getting the workflow id
You now need to verify that the product you found in the previous section has a workflow called TestFlight by:
- Making a network request to the App Store Connect API’s ciProducts/productId/workflows endpoint to list all the workflows for the product.
- Finding the
TestFlightworkflow by getting the first item in the workflows’ array whose name matchesTestFlight. If there are no matches, the lambda returns a response with404status code.
@main
struct UploadToTestFlightWebhook: SimpleLambdaHandler {
    func handle(_ request: APIGatewayV2Request, context: LambdaContext) async throws -> APIGatewayV2Response {
        // ...

        let allWorkflowsEndpoint = APIEndpoint
            .v1
            .ciProducts
            .id(productId)
            .workflows

        let workflows = try await provider
            .request(
                Request<WorkflowsResponse>(
                    method: "GET",
                    path: allWorkflowsEndpoint.path,
                    query: [("fields[ciWorkflows]", "name")]
                )
            )

        guard let workflowId = workflows.data.first(where: { $0.attributes.name == "Testflight" })?.id else {
            return .init(statusCode: .notFound, body: "Could not find a `TestFlight` workflow in product")
        }

        // ...
    }
}
Finding the correct git reference id
To start a new workflow run from the pull request’s head branch, you need to find the id associated with that branch in App Store Connect.
Contrary to what you might think, this id is Xcode Cloud specific and is not the same as the ref from the branch in GitHub.
You can retrieve this id by following these steps:
- Retrieve the
TestFlightworkflow information from the App Store Connect API’s ciWorkflows/id endpoint and specify that the response must include therepositoryinformation. - Retrieve the git references for the repository from the scmRepositories/gitReferences endpoint.
- Filter the git references array to find the object whose name matches the pull request’s head branch’s name. If no matching git reference exists, the lambda returns a response with
404status code.
@main
struct UploadToTestFlightWebhook: SimpleLambdaHandler {
    func handle(_ request: APIGatewayV2Request, context: LambdaContext) async throws -> APIGatewayV2Response {
        // ...

        let workflowEndpoint = APIEndpoint
            .v1
            .ciWorkflows
            .id(workflowId)
            .get(parameters: .init(include: [.repository]))

        let workflow = try await provider.request(workflowEndpoint).data

        let gitRefsEndpoint = APIEndpoint
            .v1
            .scmRepositories
            .id(repositoryId)
            .gitReferences
            .get()

        let gitRefs = try await provider.request(gitRefsEndpoint)

        guard let ref = gitRefs.data.first(where: { $0.attributes?.name == headBranchName }) else {
            return .init(statusCode: .notFound, body: "There is no branch named \(headBranchName) in the repository")
        }

        // ...
    }
}
Starting a new build
Now that you have all the information available, you are ready to trigger a new workflow by:
- Creating a new CiBuildRunCreateRequest object with the workflow and the source branch as relationships for the request.
- Making a network request to the ciBuildRuns endpoint from the App Store Connect API to start a new workflow run.
- Return a response with
200status code.
@main
struct UploadToTestFlightWebhook: SimpleLambdaHandler {
    func handle(_ request: APIGatewayV2Request, context: LambdaContext) async throws -> APIGatewayV2Response {
        // ...

        let requestRelationships = CiBuildRunCreateRequest
            .Data
            .Relationships(
                workflow: .init(data: .init(type: .ciWorkflows, id: workflow.id)),
                sourceBranchOrTag: .init(data: .init(type: .scmGitReferences, id: ref.id))
            )
            let requestData = CiBuildRunCreateRequest.Data(
                type: .ciBuildRuns,
                relationships: requestRelationships
            )

        let buildRunCreateRequest = CiBuildRunCreateRequest(data: requestData)

        let workflowRun = APIEndpoint
            .v1
            .ciBuildRuns
            .post(buildRunCreateRequest)

        _ = try await provider.request(workflowRun)

        return .init(
            statusCode: .ok,
            body: "Job \(workflow.attributes?.name ?? "") triggered."
        )
    }
}
Setting up the webhook
After deploying the lambda you have just built, the last thing to do is to set up the webhook on a GitHub repository.
To do so, go to the repository’s settings, navigate to the ‘Webhooks’ section and click the ‘Add Webhook’ button.
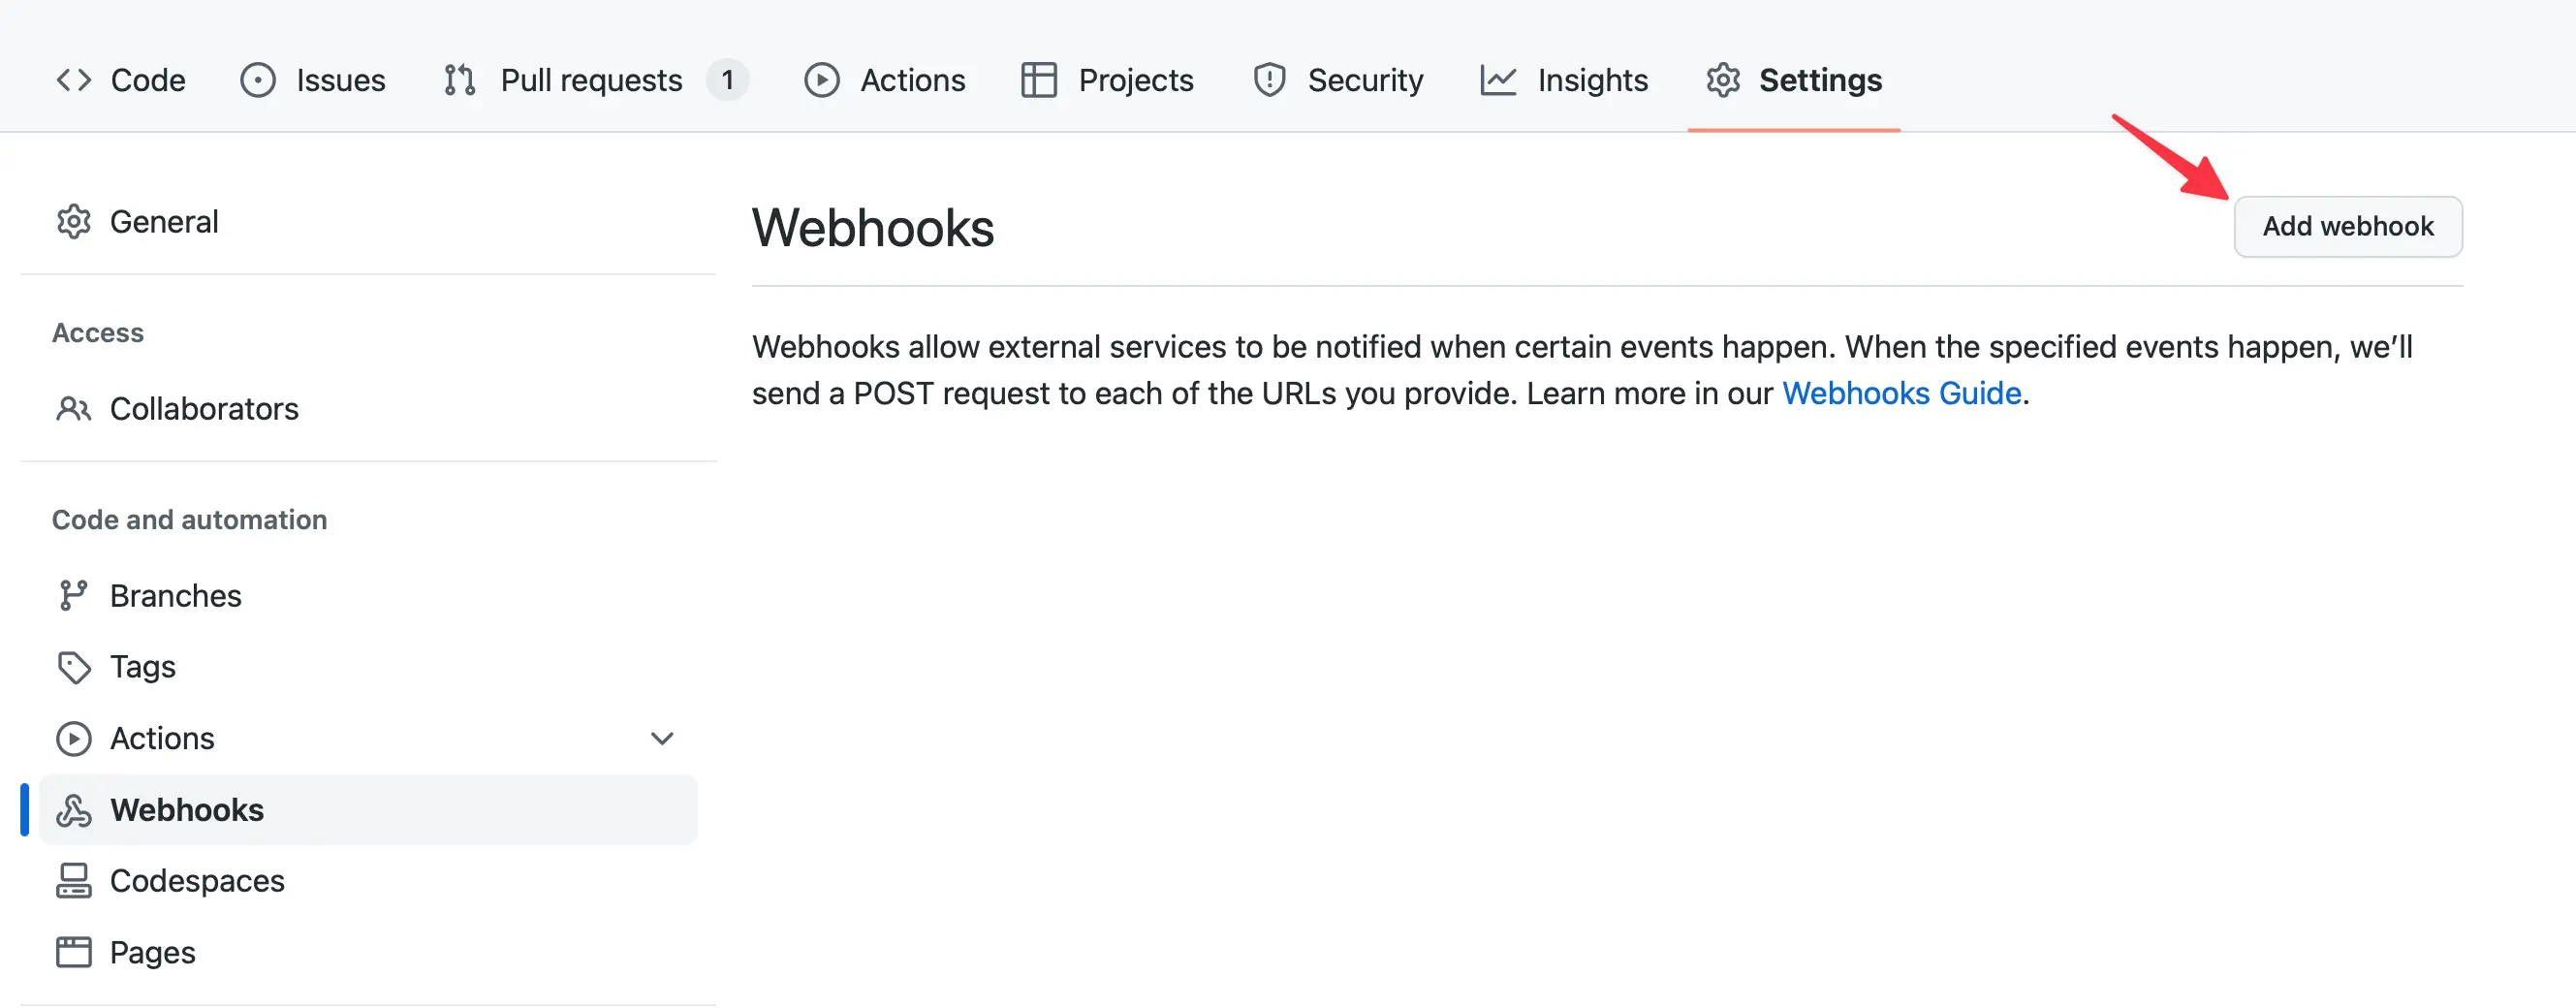
Enter the URL for the deployed server in the ‘Payload URL’ field, select ‘application/json’ as the ‘Content type’, and choose the ‘Let me select individual events’ option.
From the list of available events, select ‘Issue Comments’.
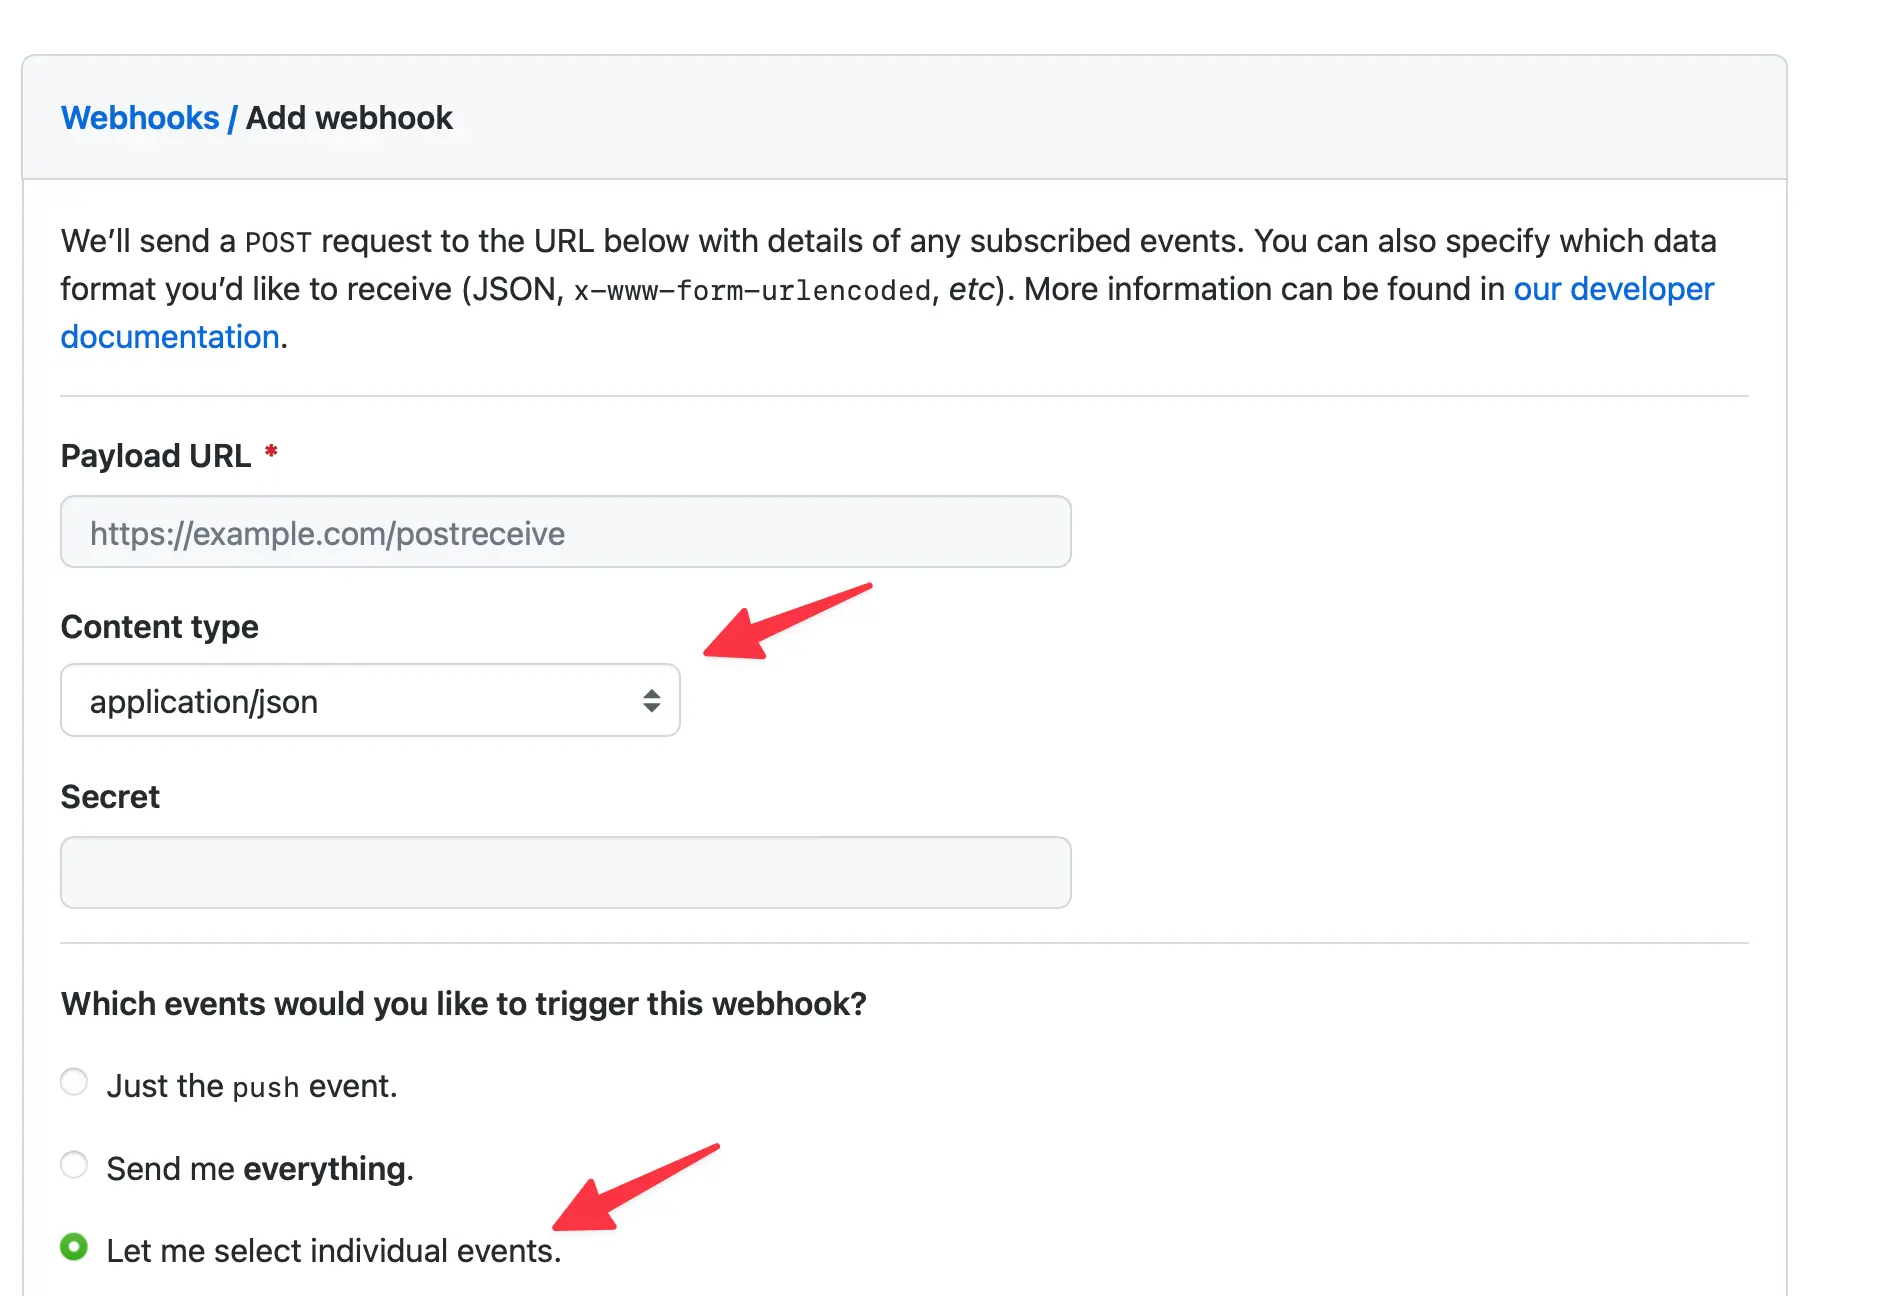
Check the ‘Active’ box to ensure the webhook is on and click the ‘Add webhook’ button to save the configuration.

You should now be able to trigger a new build by writing a comment which says ‘Upload to TestFlight’ on any pull request in the repository 🎉.