How to make an interactive picker for a Swift command-line tool

Go from confusion to confidence with a step-by-step Swift Concurrency course, helping you smoothly migrate to Swift 6 and fully leverage its features.
I have been writing command-line tools with Swift for a while now and, while I find the developer experience to be great, I have always found the number of libraries to handle user input to be lacking compared to other languages such as Javascript.
This sparked my interest in learning more about how such libraries work and investigating how hard it would be to make something similar using Swift.
In this post, I will show you how to make an interactive picker for a command-line tool using ANSI escape sequences inspired by one of my favourite javascript libraries: clack by Nate Moore.
In fact, I like the library so much that I have started working on migrating it to Swift and I am going to document my progress in a series of posts.
What are ANSI escape sequences?
ANSI escape sequences are a way to perform operations in the terminal through a series of predefined characters. These sequences are supported by terminals in Unix operating systems (like macOS) and Windows (only from Windows 10) and are used by many command-line tools to perform actions such as changing the text colour, modifying the cursor position, clearing the screen, etc.
For example, the following escape sequence changes the text colour to red:
print("\u{1B}[31mHello, world!")The sequence above starts with the escape character: \u{1B}. This is followed by the character [ and a number that represents the colour we want to use. In this case, 31 is the code for red. Finally, we end the sequence with the character m followed by the text we want to display.
Let’s now make our example a bit more complex by making the text bold. We can do this by adding the number 1 followed by a semicolon before the colour code:
print("\u{1B}[1;31mHello, world!")As you can see, escape sequences are nothing more than the combination of characters and string manipulation to achieve the desired formatting.
Creating an executable
To make an interactive command-line component, we first need to create an executable Swift package using the following command:
swift package init --type executableImporting ANSITerminal
The reason we need to create a Swift package instead of a Swift script is that we will need to import a dependency to make working with ANSI escape sequences easier: ANSITerminal.
ANSITerminal is distributed as a Swift Package, so we can add it to our project by declaring it as a dependency to the executable target in our Package.swift file:
// swift-tools-version: 5.7

import PackageDescription

let package = Package(
    name: "Picker",
    products: [
        .executable(name: "Picker", targets: ["Picker"])
    ],
    dependencies: [
         .package(url: "https://github.com/pakLebah/ANSITerminal.git", exact: "0.0.3"),
    ],
    targets: [
        .executableTarget(name: "Picker", dependencies: ["ANSITerminal"])
    ]
)
Getting started
Before we start writing some code, let’s take a look at the picker component we’ll be building in this article:
The picker, which is highly inspired by the select component in Nate Moore’s clack library, presents a number of options and allows the user to select one using a combination of the arrow keys and the enter key.
Once the user has selected an option, the picker returns the selected string, the icon is updated to a checkmark and the program exits gracefully.
Let’s start by importing the ANSITerminal library in the executable’s entry point, creating a picker function which contains the component’s code and invoking it with a title and a set of options:
import ANSITerminal

func picker(title: String, options: [String]) -> String {
    return "Hello World"
}

_ = picker(title: "Choose your favourite fruit", options: ["🍌 Banana", "🥝 Kiwi", "🍓 Strawberry"])
Note that in the following sections, unless I specifically say otherwise, all functions I will be calling in the
pickermethod are either part ofFoundationor ANSITerminal.
Showing the picker’s title
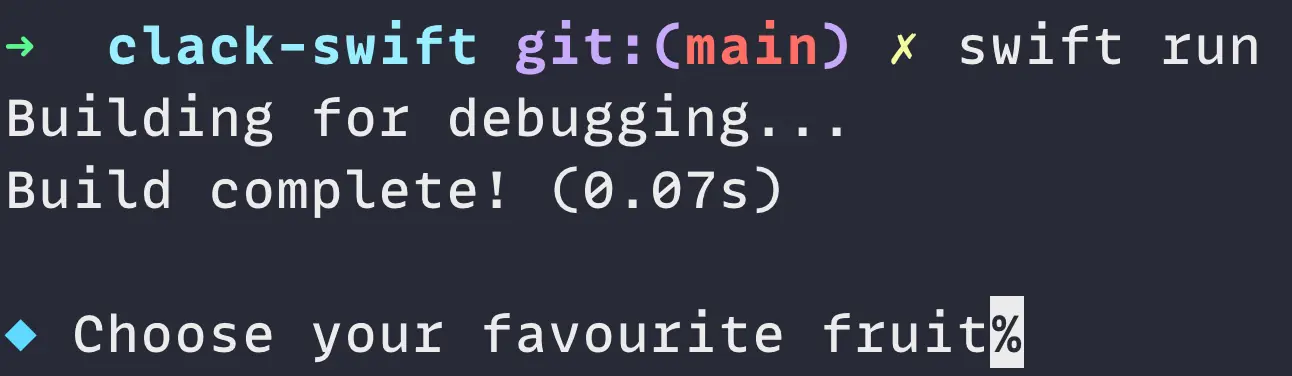
The first thing we need to do is to write the picker’s title on the terminal’s screen:
func picker(title: String, options: [String]) -> String {
    // 1
    cursorOff()
    // 2
    moveLineDown()
    // 3
    write("◆".foreColor(81).bold)
    // 4
    moveRight()
    write(title)

    return "Hello World"
}
When the picker function is called, the code above will:
- Turn the cursor off to avoid having it displayed in the terminal as there will be no need for it.
- Move one line down from the current position. This is needed because we want to start writing the title on a new line.
- Write the icon for the picker. In this case, we are using the same Unicode character as clack uses for its prompts.
- Move the cursor one character to the right to add a white space and write the title.
Output
Handling state
The next step is to create a State class and an Option struct to handle the state of the picker:
struct Option {
    let title: String
    let line: Int

    init(title: String, line: Int) {
        self.title = title
        self.line = line
    }
}

class OptionState {
    let options: [Option]
    let rangeOfLines: (minimum: Int, maximum: Int)
    var activeLine: Int = .zero

    init(options: [Option], activeLine: Int, rangeOfLines: (minimum: Int, maximum: Int)) {
        self.activeLine = activeLine
        self.rangeOfLines = rangeOfLines
        self.options = options
    }
}
This state will hold the line number for the selected option and the range of lines where the options are displayed.
Let’s create an instance of the OptionState class and feed it an initial state derived from the set of options passed to the picker function:
func picker(title: String, options: [String]) -> String {
    // ...

    // 1
    let currentLine = readCursorPos().row + 1

    // 2
    let state = OptionState(
        options: options.enumerated().map { Option(title: $1, line: currentLine + $0) },
        activeLine: currentLine,
        rangeOfLines: (currentLine, currentLine + options.count - 1)
    )

    return "Hello World"
}
Let’s break down the code above into a number of steps:
- Read the cursor’s current row. Then add one to make sure that the picker’s first option is displayed on a new line.
- Create the initial state for the picker. Use the
enumerated()method to get the index of each option and add it to the current line to get the line where the option will be displayed.
Displaying all available options
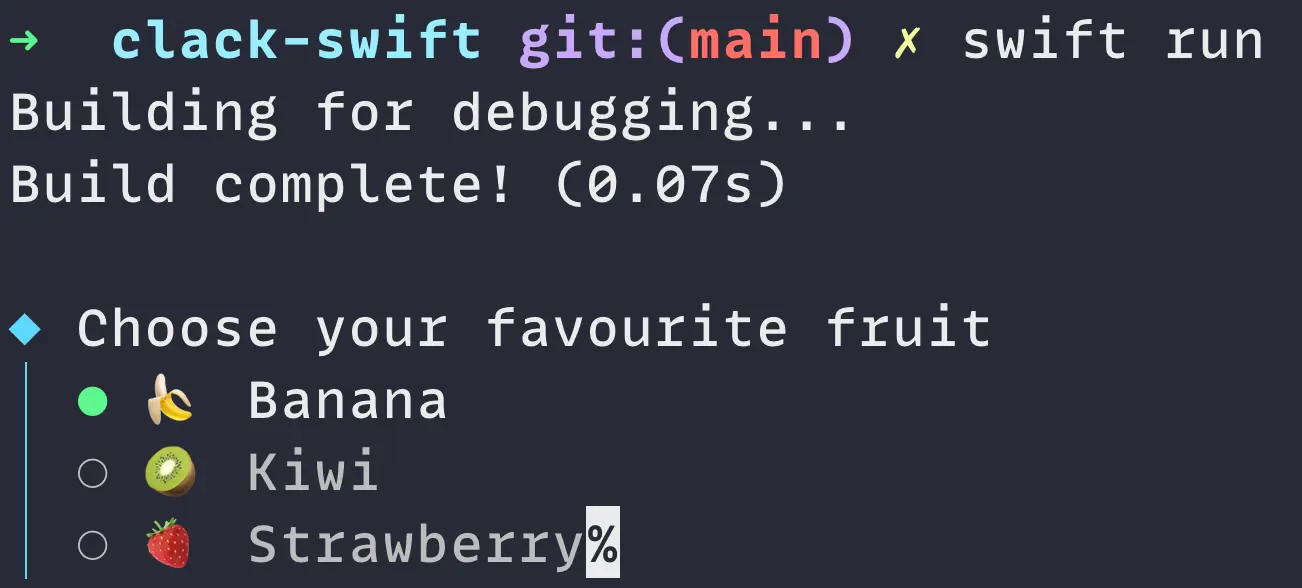
Now that we have a state and the lines where our options need to be displayed, let’s write them to the terminal:
func picker(title: String, options: [String]) -> String {
    // ...

    // 1
    options.forEach { optionTitle in
        // 2
        moveLineDown()

        // 3
        let isActive = readCursorPos().row == state.activeLine

        // 4
        write("│".foreColor(81))
        moveRight()
        if isActive {
            write("●".lightGreen)
        } else {
            write("○".foreColor(250))
        }

        // 5
        moveRight()
        if isActive {
            write(optionTitle)
        } else {
            write(optionTitle.foreColor(250))
        }
    }

    // 6
    moveLineDown()
    let bottomLine = readCursorPos().row
    write("└".foreColor(81))

    return "Hello World"
}
The code to render all options in the terminal can be summarised as follows:
- Iterate through the array of options.
- Move the cursor down so that text is written on a new line.
- Check if the current option is the active one.
- Write the icon for the option. If the option is active, use a green circle, otherwise, use a grey circle, similarly to what clack does.
- Move right by one character to leave one whitespace between the icon and the text. If the option is active, write the title in white, otherwise, write it in grey.
- Move the cursor down one line and write the closing symbol of the sidebar in the same colour.
Output
Handling user input
Now that we have a picker that displays a set of options, we need to allow the user to select one of them.
To do so, we need to halt the program’s execution, read the user’s input and perform the appropriate action depending on the pressed key:
- If the user presses the up arrow key, move the active option up. If the active option is already at the top, don’t do anything.
- If the user presses the down arrow key, move the active option down. If the active option is already at the bottom, don’t do anything.
- If the user presses the enter key, return the selected option and allow the program’s execution to continue.
Let’s now write some code that fulfils the above requirements:
func picker(title: String, options: [String]) -> String {
    // ...

    // 1
    while true {
        // 2
        clearBuffer()

        // 3
        if keyPressed() {
            // 4
            let char = readChar()
            if char == NonPrintableChar.enter.char() {
                break
            }

            // 5
            let key = readKey()
            // 6
            if key.code == .up {
                if state.activeLine > state.rangeOfLines.minimum {
                    state.activeLine -= 1

                    reRender()
                }
            // 7
            } else if key.code == .down {
                if state.activeLine < state.rangeOfLines.maximum {
                    state.activeLine += 1

                    reRender()
                }

            }
        }
    }

    return "Hello World"
}
When called, the picker method now listens for user input by doing the following:
- Start an infinite loop that will only be broken when the user presses the enter key.
- Clear the terminal’s buffer.
- Check if the user has pressed a key.
- If the user has pressed the enter key, break the loop.
- Read the key that the user has pressed.
- If the user has pressed the up arrow key, move the active option up and re-render the options. If the active option is already at the top, don’t do anything.
- If the user has pressed the down arrow key, move the active option down and re-render the options. If the active option is already at the bottom, don’t do anything.
Re-rendering the options
Let’s now implement the reRender() function used in the previous section. This function changes the colour of each option’s title and updates the circle icon next to it based on whether the option is selected or not:
func reRender(state: OptionState) {
    // 1
    (state.rangeOfLines.minimum...state.rangeOfLines.maximum).forEach { line in
        // 2
        let isActive = line == state.activeLine

        // 3
        let stateIndicator = isActive ? "●".lightGreen : "○".foreColor(250)
        writeAt(line, 3, stateIndicator)

        // 4
        if let title = state.options.first(where: { $0.line == line })?.title {
            let title = isActive ? title : title.foreColor(250)
            writeAt(line, 5, title)
        }
    }
}

// Helper method
func writeAt(_ row: Int, _ col: Int, _ text: String) {
    moveTo(row, col)
    write(text)
}
Next time the programme is executed and the user presses the up or down arrow keys, the reRender method will:
- Iterate through the range of lines where the options are displayed.
- Check if the current line is the active one.
- If the current line is the active one, write a green circle, otherwise, write a grey circle.
- If the current line is the active one, write the option’s title in white, otherwise, write it in grey.
Output
Option selected state
Now that the user has selected an option, we want to update the picker’s icon to a checkmark, change the colour of the sidebar to not be blue to denote that the component is no longer active, remove the closing bracket from the bottom of the sidebar and turn the cursor back on:
func picker(title: String, options: [String]) -> String {
    // ...

    let startLine = currentLine - 1
    writeAt(startLine, 0, "✔".green)

    (startLine + 1...bottomLine).forEach { writeAt($0, 0, "│".foreColor(252)) }

    moveTo(bottomLine, 0)

    return "Hello World"
}
Output
Returning the selected option
Last but not least, the method needs to return the selected string after the user has pressed the enter key. To do so, we need to find the option that is currently active and return its title:
func picker(title: String, options: [String]) -> String {
    // ...

    return state.options.first(where: { $0.line == state.activeLine })!.title
}
That’s it! 🎉 We have written an interactive picker for the command-line in Swift.
I am planning on writing more posts on this topic as I build up my Swift port of the clack library, so stay tuned 👀.