Load custom fonts into your app using Swift Package Plugins

Go from confusion to confidence with a step-by-step Swift Concurrency course, helping you smoothly migrate to Swift 6 and fully leverage its features.
If you’re an indie developer or you’re part of an organisation with multiple apps that share a common design language and find yourself using the same fonts over and over again, you might want to consider creating a Swift Package to contain the shared font files and font-loading code.
Doing this will allow you to launch new apps a lot faster, have a single place to update the font files for all of your apps and reduce code duplication.
If you pair the reusability of Swift Packages with the power of Swift Package Plugins, you can even remove the need to write any code yourself and have the plugin generate it all for you at build time from the font files themselves 🤯. In this article, I’ll show you how to do just that using SwiftGen!
Creating a Swift Package with resources
Let’s get started by creating a new Swift Package called Fonts:
mkdir Fonts
cd Fonts && swift package init
Let’s then modify the new Package.swift file to remove the test target and add a resource definition to the Fonts target:
// swift-tools-version: 5.7
// The swift-tools-version declares the minimum version of Swift required to build this package.

import PackageDescription

let package = Package(
    name: "Fonts",
    products: [
        .library(
            name: "Fonts",
            targets: ["Fonts"]),
    ],
    dependencies: [],
    targets: [
        .target(
            name: "Fonts",
            dependencies: [],
            resources: [.process("Resources")]
        )
    ]
)
You can keep the test target if you intend on writing tests around the font loading code, but I decided to remove it for simplicity’s sake.
All of the code in this package is going to be generated by a Swift Package Plugin so we don’t need to explicitly write any code in Fonts target. We do however need to add a dummy file to the target’s Sources directory so that the package can be built.
For this reason, let’s remove the contents of the auto-generated Fonts.swift file, rename it to something more suitable like Fake.swift and add a comment in the file to make it clear that it’s not meant to contain any code:
// The code in this package is auto-generated.
// This file is a placeholder to keep the compiler happy
Let’s now create a Resources directory in the Fonts target’s Sources directory to match the resource we defined earlier in the package’s manifest and add one or more font files to it.
As per Apple’s documentation, format support for custom fonts is limited to otf and ttf files. I will be adding both the Excon and Ranade variable font files which pair well together and that I found thanks to Fontshare’s font pair finder, which I would thoroughly recommend.
After the package setup is done, our package structure should look like this:
Fonts
├── README.md
├── Package.swift
└── Sources
    └── Fonts
        ├── Resources
        │   ├── Excon.ttf
        │   └── Ranade.ttf
        └── Fake.swift
Adding the SwiftGen plugin
Now that we have a Swift Package that can host the custom fonts we want to use in our apps, we need to generate the necessary code to load such fonts. To achieve this, I decided to use one of my favourite Swift Package Plugins: SwiftGen.
One of SwiftGen’s most powerful features is the ability to generate Swift interfaces for resources such as Fonts. To start using the plugin, we must define it as a dependency in our Package.swift file and add the SwiftGenPlugin to our target’s plugins array:
// swift-tools-version: 5.7
// The swift-tools-version declares the minimum version of Swift required to build this package.

import PackageDescription

let package = Package(
    name: "Fonts",
    products: [
        .library(
            name: "Fonts",
            targets: ["Fonts"]),
    ],
    dependencies: [
        .package(url: "https://github.com/SwiftGen/SwiftGenPlugin", exact: "6.6.0")
    ],
    targets: [
        .target(
            name: "Fonts",
            dependencies: [],
            resources: [.process("Resources")],
            plugins: [
              .plugin(name: "SwiftGenPlugin", package: "SwiftGenPlugin")
            ]
        )
    ]
)
SwiftGen requires a configuration file (swiftgen.yml) to be present in either the root of the Swift Package or in a target’s Sources directory. In our case, we’ll create this configuration file in the Fonts target’s Sources directory:
# 1
fonts:
  # 2
  inputs: Resources/
  outputs:
    # 3
    templateName: swift5
    # 4
    output: ${DERIVED_SOURCES_DIR}/Generated.swift
    params:
        # 5
        publicAccess: true
The configuration file above tells SwiftGen to:
- Generate code for font assets.
- Look for font files in the
Resourcesdirectory of the target the plugin is applied to. - Use the fonts swift5 template to generate the code.
- Output the generated code to a file called
Generated.swift. SwiftGenPlugin sets an environment variable calledDERIVED_SOURCES_DIRto the path of the plugin’s work directory, which is the only directory with write permissions the plugin has access to. We can then use this variable in the configuration file to specify the exact location within where we want SwiftGen to create any output files. - Make the generated code public so that it can be used by clients of the Swift Package.
Next time we build the package, SwiftGen will create a file called Generated.swift that will be added to the Fonts target’s list of input files. This means that the file will be compiled and included in the package’s final build product.
If you want to inspect the generated code, you need to know that the file will be created in a different location based on how you’re building the package:
-
If you’re building the package using Xcode, the file will be created in the
Fontsdirectory in~/Library/Developer/Xcode/DerivedData: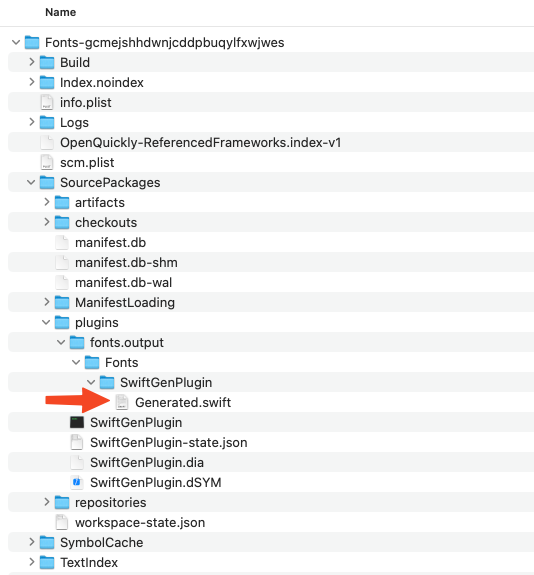
-
If you’re building the package using
swift buildfrom the command line, the file will be created in the.builddirectory in the package’s root directory: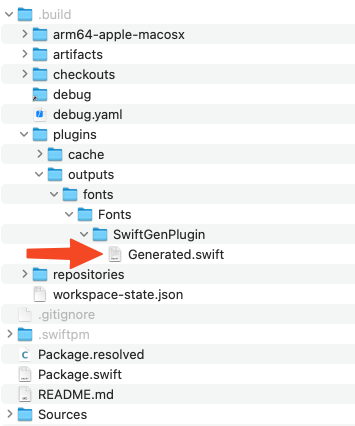
Using the generated code
SwiftGen generates a FontFamily enum with a static property for each font found in the Resources directory. Each of these properties is of type FontConvertible, which is a struct containing several methods so you can retrieve:
- A
SwiftUI.Fontthat you can use directly on your views:
import SwiftUI
import Fonts

struct ArticleView: View {
    var body: some View {
        VStack(spacing: 8) {
            Text("This is a title")
                .font(FontFamily.ExconVariable.medium.swiftUIFont(size: 28, relativeTo: .title))
            Text("This is the body!")
                .font(FontFamily.RanadeVariable.light.swiftUIFont(size: 17, relativeTo: .body))
        }
    }
}- A
Font, which is a typealias that resolves toUIFonton iOS andNSFonton macOS that you can use directly from yourAppKitorUIKitviews:
import UIKit
import Fonts

class ArticleViewController: UIViewController {
    let titleLabel = UILabel()
    let bodyLabel = UILabel()

    override func viewDidLoad() {
        super.viewDidLoad()

        titleLabel.font = scaledFont(
            from: FontFamily.ExconVariable.medium,
            size: 28,
            relativeToStyle: .title1
        )
        bodyLabel.font = scaledFont(
            from: FontFamily.RanadeVariable.light,
            size: 17,
            relativeToStyle: .body
        )
    }

    func scaledFont(
        from fontProvider: FontConvertible,
        size: CGFloat,
        relativeToStyle style: UIFont.TextStyle
    ) -> UIFont {
        let font = fontProvider.font(size: size)
        return UIFontMetrics(forTextStyle: style).scaledFont(for: font)
    }
}