Using Core Data and Swift Data side by side

A native macOS app for App Store Connect that streamlines app updates and releases, making the process faster and easier.
I have recently been looking at how to set up Core Data and Swift Data in NowPlaying to point to the same persistent data store so that I can use both frameworks side by side.
This is useful if you are looking at migrating from Core Data to Swift Data but want to do it gradually or if you want to use Swift Data for specific use cases in your app, such as Widgets.
Considering that Swift Data performs operations exclusively on the Main Thread, I would not recommend migrating to it completely just yet, as it will hurt your app’s performance, but it can indeed be very useful for small and non-expensive operations.
Context
Apple have a great session from this year’s WWDC on how to migrate to Swift Data which gave me a great starting point but I wanted to go a step further and give you some tips in this article that weren’t covered in the session and are key to get this dual set-up working.
The CoreData set up
I created a small demo project with a very simple Core Data stack described by a model file called Storage:

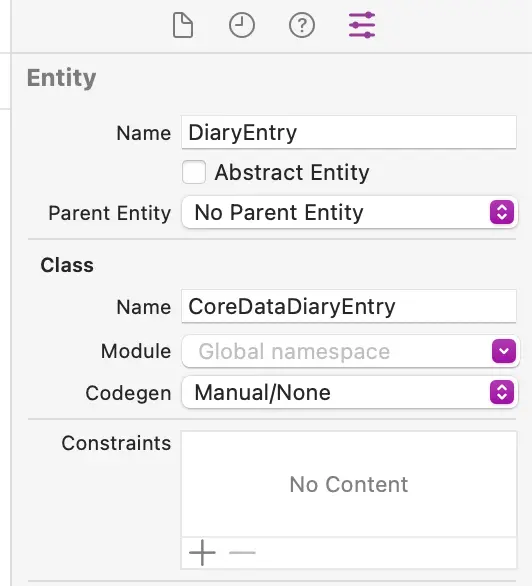
The model file defines a single entity called DiaryEntry which has three non-optional properties: title, date and body. While you might be tempted and accustomed to making use of Core Data’s automatic code generation setting, for the dual set-up to work you need to turn this off and create your own NSManagedObject subclasses.
The reason for this is that both the Swift Data and Core Data entities will need to have the same underlying name but, if you create the subclasses automatically, you will end up with two types (Core Data and Swift Data) with the same name and the compiler will complain.
I recommend changing the name of the Core Data entity to something like CoreDataDiaryEntry and keeping the actual entity name as DiaryEntry as Swift Data uses the type name for the underlying entity name and has no way of changing it that I know of.
The code for the CoreDataDiaryEntry NSManagedObject subclass is very simple:
import Foundation
import CoreData

@objc(CoreDataDiaryEntry)
public class CoreDataDiaryEntry: NSManagedObject {
    @nonobjc public class func fetchRequest() -> NSFetchRequest<CoreDataDiaryEntry> {
        return NSFetchRequest<CoreDataDiaryEntry>(entityName: "DiaryEntry")
    }

    @NSManaged public var title: String
    @NSManaged public var date: Date
    @NSManaged public var body: String
}

extension DiaryEntry : Identifiable {
}
Pro tip: If you open the
Storage.xcdatamodeldfile in Xcode, you can then automatically generate theNSManagedObjectsubclasses by going toEditor > Create NSManagedObject Subclass...and selecting theDiaryEntryentity. Note that you will then need to manually change the name.
The Core Data container
Now that we have the entity set up, we need to create a Core Data container that uses it:
import CoreData

final class CoreDataManager {
    let container: NSPersistentContainer

    init(inMemory: Bool = false) {
        let container = NSPersistentContainer(name: "Storage")

        if let description = container.persistentStoreDescriptions.first {
            // 1
            description.setOption(true as NSNumber, forKey: NSPersistentHistoryTrackingKey)
            // 2
            description.url = description.url?.deletingLastPathComponent().appending(path: "default.store")
            description.shouldMigrateStoreAutomatically = true
            description.shouldInferMappingModelAutomatically = true
        }

        container.loadPersistentStores(completionHandler: { (storeDescription, error) in
            if let error = error as NSError? {
                print("Unresolved error \(error), \(error.userInfo)")
            }
        })

        self.container = container
    }
}
While I am not going to cover how to set up a Core Data container in detail, there are a couple of very important things that you can’t miss if you want to use Swift Data and Core Data side by side:
- You need to enable persistent history tracking on the persistent store description. As stated in the WWDC session, this setting is key for changes made by Swift Data to be picked up by Core Data and vice versa and, while it is enabled by default for Swift Data, it is not for Core Data.
- You need to set the URL of the CoreData persistent store to be the same as the one used by Swift Data. This setting is only glanced over in the WWDC session and it is not clear where the path to the Swift Data store is. I did a bit of digging and, by the looks of things, Swift Data automatically creates a
default.storefile in your app’sApplication Supportfolder.
Initialising the container
Last but not least, we need to initialise the CoreData container in our app and make it available to the environment:
import SwiftUI
import SwiftData

@main
struct FoodDiariesApp: App {
    let manager = CoreDataManager()

    var body: some Scene {
        WindowGroup {
            ContentView()
                .environment(\.managedObjectContext, manager.container.viewContext)
        }
    }
}
Setting up Swift Data
Now that we have the Core Data stack set up, we can move on to setting up Swift Data. This requires a lot less effort and code than Core Data and can be done in two steps.
First, you need to define the entities as Swift models:
import Foundation
import SwiftData

@Model class DiaryEntry {
    var title: String
    var date: Date
    var body: String

    init(title: String, date: Date = .now, body: String) {
        self.title = title
        self.date = date
        self.body = body
    }
}
Pro tip: Similarly to what we did with Core Data earlier, we can also open the
Storage.xcdatamodeldfile in Xcode and automatically generate the Swift Data models by going toEditor > Create Swift Data Codeand selecting theDiaryEntryentity.
Now that we have the entity defined, we can create a ModelContainer that uses it and make it available to the environment:
import SwiftUI
import SwiftData

@main
struct FoodDiariesApp: App {
    let manager = CoreDataManager()

    var body: some Scene {
        WindowGroup {
            ContentView()
                .modelContainer(for: DiaryEntry.self)
                .environment(\.managedObjectContext, manager.container.viewContext)
        }
    }
}
That’s it! We now have both Core Data and Swift Data set up and ready to use.
Testing things out
To test that everything is working as expected, we can make a view that can create entries using both Core Data and Swift Data and keep count of how many entries each of the frameworks has in their store:
import SwiftUI
import SwiftData

struct ContentView: View {
    @FetchRequest(sortDescriptors: [SortDescriptor(\.date, order: .reverse)])
    var entries: FetchedResults<CoreDataDiaryEntry>
    @Query
    var swiftDataEntries: [DiaryEntry]

    @Environment(\.modelContext) var swiftDataContext
    @Environment(\.managedObjectContext) var coreDataContext

    var body: some View {
        VStack(spacing: 10) {
            HStack {
                VStack {
                    Text("Core data entity count")
                    Text("\(entries.count)")
                }

                VStack {
                    Text("Swift data entity count")
                    Text("\(swiftDataEntries.count)")
                }
            }
            Spacer()
            Button("New Swift Data entry", action: createSwiftDataEntry)
            Button("New Core Data entry", action: createCoreDataEntry)
        }
        .buttonStyle(.borderedProminent)
        .padding()
    }

    private func createSwiftDataEntry() {
        let entry = DiaryEntry(title: "New entry!", body: "This is a Swift Data entry")
        swiftDataContext.insert(entry)
    }

    private func createCoreDataEntry() {
        let entry = CoreDataDiaryEntry(context: coreDataContext)
        entry.date = .now
        entry.title = "New entry!"
        entry.body = "This is a CoreData entry"

        try? coreDataContext.save()
    }
}
If we run the app now and create a few entries using Core Data, we can see that the count of entities returned by both frameworks is the same:
On the other hand, if we create a few entries using Swift Data, we can see that while the count of entities returned by Swift Data is correct, the count of entities returned by Core Data is not updating.
I believe this is an issue with the @FetchRequest property wrapper which is not getting notified of changes but, if we force a refresh by restarting the app, we can see that both frameworks are returning the same amount of entities: