Image to image local Stable Diffusion pipelines with ControlNet in Swift
A native macOS app for App Store Connect that streamlines app updates and releases, making the process faster and easier.
A couple of weeks ago, I wrote an article about how to load Stable Diffusion models in Swift and generate images from text prompts.
In this article, I want to expand on that and show you a new feature I have been working on for my QReate: AI-generated QR codes.
The feature works by passing an image of a QR code to a Stable Diffusion image-to-image pipeline, which takes a prompt from the user and then changes the look of the QR code to match the prompt’s description.
Sounds easy right? Well, there’s a pretty important caveat: we need to make sure that the QR code is still readable after the transformation. To ensure this, we need to provide our pipeline with a ControlNet model which has been trained specifically to preserve the readability of QR codes. Specifically, I used Dion Timmer’s ControlNet model, which works great!
Just as an example, by the end of this article, you will know how to generate QR codes like this one:
Cool, right? Let’s get started!
Converting ControlNet models to Core ML
Let’s start by converting DionTimmer’s ControlNet model along with the Runway’s Stable Diffusion v1.5 model to CoreML using Apple’s script I showed in my previous article:
python -m python_coreml_stable_diffusion.torch2coreml \
    --bundle-resources-for-swift-cli \
    --convert-unet \
    --convert-text-encoder \
    --convert-vae-decoder \
    --convert-vae-encoder \
    --model-version runwayml/stable-diffusion-v1-5 \
    --unet-support-controlnet \
    --convert-controlnet DionTimmer/controlnet_qrcode-control_v1p_sd15 \
    -o generated
The command above looks very similar to the one I used in my previous article, but this time I’m passing a couple of extra important parameters:
--unet-support-controlnet: This tells the script to generate aUnetmodel that supportsControlNet.--convert-controlnet DionTimmer/controlnet_qrcode-control_v1p_sd15: This tells the script to convert aControlNetmodel from HuggingFace to CoreML.
The script might take some time to run but, once it finishes, it will generate a Resources folder which you can bring directly into your project.
If you’re unsure about what these files are, how to import them or want to learn about best practices when dealing with large CoreML models, make sure you check out my previous article on the topic.
Loading the models in Swift
Let’s now load these models into a StableDiffusionPipeline using Apple’s ml-stable-diffusion Swift Package:
import Foundation
import StableDiffusion
import CoreML

func generate(prompt: String, startingImageURL: URL, numberOfImages: Int) async throws -> [CGImage] {
    guard let resourcesURL = Bundle.module.url(forResource: "Resources", withExtension: nil)?.path() else {
        return []
    }
    let url = URL(fileURLWithPath: resourcesURL)
    let configuration = MLModelConfiguration()
    configuration.computeUnits = .all
    let pipeline = try StableDiffusionPipeline(resourcesAt: url,
                                               // 1
                                               controlNet: ["DiontimmerControlnetQrcodeControlV1PSd15"],
                                               configuration: configuration,
                                               disableSafety: false,
                                               reduceMemory: false)
    try pipeline.loadResources()

    // 2
    let startingNSImage = NSImage(contentsOf: startingImageURL)?.resized(to: .init(width: 512, height: 512))
    guard let startingImage = startingNSImage?.cgImage(forProposedRect: nil, context: nil, hints: nil) else {
        return []
    }

    var pipelineConfig = StableDiffusionPipeline.Configuration(prompt: prompt)
    // 3
    pipelineConfig.negativePrompt = "ugly, disfigured, low quality, blurry, nsfw"
    // 4
    pipelineConfig.controlNetInputs = [startingImage]
    pipelineConfig.startingImage = startingImage
    pipelineConfig.useDenoisedIntermediates = true
    // 5
    pipelineConfig.strength = 0.9
    pipelineConfig.seed = UInt32.random(in: (0..<UInt32.max))
    // 6
    pipelineConfig.guidanceScale = 7.5
    pipelineConfig.stepCount = 50
    pipelineConfig.originalSize = 512
    pipelineConfig.targetSize = 512
    pipelineConfig.imageCount = numberOfImages

    return try pipeline.generateImages(configuration: pipelineConfig, progressHandler: { _ in })
        .compactMap { $0 }
}
As there is a lot that I covered in my previous article and the code is fairly similar, I will only cover the new parts here:
- Pass the name of the
ControlNetmodel to use in the pipeline. The string passed here should match the name of the model in theResourcesfolder. - Load the start image from disk, resize it to the scale that the model expects and convert it to a
CGImage. If you pass an image that is too big or too small, the pipeline will throw an error. - Pass a negative prompt to the pipeline. In this case, I used the one this model on the Replicate API uses as it seems to work very well.
- Set the starting image in the pipeline configuration and also pass it as a
ControlNetinput. - Set the strength of the pipeline to a number below 1. This is important as Apple’s Stable Diffusion SDK will only set the pipeline mode to image-to-image if both the strength is below 1 and there is a starting image.
- Set the
guidanceScaleto the value that works for your use case. In this case, I used the same value that this model on the Replicate API uses and it seems to do the job well.
I want to give a massive shout-out to Dion Timmer’s effort in putting together both the model and some amazing documentation as well as Nathan Raw for coming up with the Replicate API endpoint and open-sourcing the code, they were both very helpful to find correct values to work with.
Results
Now that the pipeline is set up, let’s run a couple of prompts and check out the Results
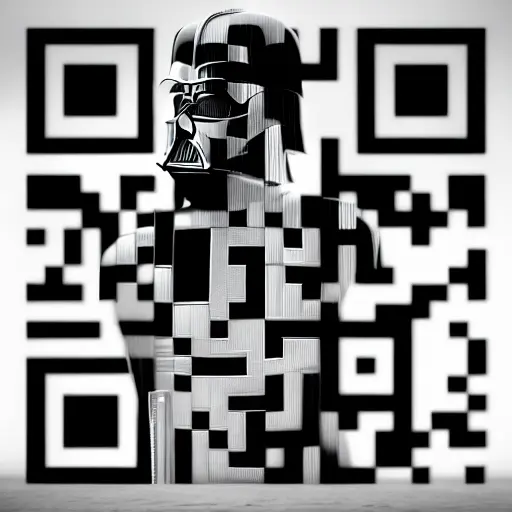
Prompt: Darth Vader from Star Wars
May the force be with you!
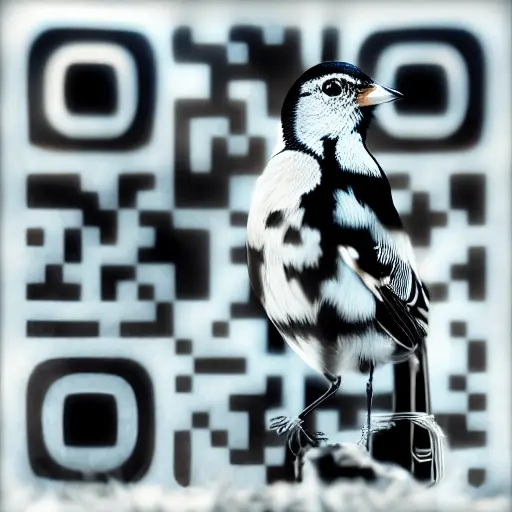
Prompt: A dark-eyed Junco
The prompt is a bit longer than that and I got it from this Reddit post. 🐦😅