Scripting in Swift: Git Hooks

A native macOS app for App Store Connect that streamlines app updates and releases, making the process faster and easier.
This week I decided to tick one of my to-do items which I have been putting off for a while at work to improve my git workflow.
To give our commits as much context as possible, we include the JIRA ticket number for the feature we are working on in the commit message. This way, if in the future someone goes back to the source code of the work we’re committing and does a git blame they’ll be able to find the ticket without having to do much digging.
Including this information for every commit can be somewhat tedious (even more if you use an approach such as TDD, where you commit very often) and, despite the fact that git clients such as Tower make this a bit easier, you still need to manually copy-paste the issue number into the commit message manually and remember to do so, which is what I struggle with the most 😅.
For this reason, I set out on a quest to learn about git hooks in an attempt to automate this task. My idea was to be able to get the JIRA ticket from the git branch (we have a set branch naming convention story/ISSUE-1234_branch-name) and then alter the commit message to prefix it with the ticket number, making the end result message: ISSUE-1234 - Some awesome commit message.
Automating commit messages with git hooks
Git Hooks provide a way of triggering custom actions when certain important git commands are run, such as running actions before a commit or push occur.
In this case, I made use of the commit-msg hook, which provides you with a way of altering the current commit message before it is applied. The hook gets invoked with a single argument, which is the path to the file containing the commit message entered by the user. This means that, in order to alter the commit message, we simply need to read from the file, modify its contents and then write back to the file the hook was invoked with.
To create a git hook, we need to provide an executable script with the name of the hook under .git/hooks. So, in my case, my hook could be found at the following path: .git/hooks/commit-msg.
Why did I use Swift?
Git hooks can be written in any language you would usually use to script with and that its interpreter, specified through a shebang, is installed in the host computer.
While there is a wide range of more popular options such as bash or ruby with plenty of examples, I decided to go for Swift as I am a lot more comfortable with it, as I use it on a daily basis, and really enjoy its strongly typed syntax and low memory footprint.
Getting set up
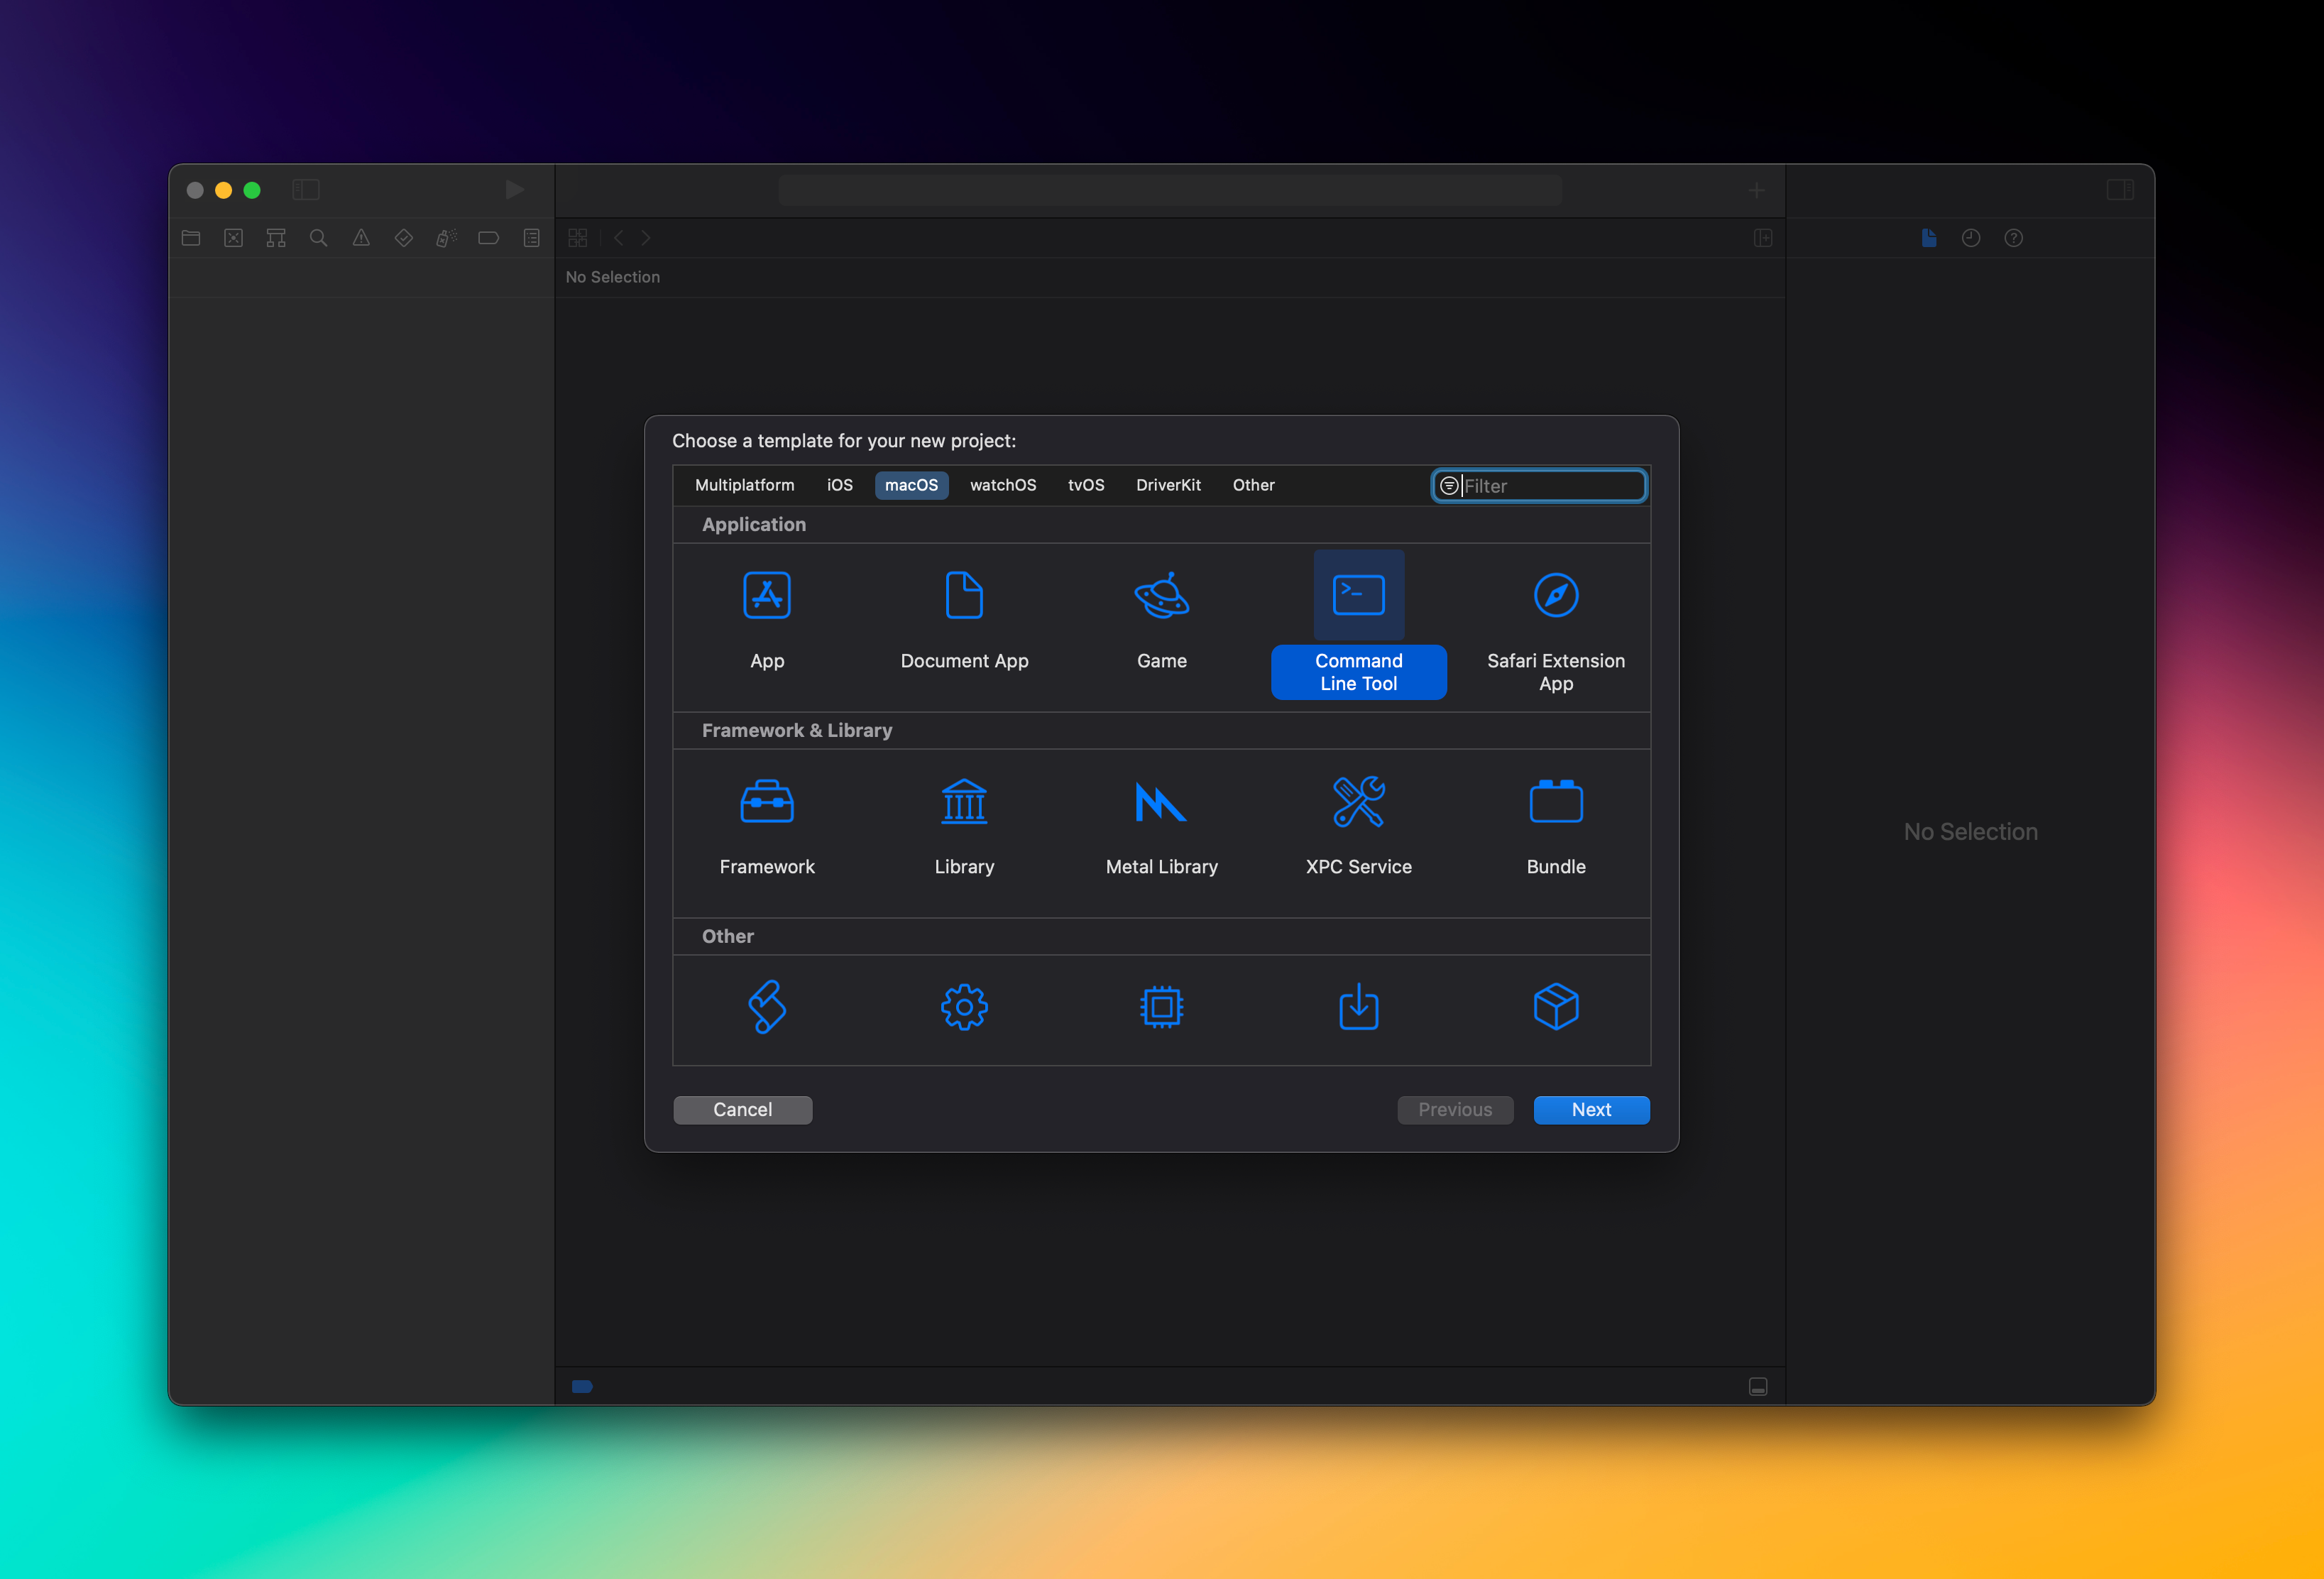
You can write a Swift script with any IDE you like but, if you want to get proper autocomplete and debugging capabilities, you can create an Xcode project for it. To do so, create a new project and, under macos, choose Command Line Tool.
At the top of the created file, add the swift shebang and import the Foundation framework:
#!/usr/bin/swift
import Foundation
This is necessary so that when git executes the file, the shebang will make sure that the /usr/bin/swift binary is invoked with the file as its input data.
Writing the git hook
The project is all set up, so the git hook can now be written. Let’s walk through all the steps.
Retrieving the commit message
The first thing to do is to retrieve the path to the temporary commit file from the script’s arguments and read its contents:
let commitMessageFile = CommandLine.arguments[1]

guard let data = FileManager.default.contents(atPath: commitMessageFile),
      let commitMessage = String(data: data, encoding: .utf8) else {
    exit(1)
}
In the snippet above, we first get the path to the commit message file (passed in to the script by git) and read its contents using the FileManager API. If, for some reason we fail to retrieve this, we exit the script with a status of 1, which will tell git to abort the commit.
Note that, according to the git hooks documentation, if any of the hook scripts exits with a code other than
0, it will abort the action that is about to take place. This will be used later on in the article to exit gracefully when no modifications need to be applied.
Retrieving the ticket number
Now that the commit message string is available, it is time to find out what the current branch is and retrieve the ticket number from it. As mentioned earlier in this article, this is only possible because of the team’s strict format on branch naming, which always contains the JIRA ticket in its name (e.g. story/ISSUE-1234_some-awesome-feature-work).
To achieve this, we must retrieve the current working branch and then apply a Regular Expression to retrieve the ticket number from it.
Let’s start by adding the ability for our script to invoke a command from the zsh shell by making use of the Process api, which will allow our script to interact with the git command line interface.
func shell(_ command: String) -> String {
    let task = Process()
    let outputPipe = Pipe()
    let errorPipe = Pipe()

    task.standardOutput = outputPipe
    task.standardError = errorPipe
    task.arguments = ["-c", command]
    task.executableURL = URL(fileURLWithPath: "/bin/zsh")

    do {
        try task.run()
        task.waitUntilExit()
    } catch {
        print("There was an error running the command: \(command)")
        print(error.localizedDescription)
        exit(1)
    }

    guard let outputData = try? outputPipe.fileHandleForReading.readToEnd(),
          let outputString = String(data: outputData, encoding: .utf8) else {
        // Print error if needed
        if let errorData = try? errorPipe.fileHandleForReading.readToEnd(),
           let errorString = String(data: errorData, encoding: .utf8) {
            print("Encountered the following error running the command:")
            print(errorString)
        }
        exit(1)
    }

    return outputString
}
Now that the shell command is implemented, it can then be used to ask git what the current branch is to then extract the ticket name from it if possible:
let gitBranchName = shell("git rev-parse --abbrev-ref HEAD")
    .trimmingCharacters(in: .newlines)

let stringRange = NSRange(location: 0, length: gitBranchName.utf16.count)

guard let regex = try? NSRegularExpression(pattern: #"(\w*-\d*)"#, options: .anchorsMatchLines),
    let match = regex.firstMatch(in: gitBranchName, range: stringRange) else {
    exit(0)
}

let range = match.range(at: 1)

let ticketNumber = (gitBranchName as NSString)
    .substring(with: range)
    .trimmingCharacters(in: .newlines)
Note how if there is no match (i.e. if the branch does not contain a JIRA issue in its name) the script exits mercifully with a status of 0, allowing the commit to go ahead without any alteration. This is to not break the workflow in branches such as main or other test/investigation ones.
Altering the commit message
In order to alter the commit message, the contents of the file that was read at the beginning of the script (containing the commit message) must be written back to that same path.
In this case, there is only one alteration that needs doing, which is prefixing the commit message with the JIRA ticket number and a (-) to separate it nicely from the rest of the commit message. It is also important to make sure that the commit message string is checked and the ticket number is only added if it’s not already there:
if !commitMessage.contains(ticketNumber) {
    do {
        try "\(ticketNumber) - \(commitMessage.trimmingCharacters(in: .newlines))"
            .write(toFile: commitMessageFile, atomically: true, encoding: .utf8)
    } catch {
        print("Could not write to file \(commitMessageFile)")
        exit(1)
    }
}
Setting up the git hook
Now that the script is ready, it is time to put it in a location where git can find it. Git hooks can be set up globally or on a per-repo basis.
My personal preference for these kind of scripts is to set them up on a per-repo basis, as that gives you more control and visibility in case something goes wrong and, should the hook start to fail, it would fail for the repos where it’s added and not globally.
To set them up, we simply need to make the file executable, rename it and copy it to the .git/hooks/ directory for the desired repo like so:
chmod +x main.swift
mv main.swift <path_to_your_repo>/.git/hooks/commit-msg
Testing the result
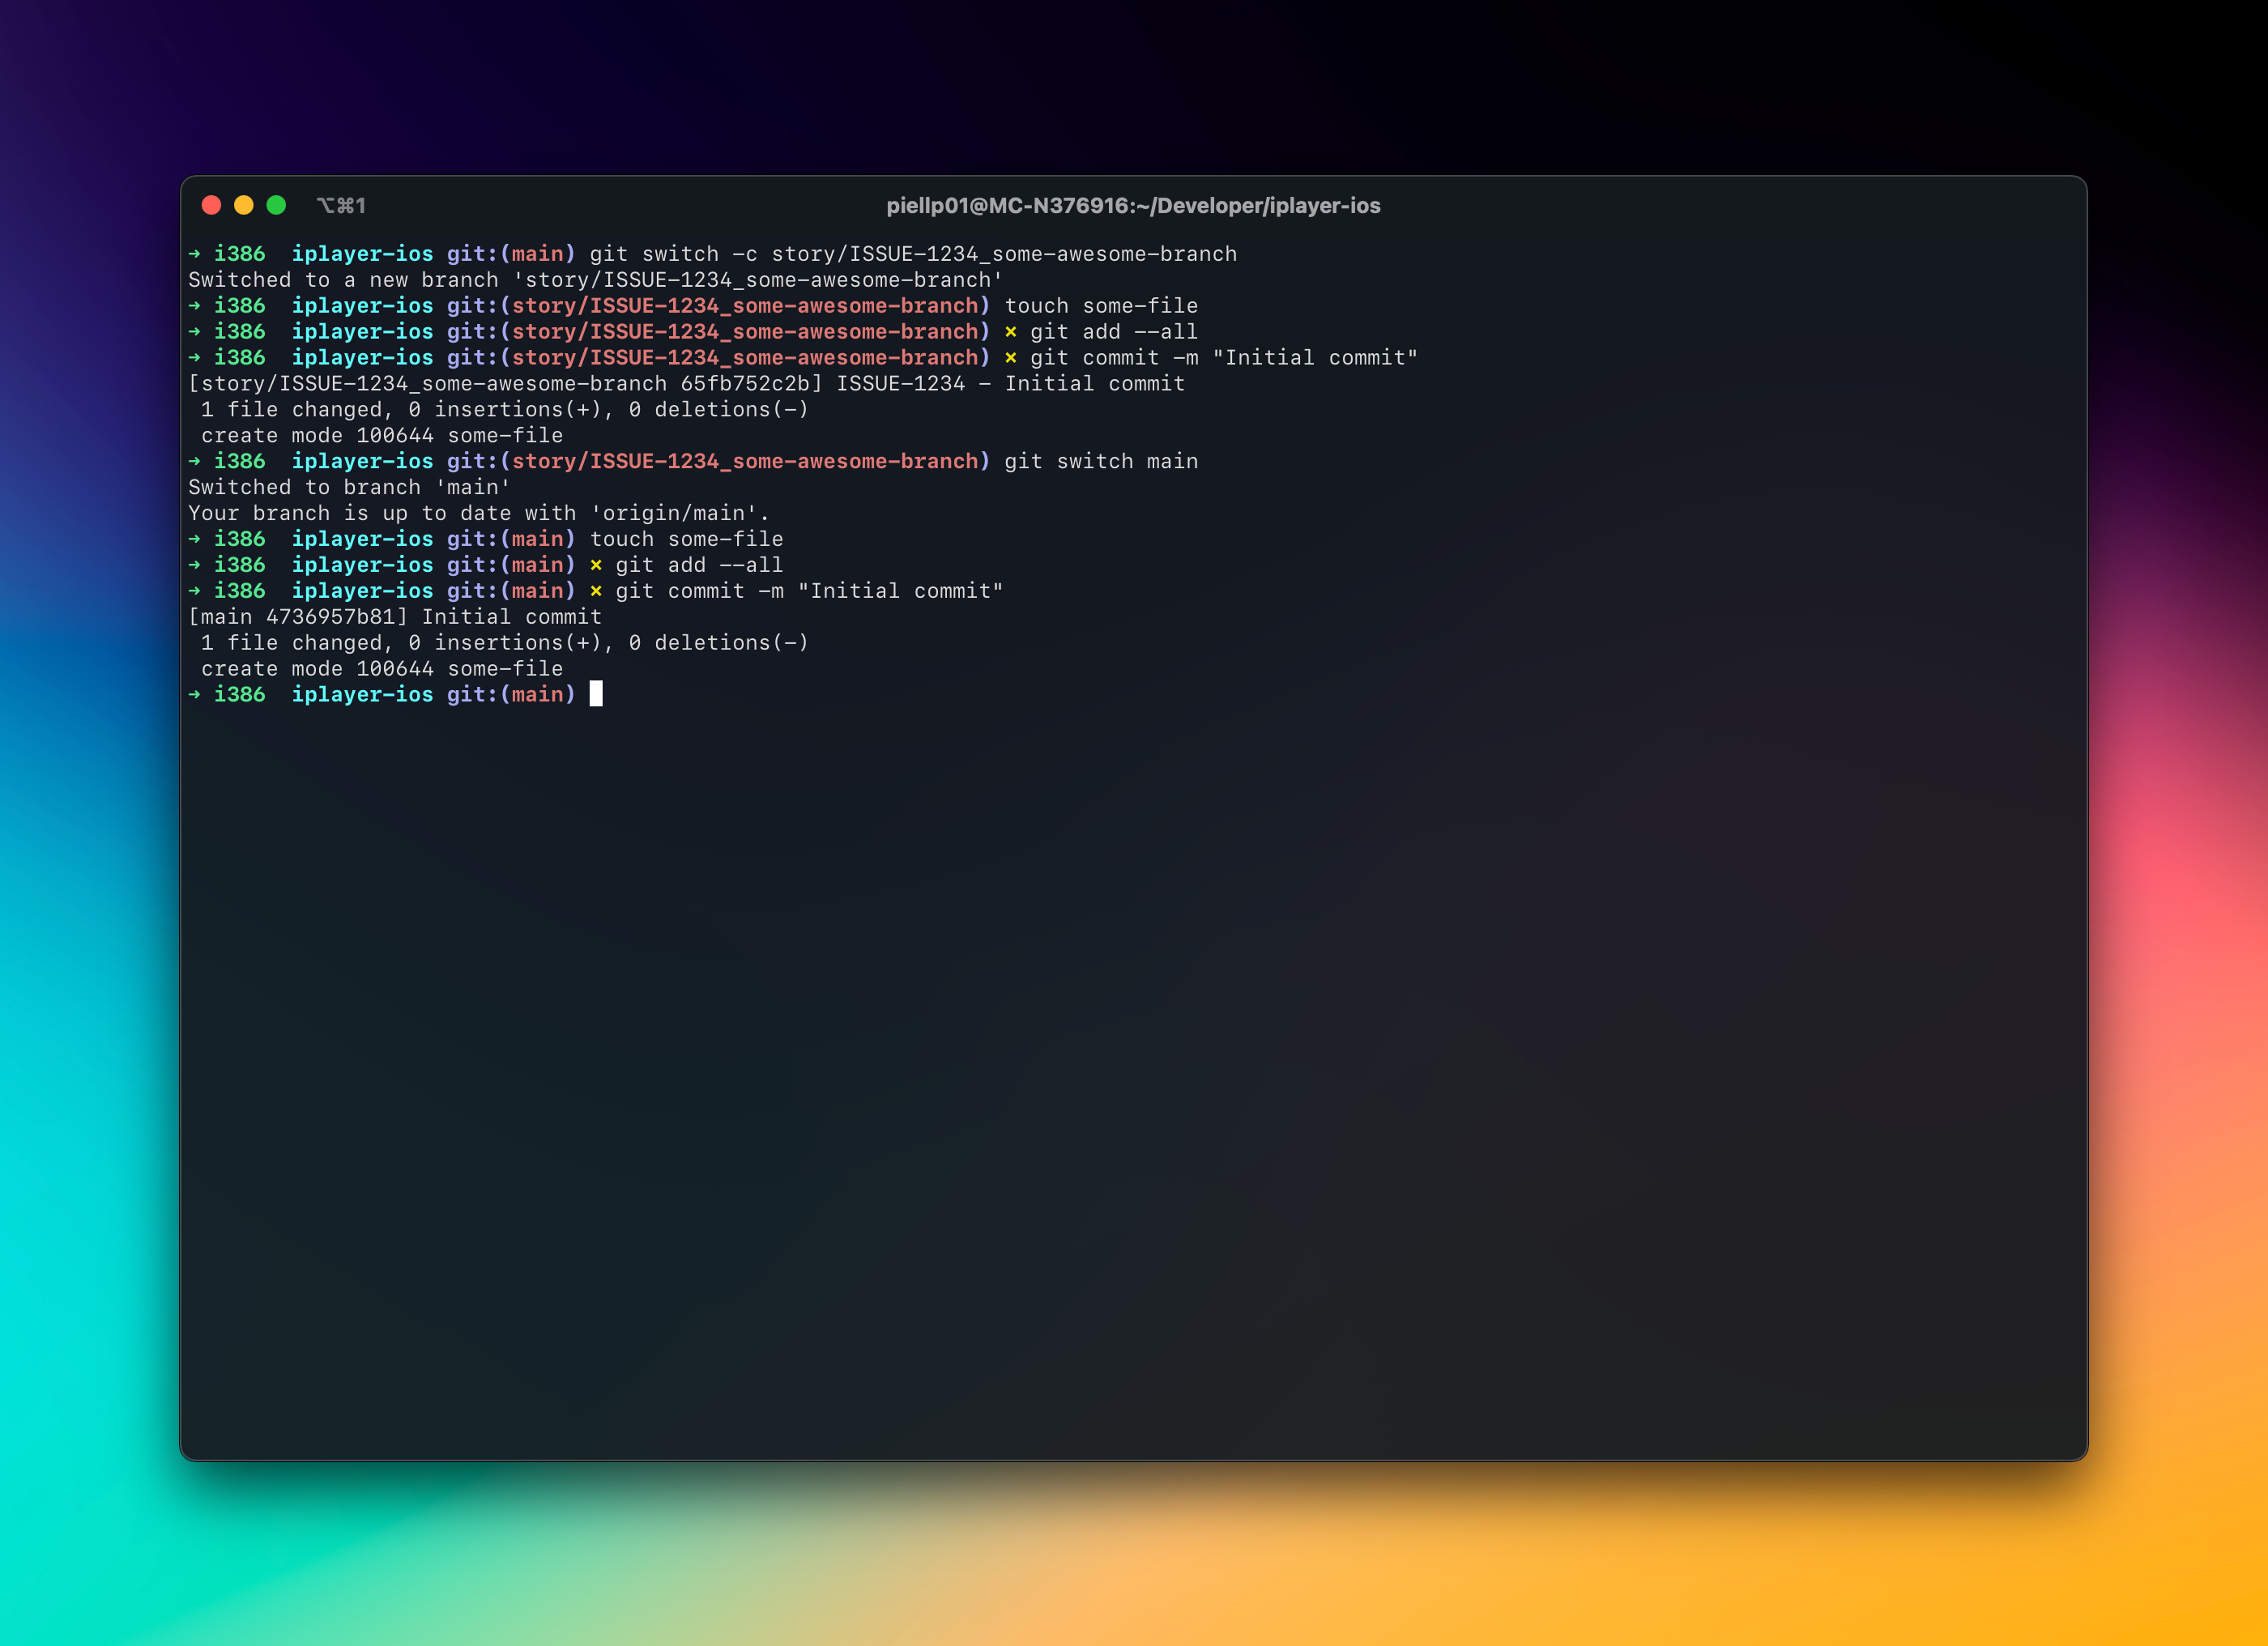
Now that the repo is all set up, all that needs doing is putting the script to the test. In the screenshot below, two branches are created, one with a ticket number in its name and one without and the same commit is applied to both. It can be seen that the script is working correctly and the commit message is being altered only when needed!