Getting started with Swift Testing

Go from confusion to confidence with a step-by-step Swift Concurrency course, helping you smoothly migrate to Swift 6 and fully leverage its features.
Swift Testing is a modern, expressive and macro-based testing library introduced by Apple during WWDC 24 as a more modern alternative to replace XCTest when writing unit tests.
I personally love this new way of writing tests and I think it will make testing in Swift much more enjoyable and expressive. In this article, I will show you how to get started with Swift Testing, how to write tests using it and how to migrate your existing XCTest tests to the new library.
Setting up Swift Testing
Using Xcode 16 or later
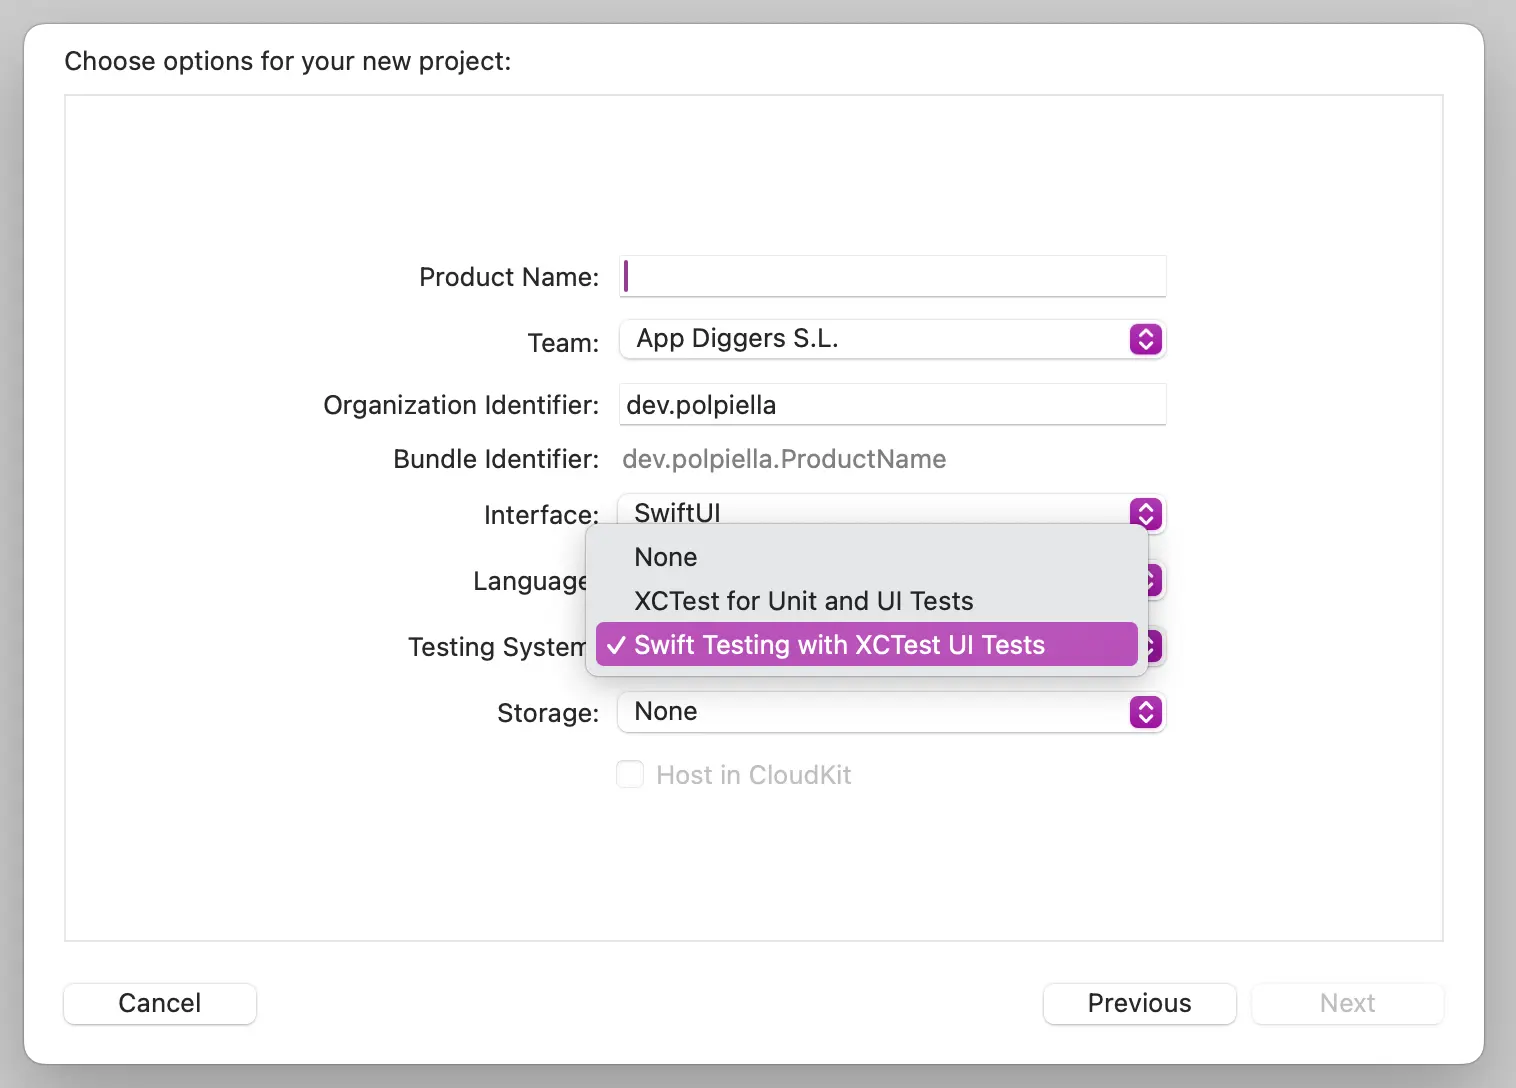
Swift Testing ships with Xcode 16 and is available to you out of the box. If you are creating a new project using this or a later version of Xcode, you can even specify during the project creation that you would like to use Swift Testing as your testing framework:
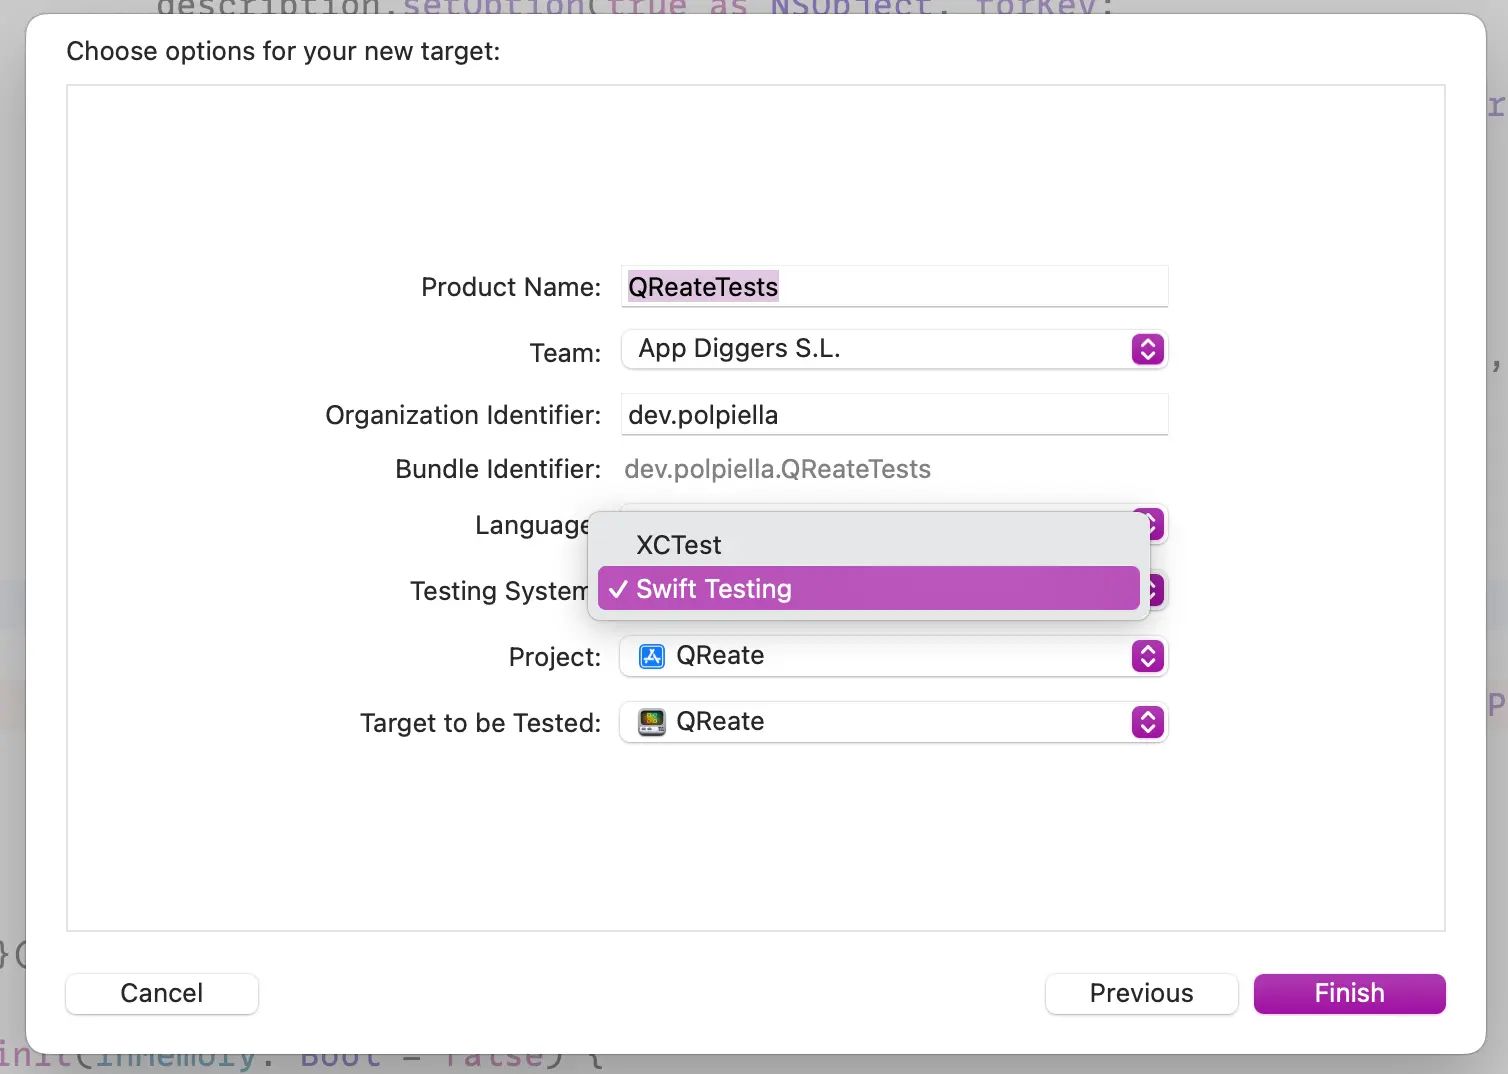
When you create a new testing bundle, the option to use Swift Testing is also available:
You can also start using a mixture of Swift Testing and XCTest unit tests in the same test bundle without any extra dependencies or setup.
Using SPM
Swift Testing is also available out of the box when you use the Swift 6 toolchain and set the tools-version to 6.0. There is a small catch that you need to be aware of when using the Swift Package Manager though.
If you don’t list Swift Testing as an explicit dependency in your Package.swift file, you will need to pass a flag to your swift test command to be able to run tests written with the new library:
swift test --enable-experimental-swift-testingBefore Xcode 16 or on other platforms
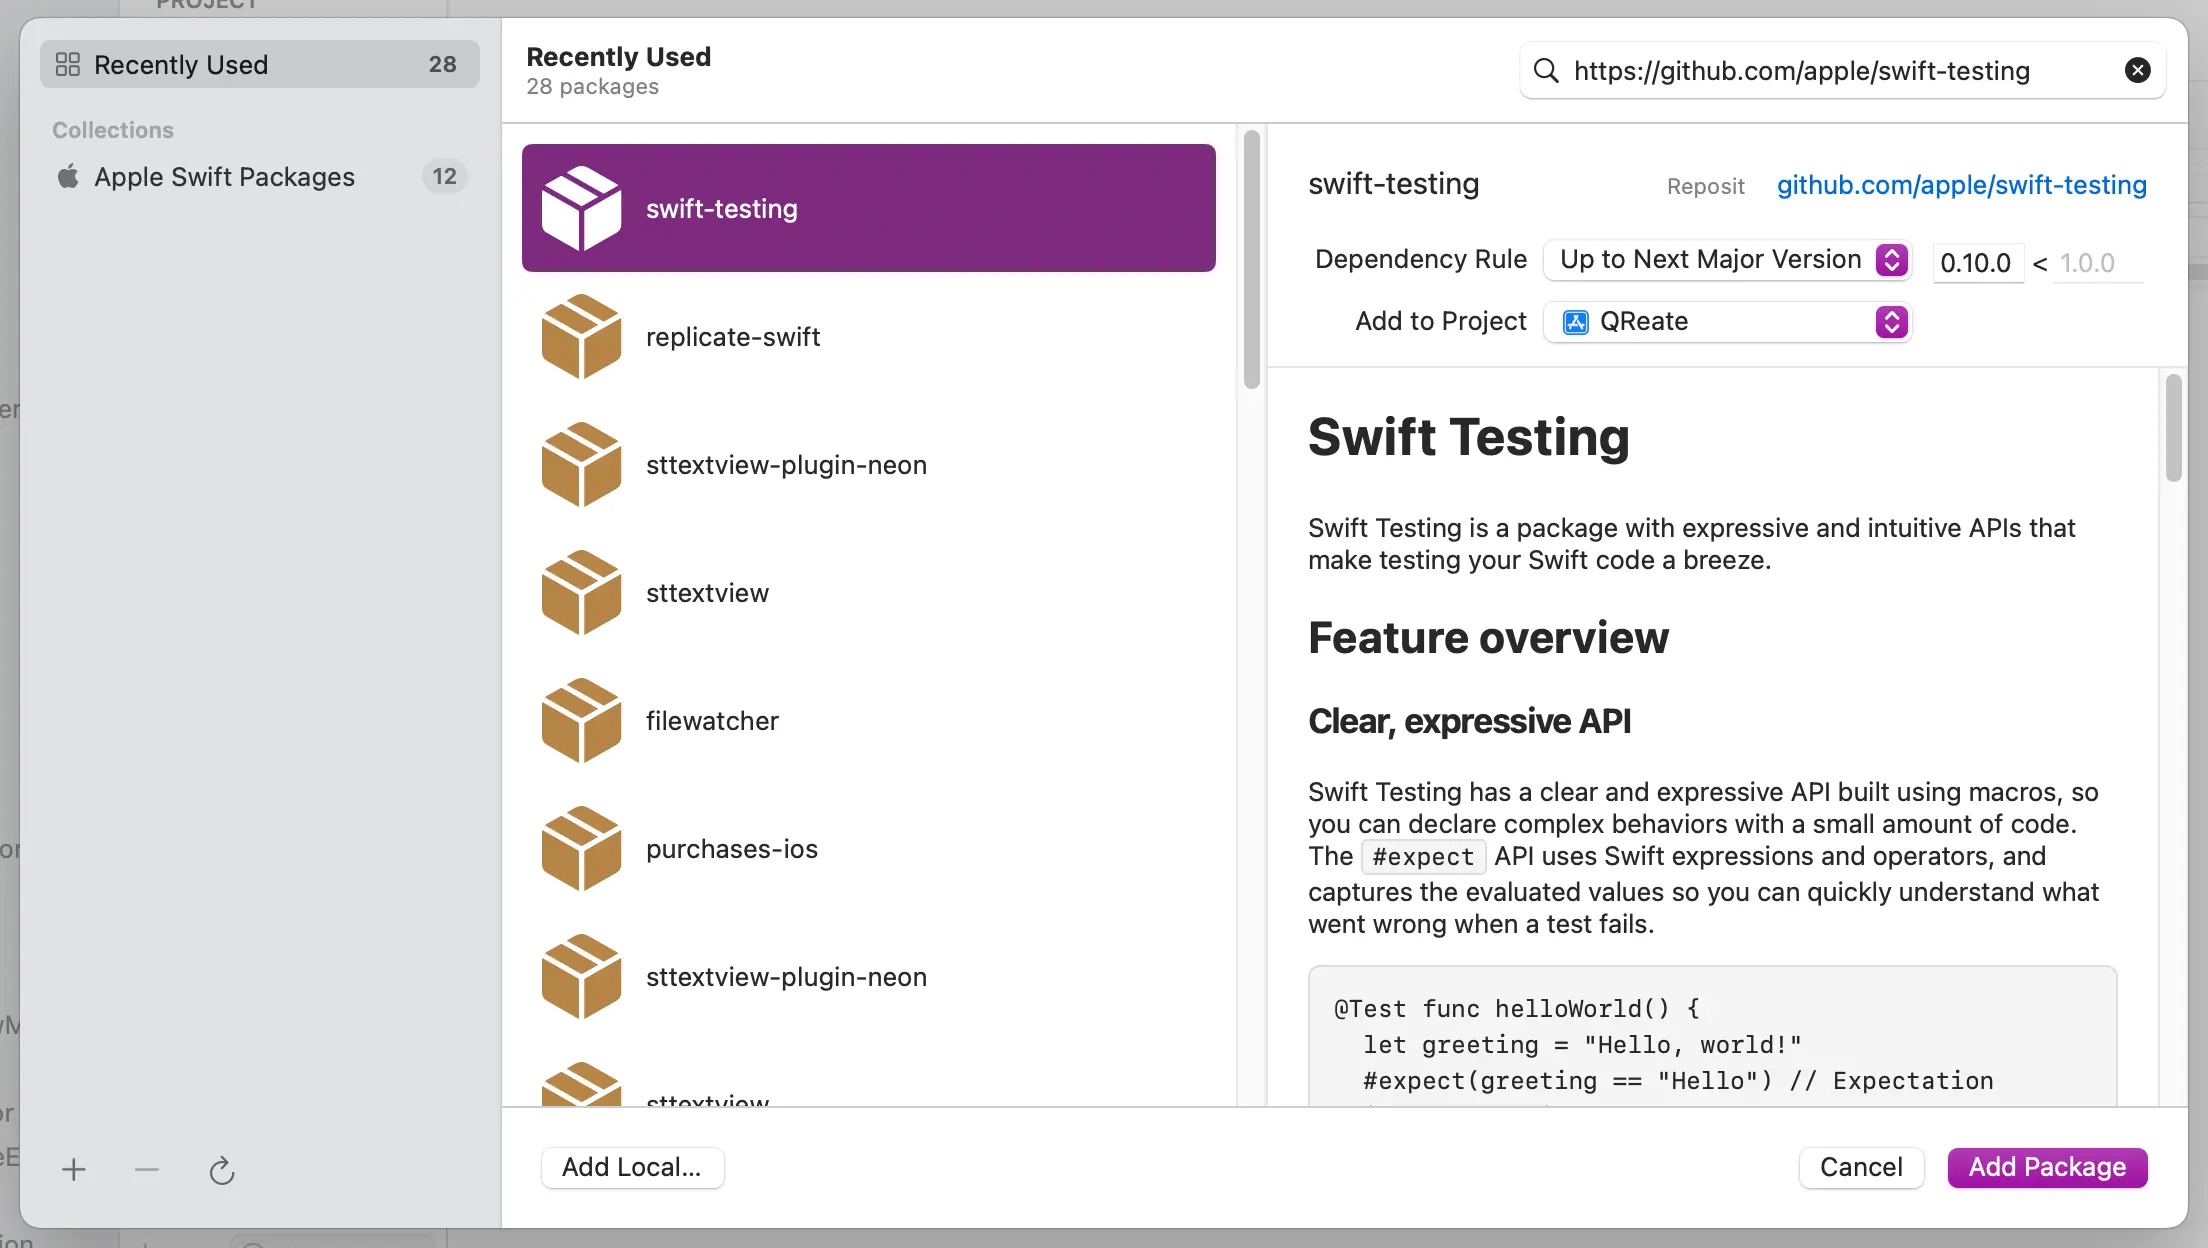
If you are not quite ready to migrate your projects to Xcode 16 yet or the 6.0 swift-tools version of SPM, as Swift Testing is open-source and distributed as a Swift Package, you can depend on it directly:
Note that you will need to use a Swift 6 toolchain to use Swift Testing on your projects. There is a workaround for Swift 5.10, but it will be removed at some point, so I don’t recommend using it.
The XCTests to migrate
Let’s consider we have the following code in our application that parses a string using a regular expression and returns a Swift type:
import Foundation

struct WifiNetwork {
    let ssid: String
    let password: String
    let security: String?
    let hidden: String?
}

protocol ErrorMonitoring {
    func monitor(_ error: Error)
}

struct WifiParser {
    enum Error: Swift.Error {
        case noMatches
    }

    private let monitoring: ErrorMonitoring

    init(monitoring: ErrorMonitoring) {
        self.monitoring = monitoring
    }

    func parse(wifi: String) throws -> WifiNetwork {
        let regex = /WIFI:S:(?<ssid>[^;]+);(?:T:(?<security>[^;]*);)?P:(?<password>[^;]+);(?:H:(?<hidden>[^;]*);)?;/

        guard let result = try? regex.wholeMatch(in: wifi) else {
            let error = Error.noMatches
            monitoring.monitor(error)
            throw error
        }

        return WifiNetwork(
            ssid: String(result.ssid),
            password: String(result.password),
            security: result.security.map(String.init),
            hidden: result.hidden.map(String.init)
        )
    }
}
To ensure that this code works as expected, we wrote some tests using XCTest:
import XCTest

final class WifiParserTests: XCTestCase {
    var sut: WifiParser!
    var errorMonitoring: SpyErrorMonitoring!

    override func setUp() {
        errorMonitoring = SpyErrorMonitoring()
        sut = WifiParser(monitoring: errorMonitoring)
    }

    func testWhenParseIsCalledWithAllFieldsThenNetworkIsInitialisedCorrectly() throws {
        let wifi = "WIFI:S:superwificonnection;T:WPA;P:strongpassword;H:YES;;"

        let network = try sut.parse(wifi: wifi)

        XCTAssertEqual(network.security, "WPA")
        XCTAssertEqual(network.hidden, "YES")
        XCTAssertEqual(network.ssid, "superwificonnection")
        XCTAssertEqual(network.password, "strongpassword")
    }

    func testWhenParseIsCalledWithEmptyStringThenNoMatchesErrorIsThrownAndMonitoringEventIsSent() {
        XCTAssertThrowsError(try sut.parse(wifi: "")) { error in
            XCTAssertEqual(error as? WifiParser.Error, .noMatches)
        }

        XCTAssertEqual(errorMonitoring.capturedErrors.compactMap { $0 as? WifiParser.Error }, [.noMatches])
    }

    func testWhenParseIsCalledWithPasswordAndNoNameFieldsStringThenNoMatchesErrorIsThrownAndMonitoringEventIsSent() {
        XCTAssertThrowsError(try sut.parse(wifi: "WIFI:T:WPA;P:strongpassword;H:YES;;")) { error in
            XCTAssertEqual(error as? WifiParser.Error, .noMatches)
        }

        XCTAssertEqual(errorMonitoring.capturedErrors.compactMap { $0 as? WifiParser.Error }, [.noMatches])
    }

    func testWhenParseIsCalledWithNameAndNoPasswordFieldsStringThenNoMatchesErrorIsThrownAndMonitoringEventIsSent() {
        XCTAssertThrowsError(try sut.parse(wifi: "WIFI:S:superwificonnection;T:WPA;H:YES;;")) { error in
            XCTAssertEqual(error as? WifiParser.Error, .noMatches)
        }

        XCTAssertEqual(errorMonitoring.capturedErrors.compactMap { $0 as? WifiParser.Error }, [.noMatches])
    }

    func testWhenParseIsCalledWithNoPasswordOrNameFieldsStringThenNoMatchesErrorIsThrownAndMonitoringEventIsSent() {
        XCTAssertThrowsError(try sut.parse(wifi: "WIFI:T:WPA;H:YES;;")) { error in
            XCTAssertEqual(error as? WifiParser.Error, .noMatches)
        }

        XCTAssertEqual(errorMonitoring.capturedErrors.compactMap { $0 as? WifiParser.Error }, [.noMatches])
    }

    func testwhenParseIsCalledWithStringContainingOnlyRequiredFieldsThenCorrectValuesAreReturned() throws {
        let wifi = "WIFI:S:superwificonnection;P:strongpassword;;"

        let network = try sut.parse(wifi: wifi)

        XCTAssertNil(network.hidden)
        XCTAssertNil(network.security)
        XCTAssertEqual(network.ssid, "superwificonnection")
        XCTAssertEqual(network.password, "strongpassword")
    }
}
The tests above make sure that:
- The parser can parse a valid WIFI string with all fields present.
- The parser throws an error when the WIFI string is invalid. Several tests check for different cases where an error should be thrown.
- The parser can parse a valid WIFI string with only the required fields present.
From XCTest to Swift Testing
Let’s now see how you can rewrite these tests in Swift Testing and how it compares to XCTest. To be able to write tests using Swift Testing, you need to import the Testing module:
import TestingDefining tests
Something that has changed compared to XCTest is how you define unit tests. You no longer need to prefix your functions with test and you can now instead attach the @Test function to any function that you want to be a test:
@Test
func whenParseIsCalledWithAllFields_thenNetworkIsInitialisedCorrectly() {
    // ...
}

@Test
func whenParseIsCalledWithEmptyString_thenNoMatchesErrorIsThrown_andMonitoringEventIsSent() {
    // ...
}

// ...
Suites: Organise your tests
In this new approach to testing, you have a lot more freedom in how you organize your tests. You can either declare them all as global functions or encapsulate them by purpose under either a struct, an actor or a final class.
These types are called Suites in Swift Testing. A type can be marked as a suite in one of two ways:
- Explicitly by decorating the type with the
Suitemacro. Doing so treats all methods in the type as tests and removes the need to add the@Testmacro to each case:
@Suite
struct WifiParserTests {
    func whenParseIsCalledWithAllFields_ThenNetworkIsInitialisedCorrectly() {
        // ...
    }
    // ...
}
I have not been able to get Xcode to show the tests with this approach. I have only been able to see the tests when explicitly setting the
@Testmacro on each test. I have opened a feedback to let Apple know about this.
- Implicitly by NOT decorating the type with the
Suitemacro and adding the@Testmacro to each test:
struct WifiParserTests {
    @Test
    func whenParseIsCalledWithAllFields_ThenNetworkIsInitialisedCorrectly() {
        // ...
    }
    // ...
}
Traits
Traits are a way to customize your Swift Testing tests. They can be used to add metadata such as tags or names to tests and to determine how and when they run.
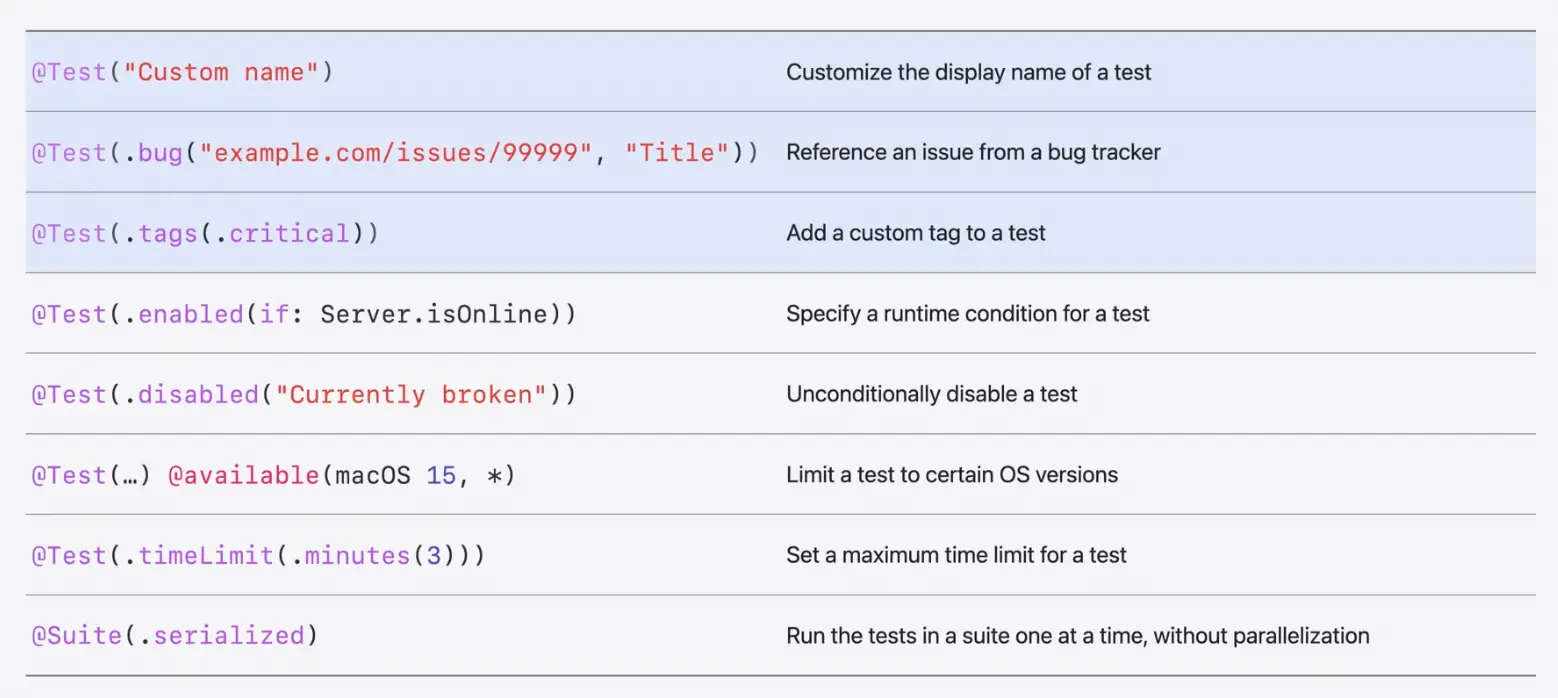
As shown in the Meet Swift Testing WWDC24 session, there are several built-in traits that you can use to customize your tests and that I will be going through one by one in the following sections:
Custom names
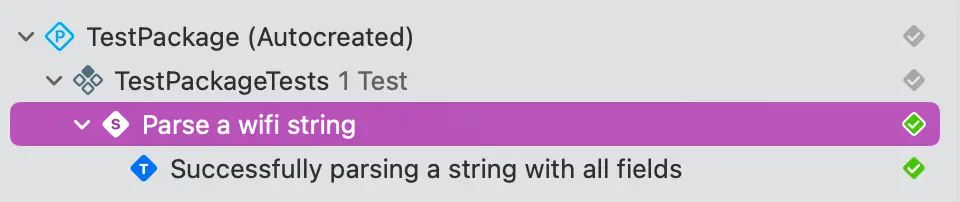
You can override the way that tests and suites are named and shown in the test navigator or test reports by passing a string to their respective macros:
@Suite("Parse a wifi string")
struct WifiParserTests {
    @Test("Successfully parsing a string with all fields")
    func whenParseIsCalledWithAllFields_ThenNetworkIsInitialisedCorrectly() {
        // ...
    }
    // ...
}
Next time you look at your tests in the test navigator, you will see the custom names you have set:
Test parallelization
Suites run tests in parallel by default in contrast to XCTestCases, which run tests serially. While running tests in parallel is the way to go, you might face some errors due to shared state between tests on some legacy codebases. If you need to run tests serially, you can pass the the .serialized tag to the @Suite macro:
@Suite(.serialized)
struct WifiParserTests {
    func whenParseIsCalledWithAllFields_ThenNetworkIsInitialisedCorrectly() {
        // ...
    }
    // ...
}
OS requirements
Let’s say that you have multiple implementations of your code that are only available on specific platforms or OS versions.
For example, as the implementation of the WifiParser is using the new iOS 16+ BareSlashRegexLiterals feature, it is marked as available only on iOS 16 or later.:
@available(iOS 16.0, *)
struct WifiParser {
    enum Error: Swift.Error {
        case noMatches
    }

    private let monitoring: ErrorMonitoring

    init(monitoring: ErrorMonitoring) {
        self.monitoring = monitoring
    }

    func parse(wifi: String) throws -> WifiNetwork {
        let regex = /WIFI:S:(?<ssid>[^;]+);(?:T:(?<security>[^;]*);)?P:(?<password>[^;]+);(?:H:(?<hidden>[^;]*);)?;/

        guard let result = try? regex.wholeMatch(in: wifi) else {
            let error = Error.noMatches
            monitoring.monitor(error)
            throw error
        }

        return WifiNetwork(
            ssid: String(result.ssid),
            password: String(result.password),
            security: result.security.map(String.init),
            hidden: result.hidden.map(String.init)
        )
    }
}
Similarly to what you would do with your production code, you can mark your tests with the same OS requirements:
@Test
@available(iOS 16.0, *)
func whenParseIsCalledWithAllFields_ThenNetworkIsInitialisedCorrectly() {
    let errorMonitoring = SpyErrorMonitoring()
    let sut = WifiParser(monitoring: errorMonitoring)
}
The same applies to Suites:
@Suite
@available(iOS 16.0, *)
struct WifiParserTests {
    func whenParseIsCalledWithAllFields_ThenNetworkIsInitialisedCorrectly() {
        let errorMonitoring = SpyErrorMonitoring()
        let sut = WifiParser(monitoring: errorMonitoring)
    }
}
Categorizing tests with tags
One exciting feature that Swift Testing brings to the table is the concept of tags. Tags are a kind of trait that you can use to categorize your tests and run them selectively.
The first thing you need to do to start categorizing your tests is to define a tag:
import Testing

extension Tag {
    @Tag static var parsing: Self
    @Tag static var errorReporting: Self
}
Once the tag is defined, you can apply it to the tests you want to categorize:
@Test(.tags(.parsing))
func whenParseIsCalledWithAllFields_thenNetworkIsInitialisedCorrectly() {
// ...
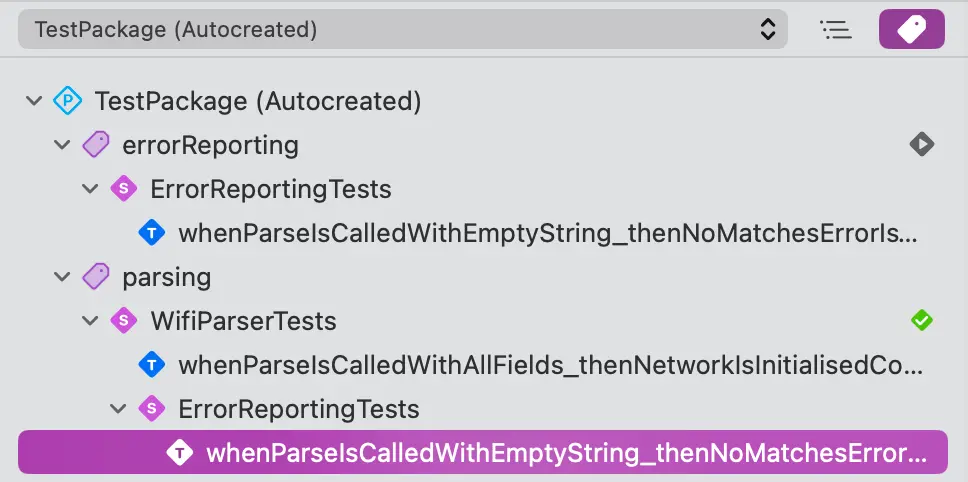
}If a tag is applied to a suite, all tests within that suite will inherit the tag. You can even nest suites and have the tags propagate down the hierarchy for more precise categorization:
@Suite(.tags(.parsing))
struct WifiParserTests {
    @Test
    func whenParseIsCalledWithAllFields_thenNetworkIsInitialisedCorrectly() {
        // ...
    }

    @Suite(.tags(.errorReporting))
    struct ErrorReportingTests {
        @Test
        func whenParseIsCalledWithEmptyString_thenNoMatchesErrorIsThrown_andMonitoringEventIsSent() {
            // ...
        }
    }
}
Now, when examining the test navigation again, you will be able to filter tests by tags:
Enabling/disabling tests
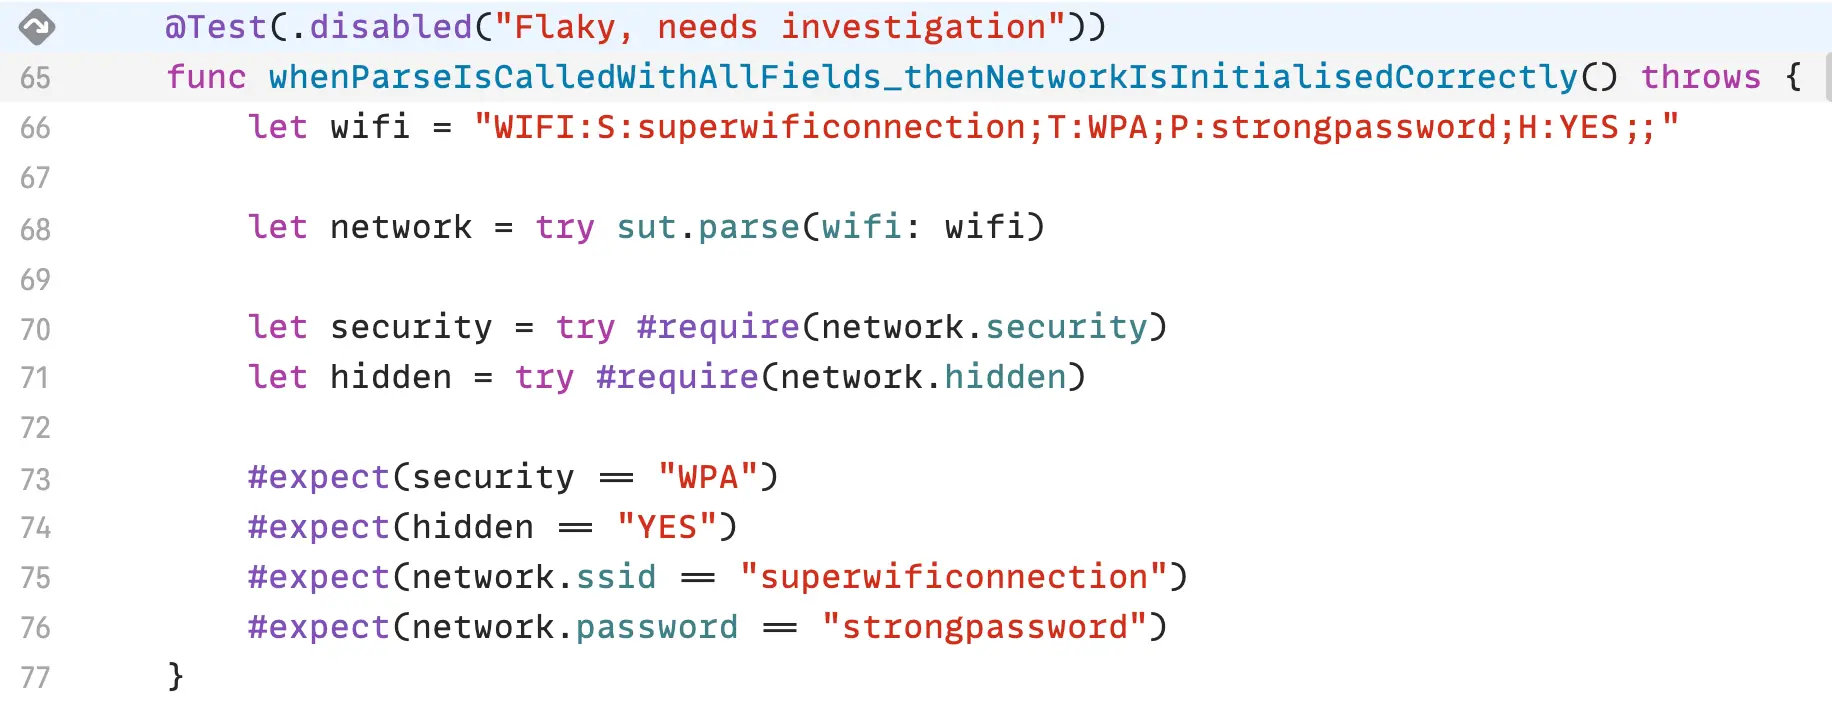
There are times when your tests start failing due to flakiness or due to an issue that you’re not quite ready to fix yet. In these cases, you can disable the test by adding the .disabled tag to the test:
@Test(.disabled("Flaky, needs investigation before reenabling"))
func whenParseIsCalledWithAllFields_thenNetworkIsInitialisedCorrectly() {
    // ...
}
The tests or suites that are disabled will still show up in the test navigator, but they will be greyed out. Whenever you run your tests, the disabled tests will be skipped and a nice indicator will show on the test diamond for such tests:
You can even pair the .disabled tag with the .bug trait to link the test to a bug-tracking software issue:
@Test(.disabled("Flaky, needs investigation"), .bug("https://linear.app/project/issue/TEST-431/flaky-test"))
func whenParseIsCalledWithAllFields_thenNetworkIsInitialisedCorrectly() {
    // ...
}
The
.bugtrait is not exclusive to the.disabledtag. You can use it in any test or suite to link the test to a bug-tracking software issue.
There is another alternative to the .disabled trait that I prefer for skipping known failures or tests that are not quite ready to integrate into your suite. You can use the withKnownIssue method to skip failures in unit tests:
@Test
func whenParseIsCalledWithAllFields_thenNetworkIsInitialisedCorrectly() {
    withKnownIssue {
        #expect(false)
    }
}
The great thing about withKnownIssue is that it will run the test and record the expected failure as part of the run. If the test starts passing, it will be flagged and reported as a failure so that you can get rid of the withKnownIssue block:

You can also enable tests based on specific conditions. For example, you could define a configuration that enables tests only when a specific environment variable is set:
@Test(.enabled(when: Config.isCIRun))
func whenParseIsCalledWithAllFields_thenNetworkIsInitialisedCorrectly() {
    // ...
}
Timeouts
A common issue with unit tests is that they can run indefinitely if there is an issue with the code or the test itself. To prevent this from happening, Swift Testing allows you to set a timeout for your tests using the .timeout trait:
@Test(.timeLimit(.minutes(3)))
@available(macOS 13.0, iOS 16.0, tvOS 16.0, watchOS 9.0, *)
func whenParseIsCalledWithAllFields_thenNetworkIsInitialisedCorrectly() {
    // ...
}
The timeLimit trait is constrained to a specific OS version for all platforms and only allows you to specify a time out in minutes as the seconds API is deprecated:

Migrating tests and assertions
The best way to learn about how to write assertions in Swift Testing is by migrating code from an existing XCTestCase. Over the next sections, I will show you how to migrate the tests from the WifiParserTests XCTestCase to a new Swift Testing Suite.
Migrating the setup code
The first thing we need to do is to migrate the setup code from the setUp method of the XCTestCase:
import Testing

extension Tag {
    @Tag static var parsing: Self
}

@Suite(.tags(.parsing))
struct WifiParserTests {
    let sut: WifiParser
    let errorMonitoring: SpyErrorMonitoring

    init() {
        errorMonitoring = SpyErrorMonitoring()
        sut = WifiParser(monitoring: errorMonitoring)
    }
}
As you can see above, the code is much more expressive and straightforward than in XCTest. As the suite is created before every single test, there is no shared state between tests and the fact that we’re using an initializer to set up the suite removes the need for mutable variables and implicitly unwrapped optionals.
The
deinitof the struct or class is Swift Testing the equivalent of theteardownmethod in XCTest.
Asserting valid decoding
Migrating the ‘happy path’ tests is straightforward once the setup is done. The only thing that really needs to be done is to decorate the tests with the @Test macro and replace the XCTAssert* calls with the #expect macro:
import Testing

@Suite(.tags(.parsing))
struct WifiParserTests {
    let sut: WifiParser
    let errorMonitoring: SpyErrorMonitoring

    init() {
        errorMonitoring = SpyErrorMonitoring()
        sut = WifiParser(monitoring: errorMonitoring)
    }

    @Test
    func whenParseIsCalledWithAllFields_thenNetworkIsInitialisedCorrectly() throws {
        let wifi = "WIFI:S:superwificonnection;T:WPA;P:strongpassword;H:YES;;"

        let network = try sut.parse(wifi: wifi)

        let security = try #require(network.security)
        let hidden = try #require(network.hidden)

        #expect(security == "WPA")
        #expect(hidden == "YES")
        #expect(network.ssid == "superwificonnection")
        #expect(network.password == "strongpassword")
    }

    @Test
    func whenParseIsCalledWithStringContainingOnlyRequiredFields_thenCorrectValuesAreReturned() throws {
        let wifi = "WIFI:S:superwificonnection;P:strongpassword;;"

        let network = try sut.parse(wifi: wifi)

        #expect(network.hidden == nil)
        #expect(network.security == nil)
        #expect(network.ssid == "superwificonnection")
        #expect(network.password == "strongpassword")
    }
}
There is an extra change above that I would like to point out. To unwrap the optional properties of the output of the parse method, I used the #require macro. This macro is similar to the try XCTUnwrap method in XCTest and returns an unwrapped version of the optional value you pass in if it can.
Asserting errors
The code I showed earlier in the article to test all possible error cases in the parser was quite verbose and had a lot of duplicated logic in it. With Swift testing, we can make use of parameterized tests to reduce the amount of code we need to write and share logic:
import Testing

@Suite(.tags(.parsing))
struct WifiParserTests {
    // ...

    // 1
    @Test(.tags(.errorReporting), arguments: [
        "",
        "WIFI:T:WPA;P:strongpassword;H:YES;;",
        "WIFI:S:superwificonnection;T:WPA;H:YES;;",
        "WIFI:T:WPA;H:YES;;",
    ]) func whenParseIsCalledWithAStringThatCanNotBeDecoded_thenNoMatchesErrorIsThrown_andMonitoringEventIsSent(input: String) throws {
        // 2
        #expect(throws: WifiParser.Error.noMatches) { try sut.parse(wifi: "") }
        // 3
        #expect(errorMonitoring.capturedErrors.compactMap { $0 as? WifiParser.Error } == [.noMatches])
    }
}
Let’s break down the contents of the test above to understand what is happening:
- The test is decorated with the
@Testmacro and the.tags(.errorReporting)tag to categorize it as an error-reporting test along with the parsing tag inherited from the Suite. An input parameter is passed to the test to allow for parameterized testing and a set of input values to be tested are passed in theargumentsparameter of the@Testmacro. The test will be executed once for each value in the arguments array, each time with the input parameter set to the value of the array for that specific iteration. - The
#expectmacro is used to assert that theparsemethod throws an error of typeWifiParser.Error.noMatcheswhen called with the input string. - The
#expectmacro is used to assert that thecapturedErrorsproperty of theerrorMonitoringobject contains an array with a single element of typeWifiParser.Error.noMatches.
Output
Whenever you run the tests, you will see a much more expressive and easy-to-parse at-first-glance output in the console:
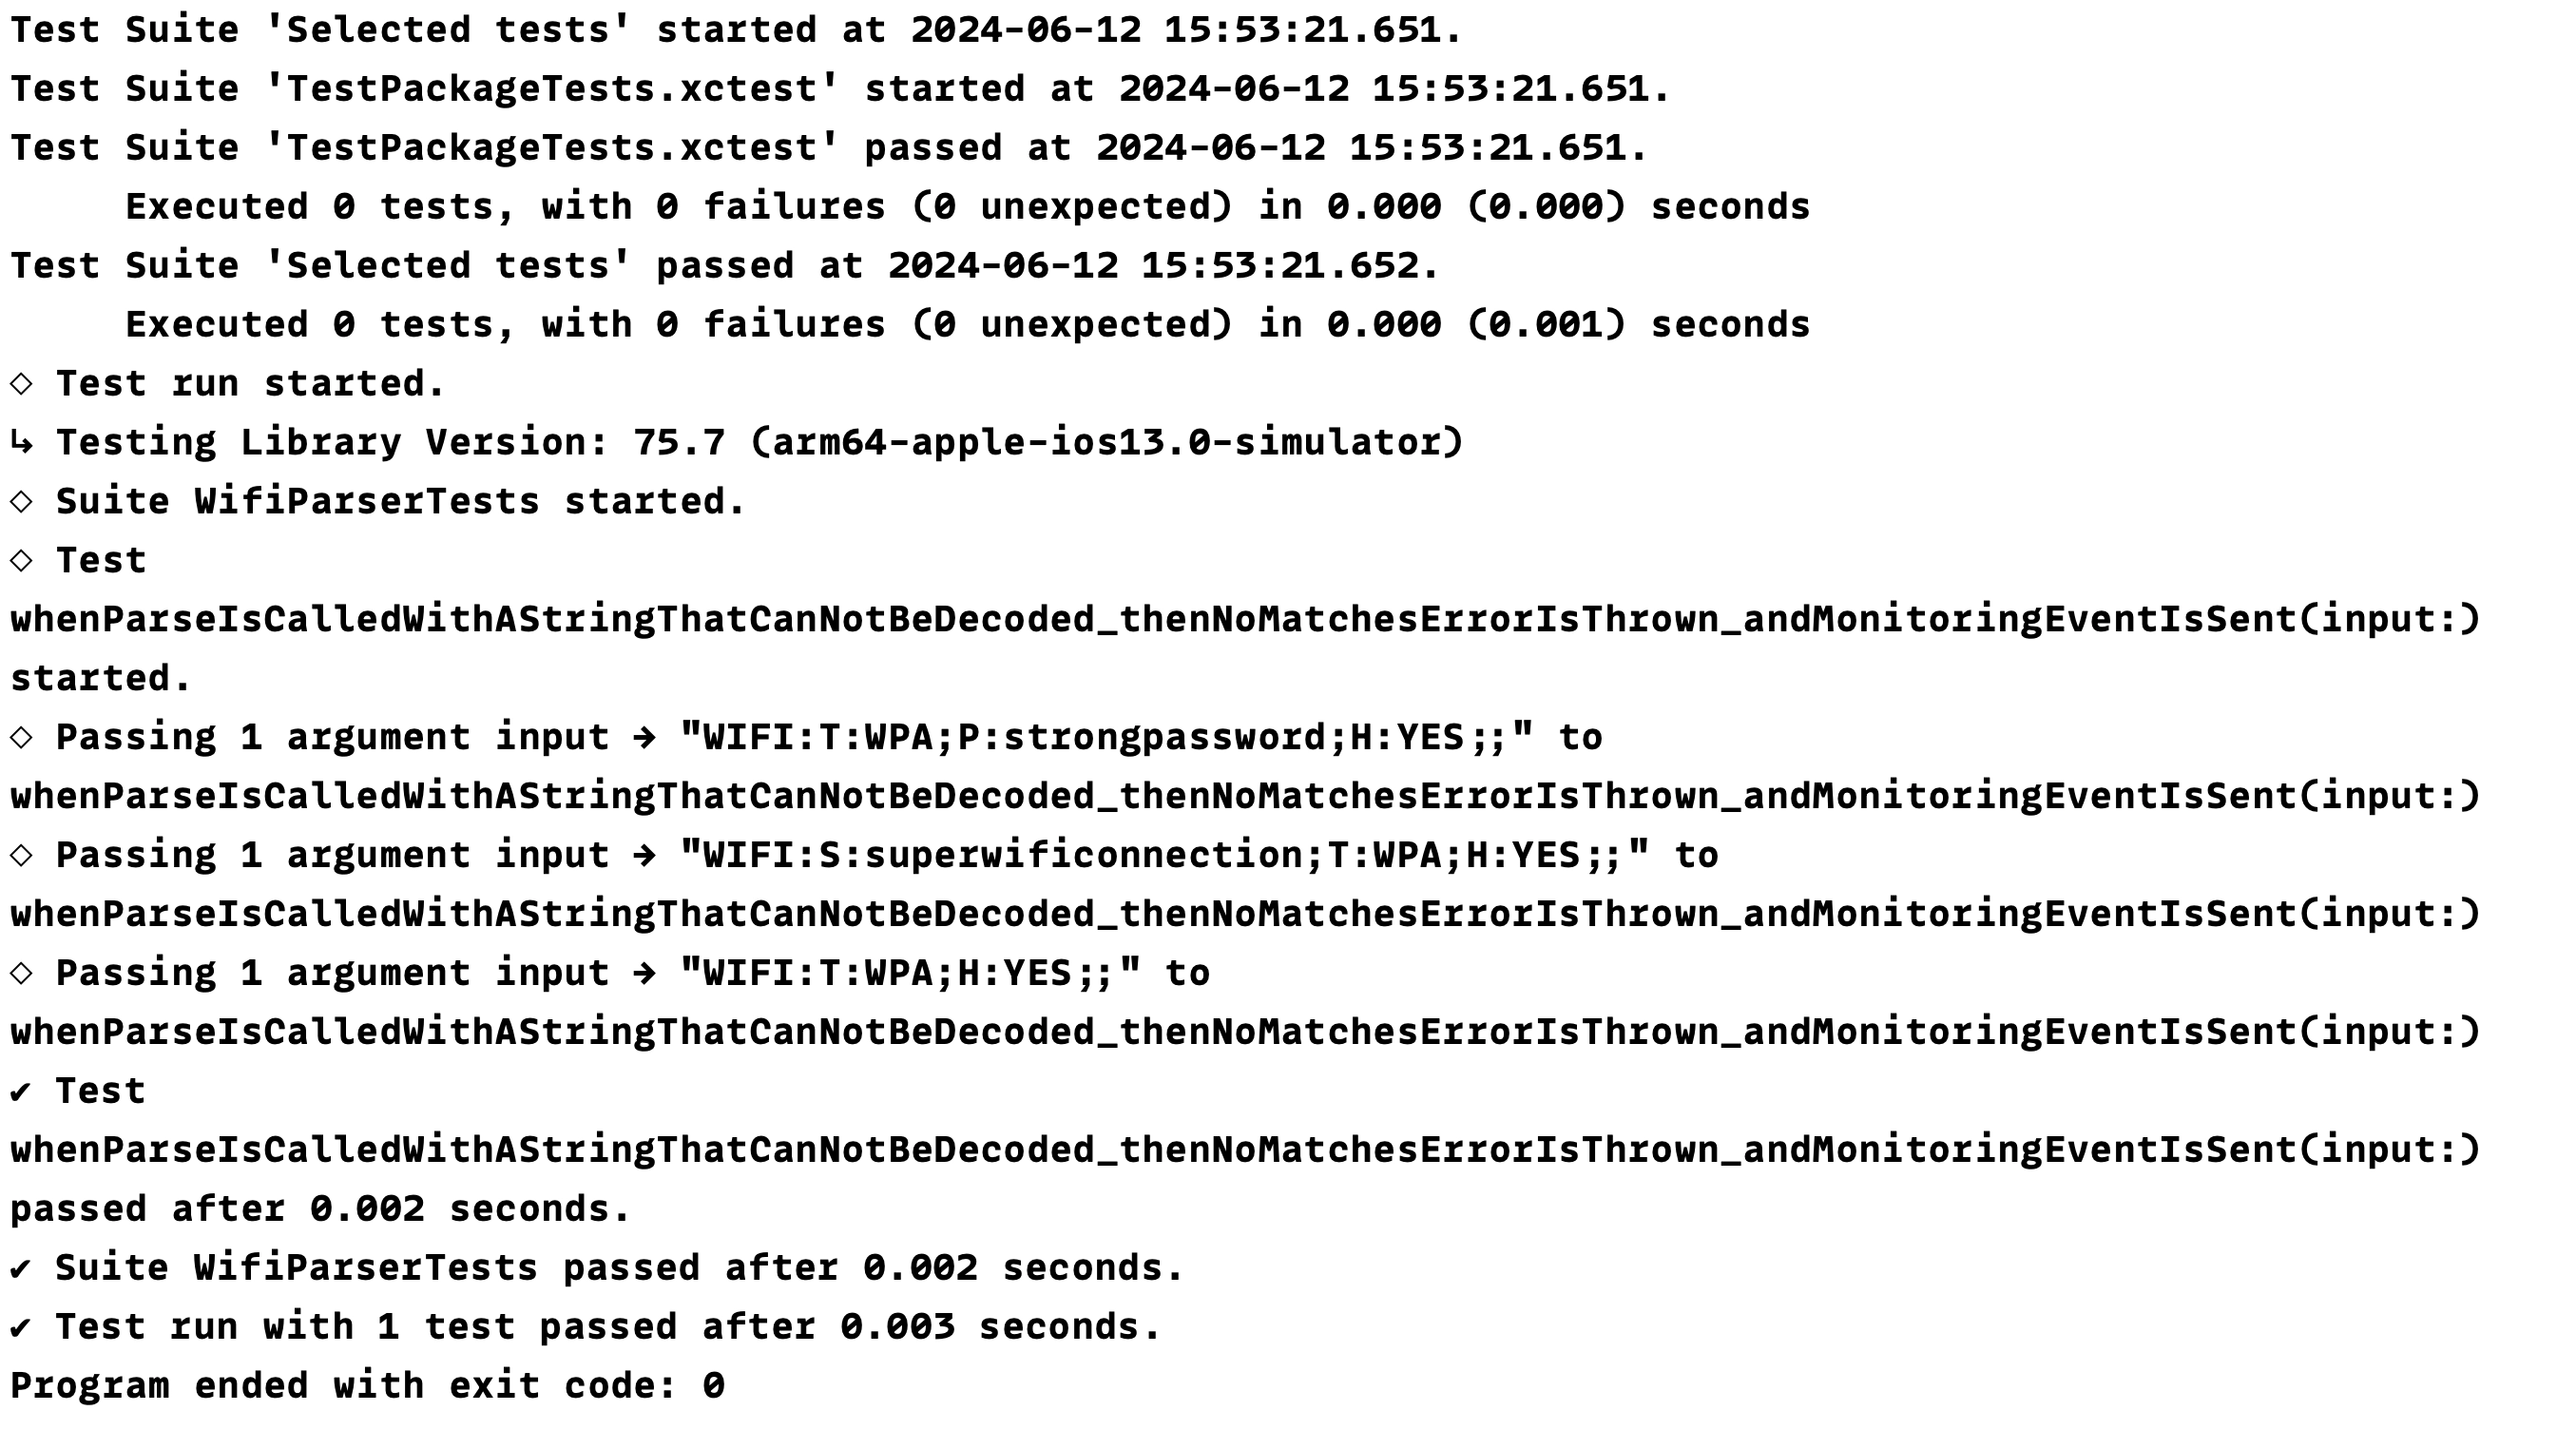
Unfortunately, even though tests are running, the first line of the output still says that no tests have been executed, presumably referring to XCTest suites.
The changes to diagnostics about failed tests are also remarkable and convey information in a much more readable way, stating exactly what has failed and where:

Further reading
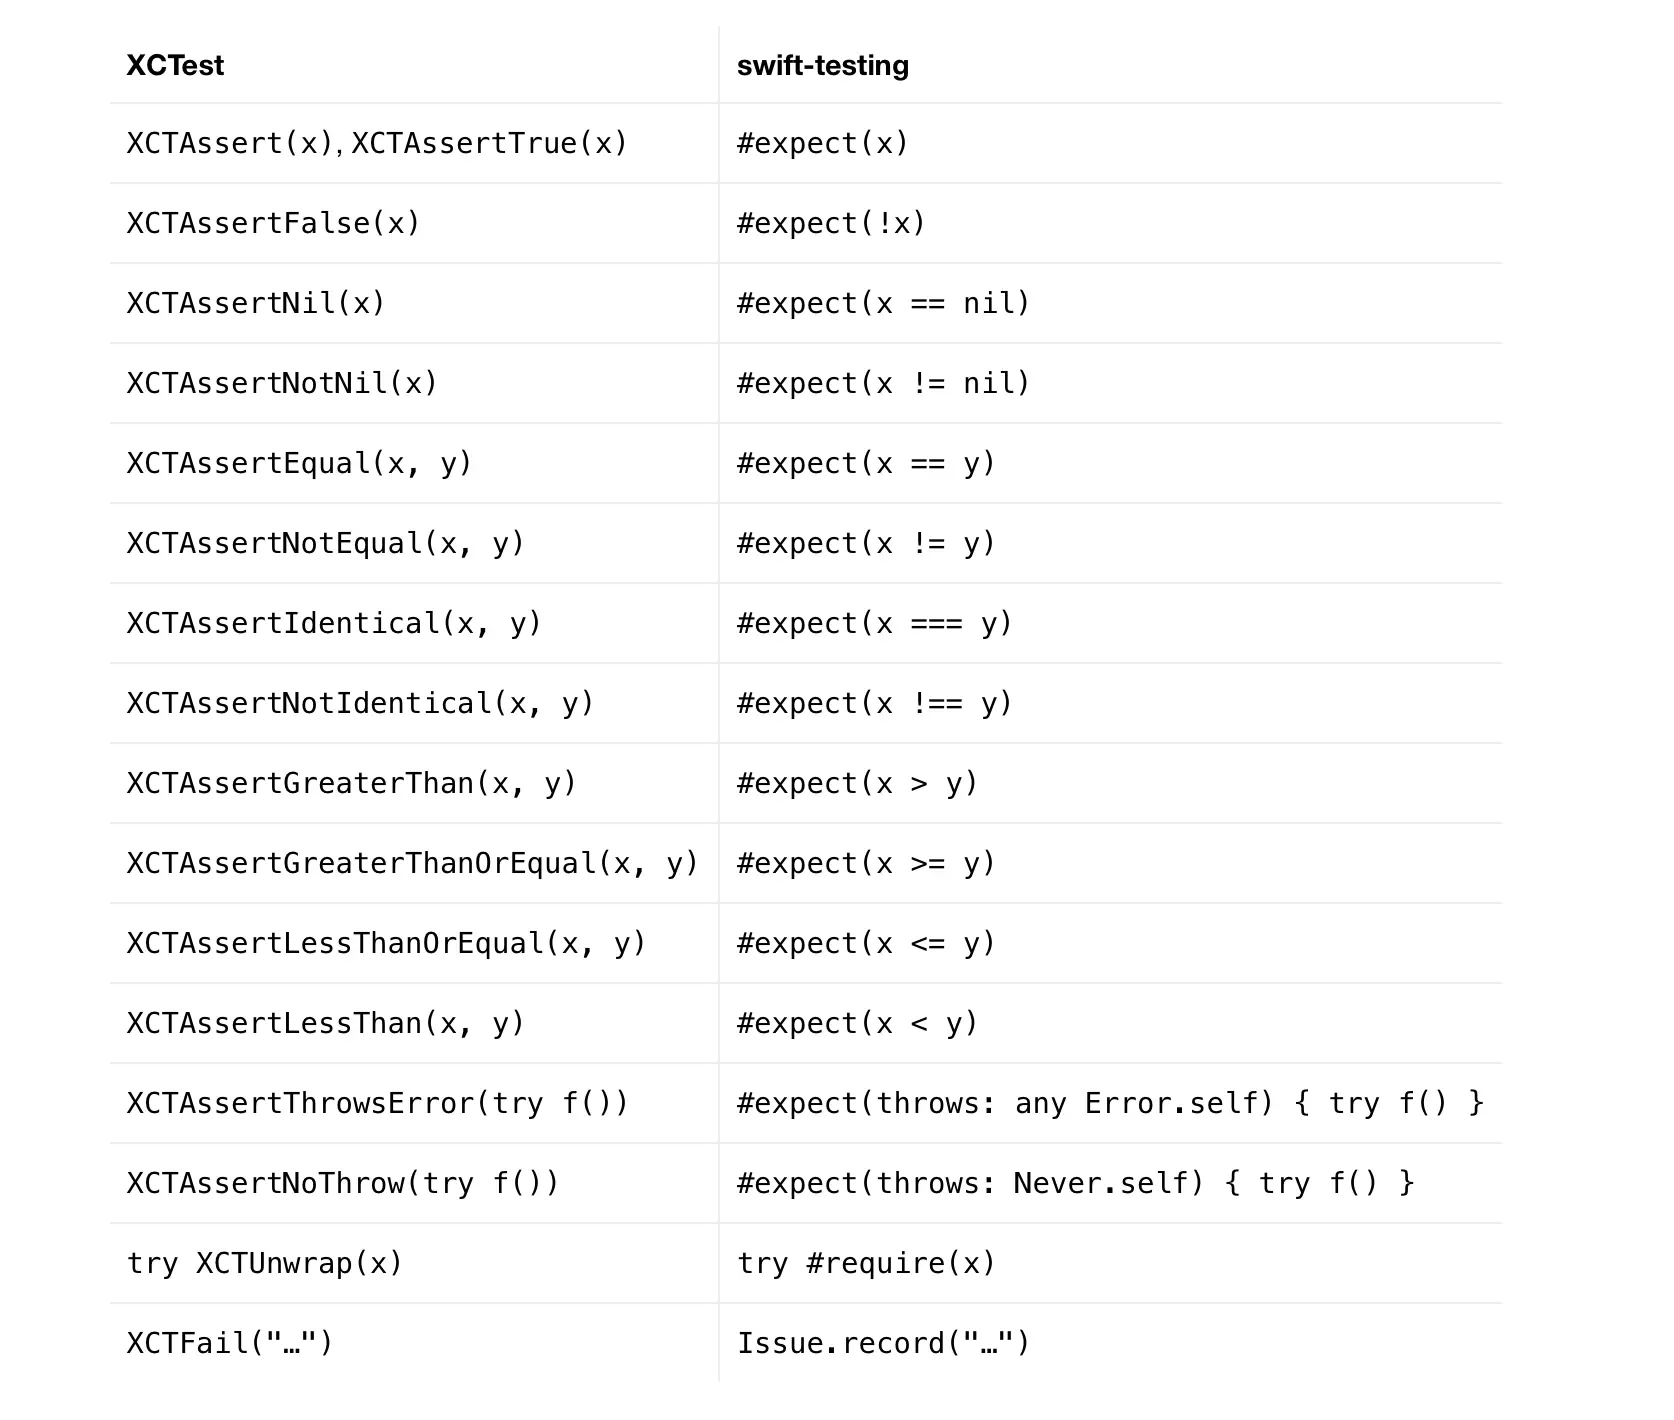
The assertions used in this article are just a small subset of what you can do with swift-testing. If you’re trying the library out and are struggling to find out how to do a specific assertion that you would normally do in XCTest, I recommend you check out this migration chart from the documentation that compares both libraries at an assertion level:
There is also a set of examples and a more in-depth explanation of the library itself in its documentation, which is hosted on the Swift Package Index site.