Building layouts with accessibility in mind - Part 2

Go from confusion to confidence with a step-by-step Swift Concurrency course, helping you smoothly migrate to Swift 6 and fully leverage its features.
In the previous article we made use of self-sizing UIStackViews to ensure that the layout we built respected all possible user’s content size preferences and making all content and buttons accessible.
One thing we missed in part one was that, while the views on-screen would resize correctly based on the user’s selected content size category, it sometimes caused the copy message and action button to go off screen in some devices.
In this second and last part, we’ll address this issue by using a UIScrollView and ensuring that the content on screen is always accessible to the user, no matter how much space it takes or how small the device is.
Setting up a UIScrollView
The use of UIScrollView is very common in mobile app development, since very often we won’t be able to guarantee the size of the content or the device it will displayed on. While the range of devices is not as wide and varied as Android devices, we have quite a big range of screen sizes to deal with and it is our job to ensure that our apps look great and are usable across the whole range.
For example, the iphone SE (2nd Generation)‘s screen size is 320 px by 568 px while the 5th gen iPad Pro (12.9”) is 1024 × 1366 px, roughly about 3 times bigger than the SE.
Despite the fact that UIScrollViews are extremely powerful and they help us overcome these issues with relative ease, they are not the most intuitive to set up and there are a few things we need to keep in mind should we want to get the correct results.
Adding content
You can think of UIScrollViews as plain UIViews with super powers. If the content you put in it fits within the frame of the UIScrollView, it will display it as a normal UIView would. However, if the content suddenly gets too big to fit in the UIScrollView’s frame, it will increase its content size and it will become scrollable to allow users to reach any overflowing content.
If you have ever done any
cssin the past, this is similar to settingoverflow-x: scrolloroverflow-y: scrollin an element, with more setup code 😅.
To layout content inside a UIScrollView, we first need to add any subviews, which we’ll refer to as content from now on, to its view hierarchy:
scrollView.addSubview(containerView)As we do to layout and resize any other views in modern UIKit code, we will make use of Auto Layout constraints to tell the UIScrollView which axis it should scroll on and let the UIScrollView know what its content size is.
Understanding a UIScrollView’s layout guides
We can define the UIScrollViews scroll axis and content size using NSLayoutConstraints. To do so, we must make use of its two different content guides:
- contentLayoutGuide: This guide can be used to layout the content inside the
UIScrollView.It will allow theUIScrollViewto figure out what the content size is and work out when and how much it should allow users to scroll to find content which overflows. - frameLayoutGuide: This layout guide provides a set of anchors to pin the subviews to the frame rectangle of the
UIScrollView, rather than the content frame itself. In other words, if you were to pin your subview’s width and height to theframeLayoutGuide’s width and height anchors, the content would not scroll at all, no matter how big. The reason for this would be that we would be defining the size of our content (subviews of theUIScrollView) relative to the frame of theUIScrollView, which should remain constant. What this allows us to do though is to define what the scrollable axis is (i.e.scrollView.widthAnchor.constraint(equalTo: subView.widthAnchor)makes yourUIScrollViewonly scroll along the Y axis).
Keeping this in mind, let’s first to set up the subviews relative to the content guide and define the scroll direction to be along the Y axis:
NSLayoutConstraint.activate([
		// Content
		containerView.topAnchor.constraint(equalTo: scrollView.contentLayoutGuide.topAnchor),
		containerView.leadingAnchor.constraint(equalTo: scrollView.contentLayoutGuide.leadingAnchor),
		containerView.trailingAnchor.constraint(equalTo: scrollView.contentLayoutGuide.trailingAnchor),
		containerView.bottomAnchor.constraint(equalTo: scrollView.contentLayoutGuide.bottomAnchor),
		// Frame - Defines scrolling along the Y axis
		containerView.widthAnchor.constraint(equalTo: scrollView.frameLayoutGuide.widthAnchor),
])
If we look at the result now and inspect it with the view debugger, we’ll see that while the content scrolls, it seems to not be centred and we get a runtime warning:
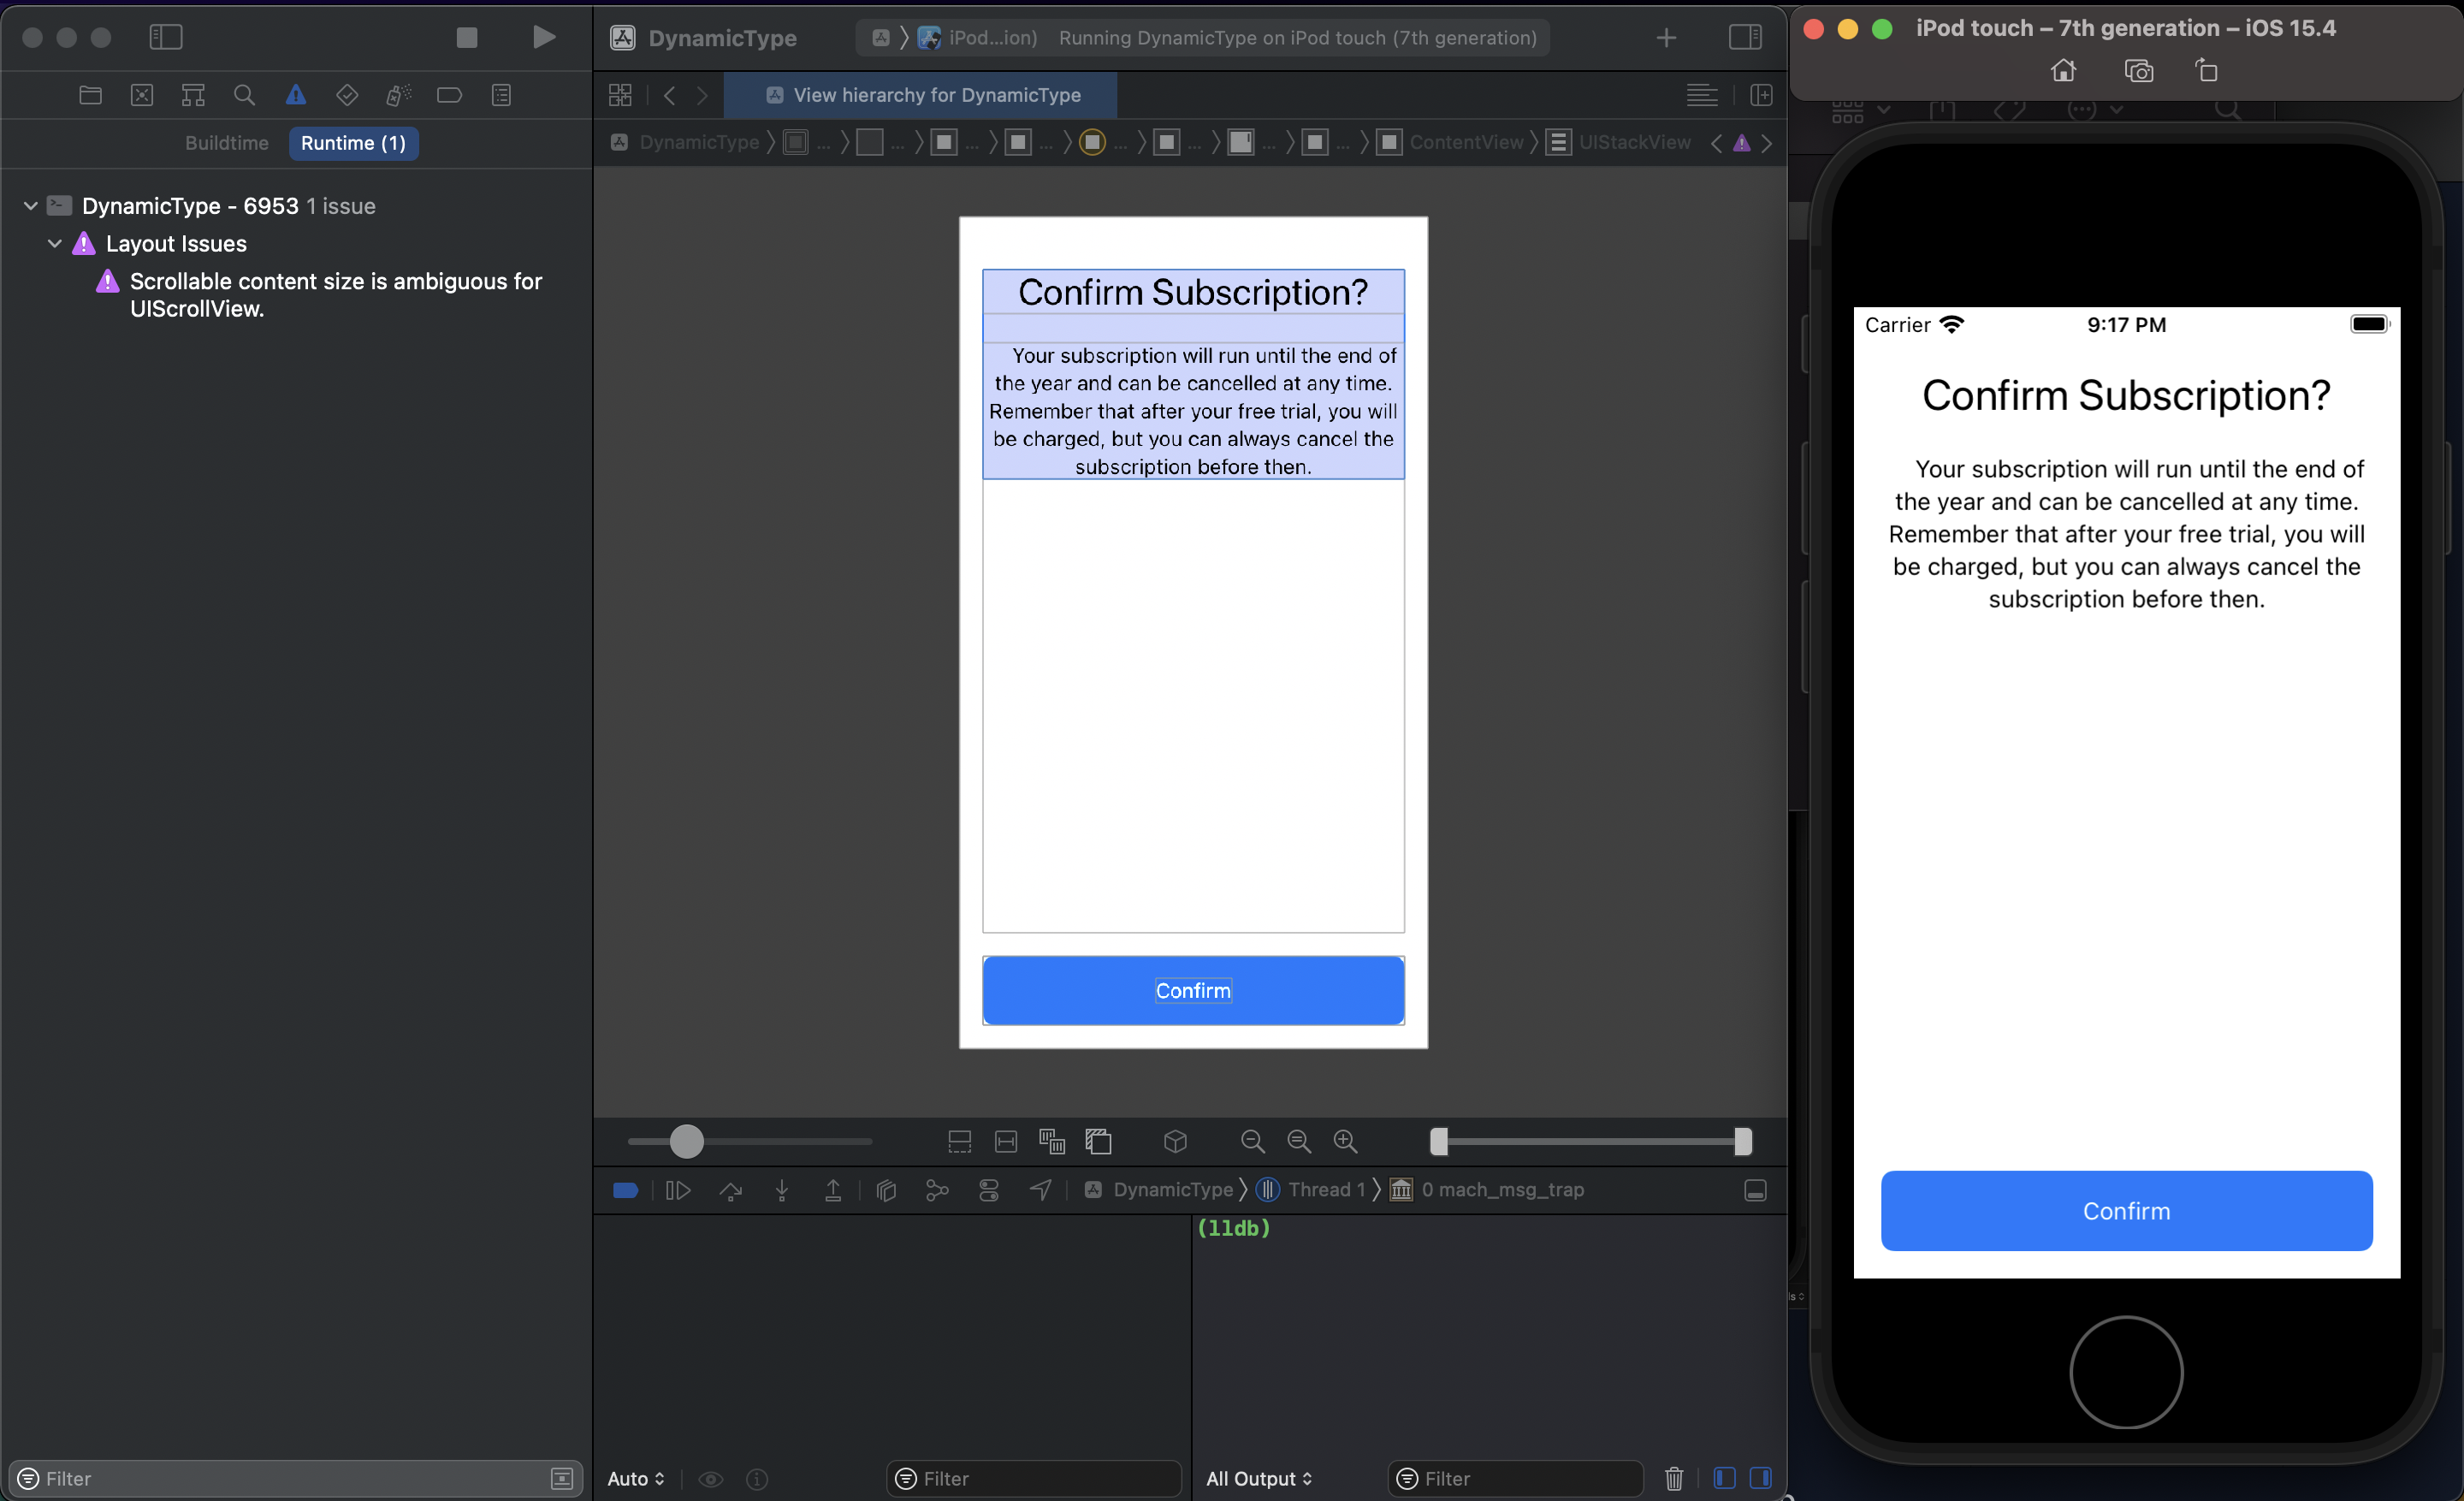
The warning occurs because we have not set a constraint for the content’s height, hence the initial height content size is ambiguous. This is a bit tricky because, if we constraint the content’s height to the UIScrollView’s frame’s height, then we’ll lose the scrolling and our content will no longer be accessible.
To overcome this issue and allow our content’s initial size to be full height (and hence center the content), we can constraint the containerView’s height anchor to the scrollView’s frame layout’s height anchor, but with a priority of defaultLow.
This will make sure the content size is not ambiguous and will initially take up the whole of the UIScrollView’s frame but, as soon as the containerView’s height overflows, it will break the height constraint to the frame layout guide we have set up and make use of the content layout guide constraints instead.
let heightConstraint = scrollView.frameLayoutGuide.heightAnchor.constraint(equalTo: containerView.heightAnchor)
heightConstraint.priority = .defaultLow

NSLayoutConstraint.activate([
		// ...
		heightConstraint
])
The result
That’s it! In these two posts, we have built a screen which looks great in the whole range of iOS/iPadOS devices, and respects the user’s content size preferences.
Let’s take a look at the result: